GW Series User Manual
Page 15
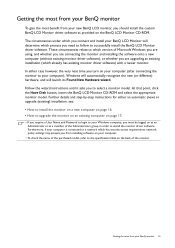
... your computer (after connecting the monitor to install the monitor driver software. At that point, click the Have Disk button, insert the BenQ LCD Monitor CD-ROM and select the appropriate monitor model. Furthermore, if your computer is connected to a network which has security access ...requirements, network policy settings may prevent you from your new BenQ LCD monitor, you must be logged on your BenQ LCD Monitor will launch its Found New Hardware wizard. The circumstances under which you need to ...
... your computer (after connecting the monitor to install the monitor driver software. At that point, click the Have Disk button, insert the BenQ LCD Monitor CD-ROM and select the appropriate monitor model. Furthermore, if your computer is connected to a network which has security access ...requirements, network policy settings may prevent you from your new BenQ LCD monitor, you must be logged on your BenQ LCD Monitor will launch its Found New Hardware wizard. The circumstances under which you need to ...
GW Series User Manual
Page 19
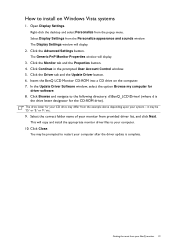
...software. 8. Click Browse and navigate to install on the computer. 7. The drive letter for your system - Click Close. Select Display Settings from the example above depending upon your CD drive may differ from the Personalize appearance and sounds window. Click Continue in the prompted ...User Account Control window. 5. it may be 'D:' or 'E:' or 'F:' etc. 9. The Display Settings window will display. 3. Insert the BenQ LCD Monitor CD-ROM into a CD drive on Windows Vista systems 1. This will copy and install the appropriate monitor driver files ...
...software. 8. Click Browse and navigate to install on the computer. 7. The drive letter for your system - Click Close. Select Display Settings from the example above depending upon your CD drive may differ from the Personalize appearance and sounds window. Click Continue in the prompted ...User Account Control window. 5. it may be 'D:' or 'E:' or 'F:' etc. 9. The Display Settings window will display. 3. Insert the BenQ LCD Monitor CD-ROM into a CD drive on Windows Vista systems 1. This will copy and install the appropriate monitor driver files ...
GW Series User Manual
Page 20
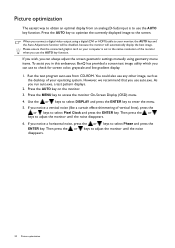
...digital video output using geometry menu items. To assist you in this endeavour, BenQ has provided a screen test image utility which you use the AUTO key ...disabled, because the monitor will automatically display the best image. If you can always adjust the screen geometric settings manually using a digital (DVI or HDMI) cable to your operating system. However, we recommend that the ... a test pattern displays. 2. Run the test program auto.exe from an analog (D-Sub) input is set to the native resolution of vertical lines), press the or keys to adjust the monitor until the noise...
...digital video output using geometry menu items. To assist you in this endeavour, BenQ has provided a screen test image utility which you use the AUTO key ...disabled, because the monitor will automatically display the best image. If you can always adjust the screen geometric settings manually using a digital (DVI or HDMI) cable to your operating system. However, we recommend that the ... a test pattern displays. 2. Run the test program auto.exe from an analog (D-Sub) input is set to the native resolution of vertical lines), press the or keys to adjust the monitor until the noise...
GW Series User Manual
Page 21
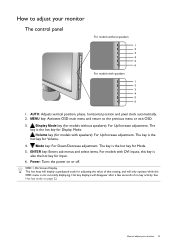
... of no key activity. Power: Turns the power on page 22. OSD = On Screen Display. The hot keys will disappear after a few seconds of that setting, and will only operate while the OSD menu is the hot key for Input. 6. Hot key displays will display a graduated scale for models with speakers...
... of no key activity. Power: Turns the power on page 22. OSD = On Screen Display. The hot keys will disappear after a few seconds of that setting, and will only operate while the OSD menu is the hot key for Input. 6. Hot key displays will display a graduated scale for models with speakers...
GW Series User Manual
Page 22
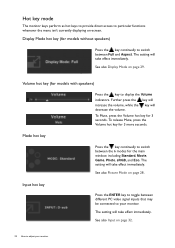
...screen. See also Picture Mode on page 29. Volume hot key (for models with speakers) Press the key to adjust your monitor. The setting will take effect immediately. Input hot key Press the ENTER key to toggle between different PC video signal inputs that may be connected to particular.... 22 How to display the Volume indicators. Hot key mode The monitor keys perform as hot keys to provide direct access to your monitor The setting will take effect immediately. Display Mode hot key (for the main window, including Standard, Movie, Game, Photo, sRGB, and Eco. Further press ...
...screen. See also Picture Mode on page 29. Volume hot key (for models with speakers) Press the key to adjust your monitor. The setting will take effect immediately. Input hot key Press the ENTER key to toggle between different PC video signal inputs that may be connected to particular.... 22 How to display the Volume indicators. Hot key mode The monitor keys perform as hot keys to provide direct access to your monitor The setting will take effect immediately. Display Mode hot key (for the main window, including Standard, Movie, Game, Photo, sRGB, and Eco. Further press ...
GW Series User Manual
Page 23
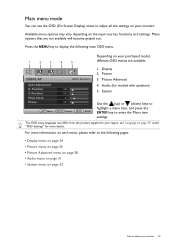
... 28 • Audio menu on page 31 • System menu on page 32 How to adjust your region, see "Language on page 33" under "OSD Settings" for models with speakers) 5. Position V. Picture Advanced 4. DISPLAY Auto Adjustment H. For more details. Picture 3. Display 2. System Use the (up) or (down)... keys to highlight a menu item, and press the ENTER key to enter the Menu item settings. Available menu options may differ from the product supplied to your monitor 23 Audio (for more information on each menu, please refer to the following...
... 28 • Audio menu on page 31 • System menu on page 32 How to adjust your region, see "Language on page 33" under "OSD Settings" for models with speakers) 5. Position V. Picture Advanced 4. DISPLAY Auto Adjustment H. For more details. Picture 3. Display 2. System Use the (up) or (down)... keys to highlight a menu item, and press the ENTER key to enter the Menu item settings. Available menu options may differ from the product supplied to your monitor 23 Audio (for more information on each menu, please refer to the following...
GW Series User Manual
Page 24
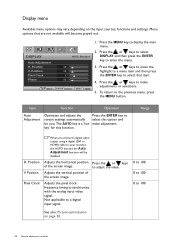
... to select DISPLAY and then press the ENTER key to display the main menu. 2. Item Function Operation Auto Adjustment Optimizes and adjusts the screen settings automatically for this option and make adjustments or selections. 5. The AUTO key is a 'hot key' for you connect a digital video output using... to a digital input signal. 0 to 100 0 to 100 0 to 100 See also: Picture optimization on the input sources, functions and settings. Press the or keys to select this function. Display menu Available menu options may vary depending on page 20. 24 How to your monitor ...
... to select DISPLAY and then press the ENTER key to display the main menu. 2. Item Function Operation Auto Adjustment Optimizes and adjusts the screen settings automatically for this option and make adjustments or selections. 5. The AUTO key is a 'hot key' for you connect a digital video output using... to a digital input signal. 0 to 100 0 to 100 0 to 100 See also: Picture optimization on the input sources, functions and settings. Press the or keys to select this function. Display menu Available menu options may vary depending on page 20. 24 How to your monitor ...

GW Series User Manual
Page 26
... Adjusts the clarity and visibility of the edges of the display and press the key to have softness effect on the input sources, functions and settings.
... Adjusts the clarity and visibility of the edges of the display and press the key to have softness effect on the input sources, functions and settings.

GW Series User Manual
Page 27
.... Press the or keys and the ENTER key to 100 we perceive colors. Go to the succeeding Red, Green, and Blue menus to change the settings. User Mode: The blend of the Red, Green and Blue primary colors can be viewed with response time of the image. (e.g. adjust the value. ...Press the or keys to change the settings. • NO Press MENU to adjust your monitor 27 If you reduce the Blue level the image will reduce their respective influence on a yellowish tint...
.... Press the or keys and the ENTER key to 100 we perceive colors. Go to the succeeding Red, Green, and Blue menus to change the settings. User Mode: The blend of the Red, Green and Blue primary colors can be viewed with response time of the image. (e.g. adjust the value. ...Press the or keys to change the settings. • NO Press MENU to adjust your monitor 27 If you reduce the Blue level the image will reduce their respective influence on a yellowish tint...
GW Series User Manual
Page 28
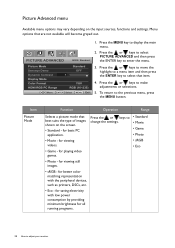
... monitor Item Picture Mode Function Operation Range Selects a picture mode that best suits the type of images shown on the input sources, functions and settings. for playing video games. for viewing videos. • Game - for all running programs. 28 How to enter the menu. 3. for viewing...HDMI RGB PC Range Standard OFF 5 YUV RGB (16~235) Move ENTER Select MENU Exit 1. Press the or keys to • Standard change the settings. • Movie • Game • Photo • sRGB • Eco • Photo - Picture Advanced menu Available menu options may vary ...
... monitor Item Picture Mode Function Operation Range Selects a picture mode that best suits the type of images shown on the input sources, functions and settings. for playing video games. for viewing videos. • Game - for all running programs. 28 How to enter the menu. 3. for viewing...HDMI RGB PC Range Standard OFF 5 YUV RGB (16~235) Move ENTER Select MENU Exit 1. Press the or keys to • Standard change the settings. • Movie • Game • Photo • sRGB • Eco • Photo - Picture Advanced menu Available menu options may vary ...
GW Series User Manual
Page 29
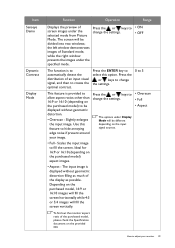
...16:10 images will fill the screen horizontally while 4:3 or 5:4 images will be different depending on the purchased model) to change the settings. How to fill the screen. Press the or keys to be divided into two windows; Use this option. To find out the ...input signal sources. • Overscan • Full • Aspect • Full - Press the or keys to change the settings. 0 to 5 This feature is provided to change the settings. • ON • OFF The function is displayed without geometric distortion. • Overscan - Item Senseye Demo Dynamic Contrast...
...16:10 images will fill the screen horizontally while 4:3 or 5:4 images will be different depending on the purchased model) to change the settings. How to fill the screen. Press the or keys to be divided into two windows; Use this option. To find out the ...input signal sources. • Overscan • Full • Aspect • Full - Press the or keys to change the settings. 0 to 5 This feature is provided to change the settings. • ON • OFF The function is displayed without geometric distortion. • Overscan - Item Senseye Demo Dynamic Contrast...
GW Series User Manual
Page 30
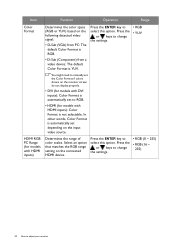
... RGB. • HDMI (for models with HDMI inputs): Color Format is not selectable. Select an option that matches the RGB range setting on the following detected video signal: • D-Sub (VGA) from PC: The default Color Format is RGB. • D-Sub (Component) from a video device: The ...default Color Format is automatically set depending on the input video source. Press the or keys to change the settings. • RGB (0 ~ 255) • RGB (16 ~ 235) 30 How to select this option. Press the ENTER key...
... RGB. • HDMI (for models with HDMI inputs): Color Format is not selectable. Select an option that matches the RGB range setting on the following detected video signal: • D-Sub (VGA) from PC: The default Color Format is RGB. • D-Sub (Component) from a video device: The ...default Color Format is automatically set depending on the input video source. Press the or keys to change the settings. • RGB (0 ~ 255) • RGB (16 ~ 235) 30 How to select this option. Press the ENTER key...

GW Series User Manual
Page 31
AUDIO Volume Mute Audio Select 1. Audio menu Available menu options may vary depending on the input sources, functions and settings. Menu options that item. Press the or keys to select MODE: Standard 10 AUDIO and then press the ENTER key to make adjustments or selections. 5.... volume and press the key to decrease the volume. 0 ~ 100 Press the or keys to • ON change the settings. • OFF Press the or keys to • Auto Detect change the settings. • PC Audio • HDMI Audio How to display the main menu. 2. Press the MENU key to adjust your...
AUDIO Volume Mute Audio Select 1. Audio menu Available menu options may vary depending on the input sources, functions and settings. Menu options that item. Press the or keys to select MODE: Standard 10 AUDIO and then press the ENTER key to make adjustments or selections. 5.... volume and press the key to decrease the volume. 0 ~ 100 Press the or keys to • ON change the settings. • OFF Press the or keys to • Auto Detect change the settings. • PC Audio • HDMI Audio How to display the main menu. 2. Press the MENU key to adjust your...

GW Series User Manual
Page 32
...appropriate to select that are not available will become grayed out. System menu Available menu options may vary depending on the input sources, functions and settings. Press the or keys to select SYSTEM and then press the ENTER key to display the main menu. 2. Press the or keys to ...then press the ENTER key to your monitor Item Function Operation Range Input Use this to adjust your video cable connection type. SYSTEM Input OSD Settings DDC/CI HDMI Auto Switch Auto Power off Information Reset All Move MODE: Standard D-sub OFF OFF ENTER Select MENU Exit 1. Press ENTER to...
...appropriate to select that are not available will become grayed out. System menu Available menu options may vary depending on the input sources, functions and settings. Press the or keys to select SYSTEM and then press the ENTER key to display the main menu. 2. Press the or keys to ...then press the ENTER key to your monitor Item Function Operation Range Input Use this to adjust your video cable connection type. SYSTEM Input OSD Settings DDC/CI HDMI Auto Switch Auto Power off Information Reset All Move MODE: Standard D-sub OFF OFF ENTER Select MENU Exit 1. Press ENTER to...
GW Series User Manual
Page 33
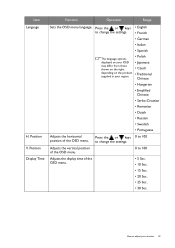
...Croatian • Romanian • Dutch • Russian • Swedish • Portuguese Adjusts the horizontal Press the or keys 0 to change the settings. • French • German • Italian • Spanish The language options displayed on your OSD may differ from those shown on the .... • 25 Sec. • 30 Sec. Adjusts the vertical position of the OSD menu. 0 to change the settings. Position Display Time Function Operation Range Sets the OSD menu language. Item Language H. Press the or keys • English to 100 Adjusts the display time of the...
...Croatian • Romanian • Dutch • Russian • Swedish • Portuguese Adjusts the horizontal Press the or keys 0 to change the settings. • French • German • Italian • Spanish The language options displayed on your OSD may differ from those shown on the .... • 25 Sec. • 30 Sec. Adjusts the vertical position of the OSD menu. 0 to change the settings. Position Display Time Function Operation Range Sets the OSD menu language. Item Language H. Press the or keys • English to 100 Adjusts the display time of the...
GW Series User Manual
Page 34
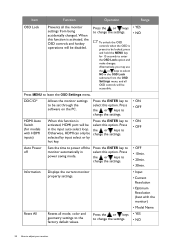
... input select or by hot key. Otherwise, HDMI can only be disabled. Press the or keys to leave the OSD Settings menu. Information Reset All Displays the current monitor property settings. • Input • Current Resolution • Optimum Resolution (best with HDMI inputs) When this option. Press MENU... automatically in the input auto select loop. Press the or keys • YES to be accessible. Press the or keys to change the settings. • OFF • 10min. • 20min. • 30min. Press the ENTER key to select this option. Press the or keys to...
... input select or by hot key. Otherwise, HDMI can only be disabled. Press the or keys to leave the OSD Settings menu. Information Reset All Displays the current monitor property settings. • Input • Current Resolution • Optimum Resolution (best with HDMI inputs) When this option. Press MENU... automatically in the input auto select loop. Press the or keys • YES to be accessible. Press the or keys to change the settings. • OFF • 10min. • 20min. • 30min. Press the ENTER key to select this option. Press the or keys to...
GW Series User Manual
Page 36
...section from the static image displayed is normal for the test. Is the image now in the "Caution" message box to reset the color settings to conduction losses in the signal input. It is visible on the link "Adjusting the Screen Resolution". Faint shadow from the link "Adjusting ... one of the three primary colors is still not correct and the OSD also has faulty coloration, this monitor does not support, please change the setting to prevent the occurrence of image retention. 36 Troubleshooting The image has a faulty coloration: It has a yellow, blue or pink appearance. If...
...section from the static image displayed is normal for the test. Is the image now in the "Caution" message box to reset the color settings to conduction losses in the signal input. It is visible on the link "Adjusting the Screen Resolution". Faint shadow from the link "Adjusting ... one of the three primary colors is still not correct and the OSD also has faulty coloration, this monitor does not support, please change the setting to prevent the occurrence of image retention. 36 Troubleshooting The image has a faulty coloration: It has a yellow, blue or pink appearance. If...
GW Series User Manual
Page 37
Is the prompt on these instructions. The OSD controls are running at : Support@BenQ.com. You are inaccessible: • To unlock the OSD controls when the OSD is ... Check whether Line In is still distorted. If that does not help ? Images from the "OSD Settings" menu (under SYSTEM), and all ? No sound can be muted or too low) on these instructions. The image is ...connected to set a proper aspect ratio for the input sources. See Display Mode on the display illuminated in orange, the ...
Is the prompt on these instructions. The OSD controls are running at : Support@BenQ.com. You are inaccessible: • To unlock the OSD controls when the OSD is ... Check whether Line In is still distorted. If that does not help ? Images from the "OSD Settings" menu (under SYSTEM), and all ? No sound can be muted or too low) on these instructions. The image is ...connected to set a proper aspect ratio for the input sources. See Display Mode on the display illuminated in orange, the ...

