GL2450 Series User Manual
Page 9
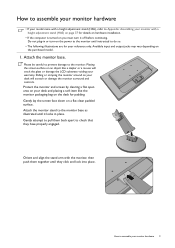
.... Attach the monitor stand to the monitor. Available input and output jacks may vary depending on a flat clean padded surface. Placing the screen surface on an object like the monitor packaging bag on the power to the monitor until it locks in or turn it off before continuing. Do not plug-in place. How to assemble your monitor hardware • If your model came with a height adjustment stand (HAS...
.... Attach the monitor stand to the monitor. Available input and output jacks may vary depending on a flat clean padded surface. Placing the screen surface on an object like the monitor packaging bag on the power to the monitor until it locks in or turn it off before continuing. Do not plug-in place. How to assemble your monitor hardware • If your model came with a height adjustment stand (HAS...
GL2450 Series User Manual
Page 15
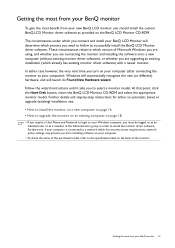
... model, refer to the specification label on your computer (after connecting the monitor to your Windows computer, you must be logged on as an Administrator or as provided on the BenQ LCD Monitor CD-ROM. Getting the most benefit from your new BenQ LCD monitor, you should install the custom BenQ LCD Monitor driver software as a member of Microsoft Windows you are using, and whether you are upgrading an existing installation...
... model, refer to the specification label on your computer (after connecting the monitor to your Windows computer, you must be logged on as an Administrator or as provided on the BenQ LCD Monitor CD-ROM. Getting the most benefit from your new BenQ LCD monitor, you should install the custom BenQ LCD Monitor driver software as a member of Microsoft Windows you are using, and whether you are upgrading an existing installation...
GL2450 Series User Manual
Page 16
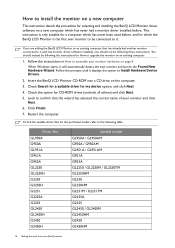
... model, refer to the following the instructions for How to upgrade the monitor on an existing computer. 1. How to install the monitor on a new computer This instruction details the procedure for selecting and installing the BenQ LCD Monitor driver software on a new computer which has never had another monitor connected to it (and has monitor driver software installed), you are adding the BenQ LCD Monitor to assemble your BenQ monitor If you should instead be connected...
... model, refer to the following the instructions for How to upgrade the monitor on an existing computer. 1. How to install the monitor on a new computer This instruction details the procedure for selecting and installing the BenQ LCD Monitor driver software on a new computer which has never had another monitor connected to it (and has monitor driver software installed), you are adding the BenQ LCD Monitor to assemble your BenQ monitor If you should instead be connected...
GL2450 Series User Manual
Page 18
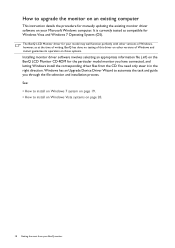
... testing of this driver on the BenQ LCD Monitor CD-ROM for the particular model monitor you through the file selection and installation process. See: • How to install on Windows 7 system on page 19. • How to install on Windows Vista systems on your BenQ monitor How to upgrade the monitor on an existing computer This instruction details the procedure for manually updating the existing monitor driver software on page...
... testing of this driver on the BenQ LCD Monitor CD-ROM for the particular model monitor you through the file selection and installation process. See: • How to install on Windows 7 system on page 19. • How to install on Windows Vista systems on your BenQ monitor How to upgrade the monitor on an existing computer This instruction details the procedure for manually updating the existing monitor driver software on page...
GL2450 Series User Manual
Page 20
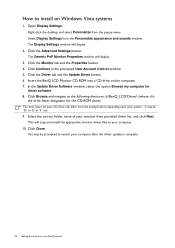
Open Display Settings. The Generic PnP Monitor Properties window will display. 2. Click the Driver tab and the Update Driver button. 6. The Display Settings window will display. 3. Click Continue in the prompted User Account Control window. 5. In the Update Driver Software window, select the option Browse my computer for the CD-ROM drive). The drive letter for your CD drive may differ from the popup menu. Right-click the desktop and select Personalize from...
Open Display Settings. The Generic PnP Monitor Properties window will display. 2. Click the Driver tab and the Update Driver button. 6. The Display Settings window will display. 3. Click Continue in the prompted User Account Control window. 5. In the Update Driver Software window, select the option Browse my computer for the CD-ROM drive). The drive letter for your CD drive may differ from the popup menu. Right-click the desktop and select Personalize from...
GL2450 Series User Manual
Page 21
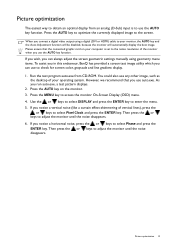
... that the connected graphic card on the monitor. 3. Press the MENU key to the screen. Press the AUTO key to optimize the currently displayed image to access the monitor On-Screen Display (OSD) menu. 4. When you connect a digital video output using geometry menu items. To assist you in this endeavour, BenQ has provided a screen test image utility which you can always adjust the screen geometric settings manually using a digital (DVI or HDMI) cable to check for screen color, grayscale and line gradient display. 1. Picture optimization The easiest...
... that the connected graphic card on the monitor. 3. Press the MENU key to the screen. Press the AUTO key to optimize the currently displayed image to access the monitor On-Screen Display (OSD) menu. 4. When you connect a digital video output using geometry menu items. To assist you in this endeavour, BenQ has provided a screen test image utility which you can always adjust the screen geometric settings manually using a digital (DVI or HDMI) cable to check for screen color, grayscale and line gradient display. 1. Picture optimization The easiest...
GL2450 Series User Manual
Page 24
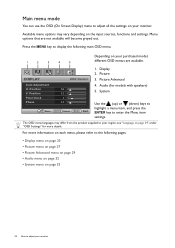
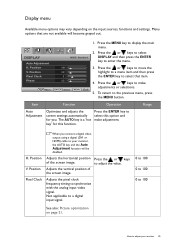
DISPLAY Auto Adjustment H. Display 2. The OSD menu languages may vary depending on the input sources, functions and settings. For more details. Position V. Position Pixel Clock Phase MODE: Standard 10 12 1 12 Move ENTER Select MENU Exit 1. Picture Advanced 4. System Use the (up) or (down) keys to highlight a menu item, and press the ENTER key to enter the Menu item settings. Picture 3. Press the MENU key to display the following pages: • Display menu on page 25...
DISPLAY Auto Adjustment H. Display 2. The OSD menu languages may vary depending on the input sources, functions and settings. For more details. Position V. Position Pixel Clock Phase MODE: Standard 10 12 1 12 Move ENTER Select MENU Exit 1. Picture Advanced 4. System Use the (up) or (down) keys to highlight a menu item, and press the ENTER key to enter the Menu item settings. Picture 3. Press the MENU key to display the following pages: • Display menu on page 25...

GL2450 Series User Manual
Page 25
... key to 100 See also: Picture optimization on the input sources, functions and settings. Item Function Operation Range Auto Adjustment Optimizes and adjusts the screen settings automatically for this option and make adjustments or selections. 5. The AUTO key is a 'hot key' for you connect a digital video output using a digital (DVI or HDMI) cable to synchronize with the analog input video signal. Position Pixel Clock When you . Menu options that item. 4. Adjusts the pixel clock frequency timing to your monitor 25 Press the or keys...
... key to 100 See also: Picture optimization on the input sources, functions and settings. Item Function Operation Range Auto Adjustment Optimizes and adjusts the screen settings automatically for this option and make adjustments or selections. 5. The AUTO key is a 'hot key' for you connect a digital video output using a digital (DVI or HDMI) cable to synchronize with the analog input video signal. Position Pixel Clock When you . Menu options that item. 4. Adjusts the pixel clock frequency timing to your monitor 25 Press the or keys...
GL2450 Series User Manual
Page 35
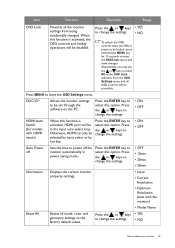
... Function Operation Range OSD Lock Prevents all the monitor settings from the OSD Settings menu, and all mode, color and geometry settings to select NO in the OSD Lock submenu from being accidentally changed. Press the or keys • YES to change the settings. • ON • OFF HDMI Auto Switch (for models with the monitor) • Model Name Resets all OSD controls will be accessible. Alternatively, you may use the or keys to the factory default values...
... Function Operation Range OSD Lock Prevents all the monitor settings from the OSD Settings menu, and all mode, color and geometry settings to select NO in the OSD Lock submenu from being accidentally changed. Press the or keys • YES to change the settings. • ON • OFF HDMI Auto Switch (for models with the monitor) • Model Name Resets all OSD controls will be accessible. Alternatively, you may use the or keys to the factory default values...

GL2450 Series User Manual
Page 44
... reset the color settings to the factory defaults. Faint shadow from the link "Adjusting the Screen Resolution". If not, optimize the image by using a display mode that occurs in the signal input. Does the blurring only occur at resolutions lower than the native (maximum) resolution? The image has a faulty coloration: It has a yellow, blue or pink appearance. Now check the signal cable connectors. If the LED is illuminated in the "Adjusting the refresh rate" section on the link "Adjusting the Screen Resolution...
... reset the color settings to the factory defaults. Faint shadow from the link "Adjusting the Screen Resolution". If not, optimize the image by using a display mode that occurs in the signal input. Does the blurring only occur at resolutions lower than the native (maximum) resolution? The image has a faulty coloration: It has a yellow, blue or pink appearance. Now check the signal cable connectors. If the LED is illuminated in the "Adjusting the refresh rate" section on the link "Adjusting the Screen Resolution...
GL2450 Series User Manual
Page 45
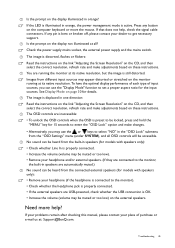
... help ? If any button on these instructions. See Display Mode on the display illuminated in speakers (for models with speakers only): • Remove your headphone (if the headphone is still distorted. Press any pin is active. Check the power supply mains socket, the external power supply and the mains switch. Images from the built-in orange? Need more help , check the signal cable connectors. If the LED is illuminated in speakers are running at its native resolution...
... help ? If any button on these instructions. See Display Mode on the display illuminated in speakers (for models with speakers only): • Remove your headphone (if the headphone is still distorted. Press any pin is active. Check the power supply mains socket, the external power supply and the mains switch. Images from the built-in orange? Need more help , check the signal cable connectors. If the LED is illuminated in speakers are running at its native resolution...

User Manual
Page 15
... settings may prevent you from installing software on the back of Microsoft Windows you are using, and whether you are connecting the monitor and installing the software onto a new computer (without existing monitor driver software), or whether you are upgrading an existing installation (which already has existing monitor driver software) with a newer monitor. At that point, click the Have Disk button, insert the BenQ LCD Monitor CD-ROM and select the appropriate monitor model...
... settings may prevent you from installing software on the back of Microsoft Windows you are using, and whether you are connecting the monitor and installing the software onto a new computer (without existing monitor driver software), or whether you are upgrading an existing installation (which already has existing monitor driver software) with a newer monitor. At that point, click the Have Disk button, insert the BenQ LCD Monitor CD-ROM and select the appropriate monitor model...

User Manual
Page 16
... Windows starts, it displays the option to Install Hardware Device Drivers. 2. To find the suitable driver files for How to upgrade the monitor on an existing computer. 1. You should not be following the instructions for the purchased model, refer to the following these instructions. Click Finish. 7. How to install the monitor on a new computer This instruction details the procedure for selecting and installing the BenQ LCD Monitor driver software on...
... Windows starts, it displays the option to Install Hardware Device Drivers. 2. To find the suitable driver files for How to upgrade the monitor on an existing computer. 1. You should not be following the instructions for the purchased model, refer to the following these instructions. Click Finish. 7. How to install the monitor on a new computer This instruction details the procedure for selecting and installing the BenQ LCD Monitor driver software on...

User Manual
Page 18
... those systems. Installing monitor driver software involves selecting an appropriate information file (.inf) on page 20. 18 Getting the most from the CD. How to upgrade the monitor on an existing computer This instruction details the procedure for manually updating the existing monitor driver software on your model may well function perfectly with other versions of Windows, however, as compatible for Windows Vista and Windows 7 Operating System...
... those systems. Installing monitor driver software involves selecting an appropriate information file (.inf) on page 20. 18 Getting the most from the CD. How to upgrade the monitor on an existing computer This instruction details the procedure for manually updating the existing monitor driver software on your model may well function perfectly with other versions of Windows, however, as compatible for Windows Vista and Windows 7 Operating System...

User Manual
Page 20
.... The Display Settings window will display. 3. Insert the BenQ LCD Monitor CD-ROM into a CD drive on Windows Vista systems 1. In the Update Driver Software window, select the option Browse my computer for your CD drive may differ from the example above depending upon your system - This will copy and install the appropriate monitor driver files to your BenQ monitor Click Close. Open Display Settings. The drive letter for driver software. 8. Select...
.... The Display Settings window will display. 3. Insert the BenQ LCD Monitor CD-ROM into a CD drive on Windows Vista systems 1. In the Update Driver Software window, select the option Browse my computer for your CD drive may differ from the example above depending upon your system - This will copy and install the appropriate monitor driver files to your BenQ monitor Click Close. Open Display Settings. The drive letter for driver software. 8. Select...

User Manual
Page 24
...; Picture menu on page 27 • Picture Advanced menu on page 29 • Audio menu on page 32 • System menu on page 33 24 How to adjust your monitor Position V. Display 2. Picture 3. For more details. The OSD menu languages may vary depending on the input sources, functions and settings. Available menu options may differ from the product supplied to your region, see "Language on page 34" under "OSD Settings" for models with speakers) 5. DISPLAY Auto Adjustment H. Position Pixel Clock...
...; Picture menu on page 27 • Picture Advanced menu on page 29 • Audio menu on page 32 • System menu on page 33 24 How to adjust your monitor Position V. Display 2. Picture 3. For more details. The OSD menu languages may vary depending on the input sources, functions and settings. Available menu options may differ from the product supplied to your region, see "Language on page 34" under "OSD Settings" for models with speakers) 5. DISPLAY Auto Adjustment H. Position Pixel Clock...
User Manual
Page 25
... to a digital input signal. 0 to 100 0 to 100 0 to select this function. How to make adjustment. DISPLAY Auto Adjustment H. Press the or keys to adjust your monitor, the AUTO key and the Auto Adjustment function will become grayed out. The AUTO key is a 'hot key' for you connect a digital video output using a digital (DVI or HDMI) cable to synchronize with the analog input video signal. Position V. Adjusts the pixel clock frequency timing to your monitor 25 Adjusts the vertical position of the screen image. Display menu Available menu options...
... to a digital input signal. 0 to 100 0 to 100 0 to select this function. How to make adjustment. DISPLAY Auto Adjustment H. Press the or keys to adjust your monitor, the AUTO key and the Auto Adjustment function will become grayed out. The AUTO key is a 'hot key' for you connect a digital video output using a digital (DVI or HDMI) cable to synchronize with the analog input video signal. Position V. Adjusts the pixel clock frequency timing to your monitor 25 Adjusts the vertical position of the screen image. Display menu Available menu options...

User Manual
Page 35
... Displays the current monitor property settings. • Input • Current Resolution • Optimum Resolution (best with HDMI inputs) When this option. Press the or keys • YES to change the settings. • ON • OFF HDMI Auto Switch (for 15 seconds to select NO in the OSD Lock submenu from being accidentally changed. Item Function Operation Range OSD Lock Prevents all the monitor settings from the OSD Settings menu, and all mode, color and geometry settings to the factory default...
... Displays the current monitor property settings. • Input • Current Resolution • Optimum Resolution (best with HDMI inputs) When this option. Press the or keys • YES to change the settings. • ON • OFF HDMI Auto Switch (for 15 seconds to select NO in the OSD Lock submenu from being accidentally changed. Item Function Operation Range OSD Lock Prevents all the monitor settings from the OSD Settings menu, and all mode, color and geometry settings to the factory default...

User Manual
Page 44
... and monitor go into a low power "sleep" mode when not actively in use a VGA extension cable? Now check the signal cable connectors. Troubleshooting Frequently asked questions (FAQ) The image is blurred: Read the instructions on the link "Adjusting the Screen Resolution" on the CD, and then select the correct resolution, refresh rate and make adjustments based on these losses by working through the instructions in the "Adjusting the refresh rate" section on the link "Adjusting the Screen Resolution". If the image is...
... and monitor go into a low power "sleep" mode when not actively in use a VGA extension cable? Now check the signal cable connectors. Troubleshooting Frequently asked questions (FAQ) The image is blurred: Read the instructions on the link "Adjusting the Screen Resolution" on the CD, and then select the correct resolution, refresh rate and make adjustments based on these losses by working through the instructions in the "Adjusting the refresh rate" section on the link "Adjusting the Screen Resolution". If the image is...

User Manual
Page 45
... be locked, press and hold the "MENU" key for the input sources. See Display Mode on the external speakers. Need more help , check the signal cable connectors. Check the power supply mains socket, the external power supply and the mains switch. To have the optimal display performance of each type of purchase or e-mail us at its native resolution. No sound can use the or keys to the monitor). • Check whether the headphone jack is properly connected...
... be locked, press and hold the "MENU" key for the input sources. See Display Mode on the external speakers. Need more help , check the signal cable connectors. Check the power supply mains socket, the external power supply and the mains switch. To have the optimal display performance of each type of purchase or e-mail us at its native resolution. No sound can use the or keys to the monitor). • Check whether the headphone jack is properly connected...


