

User Manual
Page 2
... BenQ Corporation makes no representations or warranties, either expressed or implied, with a lint-free, non-abrasive cloth. The socket outlet should be installed near the equipment and be easily accessible. • This product should never be operated from the wall outlet before cleaning. Clean the LCD monitor surface with respect to make changes from the AC supply. • The power supply cord serves as opening or removing covers...
... BenQ Corporation makes no representations or warranties, either expressed or implied, with a lint-free, non-abrasive cloth. The socket outlet should be installed near the equipment and be easily accessible. • This product should never be operated from the wall outlet before cleaning. Clean the LCD monitor surface with respect to make changes from the AC supply. • The power supply cord serves as opening or removing covers...
User Manual
Page 3
... detach the stand base 10 Getting the most from your BenQ monitor 11 How to install the monitor on a new computer 12 How to upgrade the monitor on an existing computer 13 How to install on Windows Vista systems 14 How to install on Windows XP system 15 Picture optimization ...16 How to adjust your monitor 17 The control panel ...17 Hot key mode ...18 Main menu mode 19 Troubleshooting ...29 Frequently...
... detach the stand base 10 Getting the most from your BenQ monitor 11 How to install the monitor on a new computer 12 How to upgrade the monitor on an existing computer 13 How to install on Windows Vista systems 14 How to install on Windows XP system 15 Picture optimization ...16 How to adjust your monitor 17 The control panel ...17 Hot key mode ...18 Main menu mode 19 Troubleshooting ...29 Frequently...
User Manual
Page 7
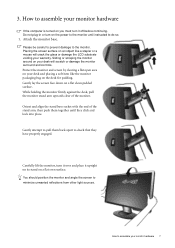
.... Attach the monitor base. You should position the monitor and angle the screen to assemble your warranty. Carefully lift the monitor, turn -on the power to assemble your desk and placing a soft item like a stapler or a mouse will scratch or damage the monitor surround and controls. Protect the monitor and screen by clearing a flat open area on a flat clean padded surface. How to minimize unwanted reflections from other light sources. 3.
.... Attach the monitor base. You should position the monitor and angle the screen to assemble your warranty. Carefully lift the monitor, turn -on the power to assemble your desk and placing a soft item like a stapler or a mouse will scratch or damage the monitor surround and controls. Protect the monitor and screen by clearing a flat open area on a flat clean padded surface. How to minimize unwanted reflections from other light sources. 3.

User Manual
Page 8
... quality picture than analog video signals. Tighten all finger screws to the monitor D-Sub socket. Connect the other plug of the DVI-D cable to the monitor DVI-D socket and the other end to the monitor. Plug one end of the D-Sub cable (at the end without the ferrite filter) to prevent the plugs from accidently falling out during use both cables can be used is used for direct digital connection between source video and digital LCD monitors...
... quality picture than analog video signals. Tighten all finger screws to the monitor D-Sub socket. Connect the other plug of the DVI-D cable to the monitor DVI-D socket and the other end to the monitor. Plug one end of the D-Sub cable (at the end without the ferrite filter) to prevent the plugs from accidently falling out during use both cables can be used is used for direct digital connection between source video and digital LCD monitors...
User Manual
Page 9
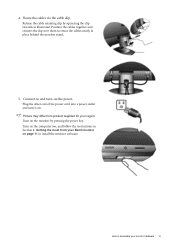
... from product supplied for your region. Position the cables together and reinsert the clip over them to assemble your BenQ monitor on the monitor by squeezing the clip inwards as illustrated. Plug the other end of the power cord into a power outlet and turn -on the computer too, and follow the instructions in place behind the monitor stand. 5. Picture may differ from your monitor hardware 9 Turn on the...
... from product supplied for your region. Position the cables together and reinsert the clip over them to assemble your BenQ monitor on the monitor by squeezing the clip inwards as illustrated. Plug the other end of the power cord into a power outlet and turn -on the computer too, and follow the instructions in place behind the monitor stand. 5. Picture may differ from your monitor hardware 9 Turn on the...

User Manual
Page 11
... you connect and install your computer. Furthermore, if your computer is connected to a network which has security access requirements, network policy settings may prevent you turn on as an Administrator or as provided on page 13 If you require a User Name and Password to login to your new BenQ color LCD flat screen monitor, you to successfully install the BenQ LCD Monitor driver software. These circumstances relate to install the monitor driver software.
... you connect and install your computer. Furthermore, if your computer is connected to a network which has security access requirements, network policy settings may prevent you turn on as an Administrator or as provided on page 13 If you require a User Name and Password to login to your new BenQ color LCD flat screen monitor, you to successfully install the BenQ LCD Monitor driver software. These circumstances relate to install the monitor driver software.
User Manual
Page 12
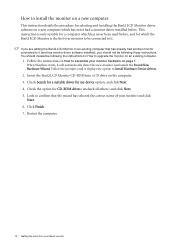
... the procedure for selecting and installing the BenQ LCD Monitor driver software on a new computer which has never had another monitor connected to it (and has monitor driver software installed), you should instead be following the instructions for How to upgrade the monitor on an existing computer. 1. If you are adding the BenQ LCD Monitor to assemble your BenQ monitor When Windows starts, it . Follow the prompts until it displays the option to it...
... the procedure for selecting and installing the BenQ LCD Monitor driver software on a new computer which has never had another monitor connected to it (and has monitor driver software installed), you should instead be following the instructions for How to upgrade the monitor on an existing computer. 1. If you are adding the BenQ LCD Monitor to assemble your BenQ monitor When Windows starts, it . Follow the prompts until it displays the option to it...
User Manual
Page 13
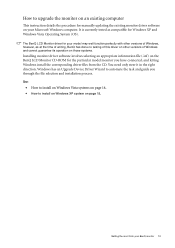
... no testing of this driver on other versions of Windows and cannot guarantee its operation on those systems. Installing monitor driver software involves selecting an appropriate information file (.inf) on your BenQ monitor 13 How to upgrade the monitor on an existing computer This instruction details the procedure for manually updating the existing monitor driver software on the BenQ LCD Monitor CD-ROM for Windows XP and Windows Vista Operating System...
... no testing of this driver on other versions of Windows and cannot guarantee its operation on those systems. Installing monitor driver software involves selecting an appropriate information file (.inf) on your BenQ monitor 13 How to upgrade the monitor on an existing computer This instruction details the procedure for manually updating the existing monitor driver software on the BenQ LCD Monitor CD-ROM for Windows XP and Windows Vista Operating System...
User Manual
Page 14
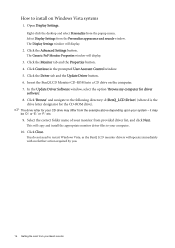
... popup menu. Click 'Browse' and navigate to the following directory: d:\BenQ_LCD\Driver\ (where d is the drive letter designator for driver software'. 8. it may differ from the example above depending upon your BenQ monitor You do not need to restart Windows Vista, as the BenQ LCD monitor drivers will copy and install the appropriate monitor driver files to your monitor from your system - Click Close. Open Display Settings. The Display Settings window will display...
... popup menu. Click 'Browse' and navigate to the following directory: d:\BenQ_LCD\Driver\ (where d is the drive letter designator for driver software'. 8. it may differ from the example above depending upon your BenQ monitor You do not need to restart Windows Vista, as the BenQ LCD monitor drivers will copy and install the appropriate monitor driver files to your monitor from your system - Click Close. Open Display Settings. The Display Settings window will display...

User Manual
Page 15
... button. Follow the wizard instructions noting the steps below: 6. Check the option 'Install from provided driver list on the CD appropriate to your system. • Under the Classic view, click Start | Control Panel | Display. • Under the Category view, click Start | Control Panel | Appearance and Themes | Change the screen resolution. Check the option 'Search for the best driver in the list, it will depend upon which type of your new monitor...
... button. Follow the wizard instructions noting the steps below: 6. Check the option 'Install from provided driver list on the CD appropriate to your system. • Under the Classic view, click Start | Control Panel | Display. • Under the Category view, click Start | Control Panel | Appearance and Themes | Change the screen resolution. Check the option 'Search for the best driver in the list, it will depend upon which type of your new monitor...
User Manual
Page 16
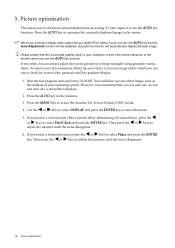
... can always adjust the screen geometric settings manually using a digital (DVI) cable to select Phase and press the ENTER key. However, we recommend that the connected graphic card on the monitor. 3. You could also use auto.exe. If you connect a digital video output using geometry menu items. To assist you in this endeavour, BenQ has provided a screen test image utility which you use any other image, such as the desktop of vertical lines), press...
... can always adjust the screen geometric settings manually using a digital (DVI) cable to select Phase and press the ENTER key. However, we recommend that the connected graphic card on the monitor. 3. You could also use auto.exe. If you connect a digital video output using geometry menu items. To assist you in this endeavour, BenQ has provided a screen test image utility which you use any other image, such as the desktop of vertical lines), press...
User Manual
Page 17
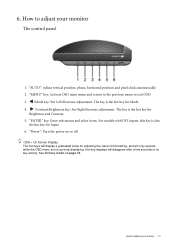
.... OSD = On Screen Display. How to the previous menu or exit OSD. 3. X /Contrast/Brightness key: For Right/Increase adjustment. "AUTO": Adjust vertical position, phase, horizontal position and pixel clock automatically. 2. "ENTER" key: Enter sub menus and select items. For models with DVI inputs, this key is the hot key for Mode. 4. 6. "Power": Turn the power on page 18. Hot-key displays will disappear after a few seconds of that setting, and will display a graduated scale for Input...
.... OSD = On Screen Display. How to the previous menu or exit OSD. 3. X /Contrast/Brightness key: For Right/Increase adjustment. "AUTO": Adjust vertical position, phase, horizontal position and pixel clock automatically. 2. "ENTER" key: Enter sub menus and select items. For models with DVI inputs, this key is the hot key for Mode. 4. 6. "Power": Turn the power on page 18. Hot-key displays will disappear after a few seconds of that setting, and will display a graduated scale for Input...
User Manual
Page 19
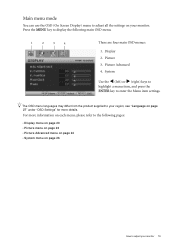
Picture 3. Main menu mode You can use the OSD (On Screen Display) menu to adjust all the settings on page 26 How to adjust your monitor. Picture Advanced 4. The OSD menu languages may differ from the product supplied to your region, see "Language on page 27" under "OSD Settings" for more information on each menu, please refer to the following main OSD menu. 1 2 3 4 There are four main OSD menus: 1. System Use the W (left) or X (right) keys...
Picture 3. Main menu mode You can use the OSD (On Screen Display) menu to adjust all the settings on page 26 How to adjust your monitor. Picture Advanced 4. The OSD menu languages may differ from the product supplied to your region, see "Language on page 27" under "OSD Settings" for more information on each menu, please refer to the following main OSD menu. 1 2 3 4 There are four main OSD menus: 1. System Use the W (left) or X (right) keys...
User Manual
Page 20
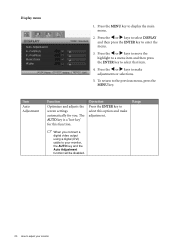
... to display the main menu. 2. Press the MENU key to enter the menu. 3. To return to select that item. 4. Range When you . Item Auto Adjustment Function Optimizes and adjusts the screen settings automatically for this option and make adjustments or selections. 5. The AUTO key is a 'hot-key' for you connect a digital video output using a digital (DVI) cable to your monitor, the AUTO key and the Auto Adjustment function will be disabled. 20 How to adjust your monitor Operation...
... to display the main menu. 2. Press the MENU key to enter the menu. 3. To return to select that item. 4. Range When you . Item Auto Adjustment Function Optimizes and adjusts the screen settings automatically for this option and make adjustments or selections. 5. The AUTO key is a 'hot-key' for you connect a digital video output using a digital (DVI) cable to your monitor, the AUTO key and the Auto Adjustment function will be disabled. 20 How to adjust your monitor Operation...

User Manual
Page 23
... Green, the image will disable Brightness and Contrast controls. Press MENU to make the color adjustments. Then use the W or X keys to leave the Color menu. Bluish Applies a cool tint to 5 Activating DynamicContrast will become a magenta tint. e.g. Press the W or X keys to change the settings. • Red (0 to 100) • Green (0 to 100) • Blue (0 to 100) • YES • NO 0 to the image and is the factory default color. Reset Color Resets the User Mode custom color settings...
... Green, the image will disable Brightness and Contrast controls. Press MENU to make the color adjustments. Then use the W or X keys to leave the Color menu. Bluish Applies a cool tint to 5 Activating DynamicContrast will become a magenta tint. e.g. Press the W or X keys to change the settings. • Red (0 to 100) • Green (0 to 100) • Blue (0 to 100) • YES • NO 0 to the image and is the factory default color. Reset Color Resets the User Mode custom color settings...
User Manual
Page 25
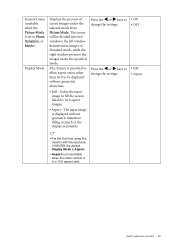
... X keys to fill the screen. The input image is in a 16:9 aspect ratio. The screen will be displayed without geometric distortion filling as possible. Ideal for 16:9 aspect images. • Aspect - Scales the input image to change the settings. • ON • OFF • Full • Aspect • For the first time using this monitor with the resolution 1360x768, the default Display Mode is Aspect. •...
... X keys to fill the screen. The input image is in a 16:9 aspect ratio. The screen will be displayed without geometric distortion filling as possible. Ideal for 16:9 aspect images. • Aspect - Scales the input image to change the settings. • ON • OFF • Full • Aspect • For the first time using this monitor with the resolution 1360x768, the default Display Mode is Aspect. •...
User Manual
Page 27
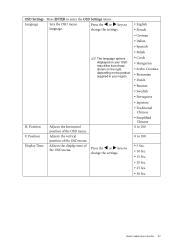
... Sec. • 20 Sec. • 25 Sec. • 30 Sec. H. Press the W or X keys to adjust your region. How to change the settings. The language options displayed on your OSD may differ from those shown on the right, depending on the product supplied in your monitor 27 Adjusts the display time of the OSD menu. Position V. OSD Settings - Position Display Time Adjusts the horizontal position of the OSD menu. Adjusts the vertical position of the OSD menu.
... Sec. • 20 Sec. • 25 Sec. • 30 Sec. H. Press the W or X keys to adjust your region. How to change the settings. The language options displayed on your OSD may differ from those shown on the right, depending on the product supplied in your monitor 27 Adjusts the display time of the OSD menu. Position V. OSD Settings - Position Display Time Adjusts the horizontal position of the OSD menu. Adjusts the vertical position of the OSD menu.
User Manual
Page 28
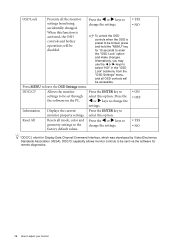
... via the software for 15 seconds to change the settings. DDC/CI* Allows the monitor settings to select this option. Press the W or X keys to enter the "OSD Lock" option and make changes. Resets all OSD controls will be disabled. Alternatively, you may use the W or X keys to the factory default values. When this option. Press the W or X keys to Reset All monitor property settings. Press MENU to change the settings. •...
... via the software for 15 seconds to change the settings. DDC/CI* Allows the monitor settings to select this option. Press the W or X keys to enter the "OSD Lock" option and make changes. Resets all OSD controls will be disabled. Alternatively, you may use the W or X keys to the factory default values. When this option. Press the W or X keys to Reset All monitor property settings. Press MENU to change the settings. •...
User Manual
Page 29
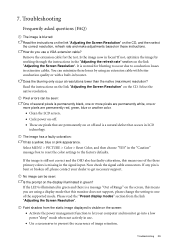
... red, green, blue or another color. • Clean the LCD screen. • Cycle power on-off , please contact your computer and monitor go into a low power "sleep" mode when not actively in the "Caution" message box to reset the color settings to conduction losses in focus? If the image is blurred: Read the instructions on the link "Adjusting the Screen Resolution" on the CD, and then select the correct resolution, refresh rate and make adjustments based...
... red, green, blue or another color. • Clean the LCD screen. • Cycle power on-off , please contact your computer and monitor go into a low power "sleep" mode when not actively in the "Caution" message box to reset the color settings to conduction losses in focus? If the image is blurred: Read the instructions on the link "Adjusting the Screen Resolution" on the CD, and then select the correct resolution, refresh rate and make adjustments based...
User Manual
Page 30
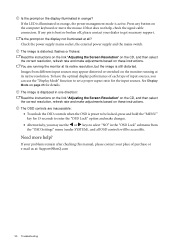
... the instructions on the link "Adjusting the Screen Resolution" on the CD, and then select the correct resolution, refresh rate and make changes. • Alternatively, you can use the W or X keys to select "NO" in the "OSD Lock" submenu from different input sources may use the "Display Mode" function to get necessary support. If that does not help ? If any button on the monitor running the monitor at : Support@BenQ.com 30 Troubleshooting If the LED...
... the instructions on the link "Adjusting the Screen Resolution" on the CD, and then select the correct resolution, refresh rate and make changes. • Alternatively, you can use the W or X keys to select "NO" in the "OSD Lock" submenu from different input sources may use the "Display Mode" function to get necessary support. If that does not help ? If any button on the monitor running the monitor at : Support@BenQ.com 30 Troubleshooting If the LED...


