User Manual
Page 5
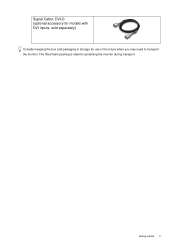
Getting started 5 The fitted foam packing is ideal for use in storage for protecting the monitor during transport. Signal Cable: DVI-D (optional accessory for models with DVI inputs, sold separately) Consider keeping the box and packaging in the future when you may need to transport the monitor.
Getting started 5 The fitted foam packing is ideal for use in storage for protecting the monitor during transport. Signal Cable: DVI-D (optional accessory for models with DVI inputs, sold separately) Consider keeping the box and packaging in the future when you may need to transport the monitor.
User Manual
Page 6
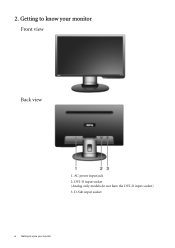
DVI-D input socket (Analog-only models do not have the DVI-D input socket) 3. D-Sub input socket 6 Getting to know your monitor Front view Back view 1. Getting to know your monitor AC power input jack 2. 2.
DVI-D input socket (Analog-only models do not have the DVI-D input socket) 3. D-Sub input socket 6 Getting to know your monitor Front view Back view 1. Getting to know your monitor AC power input jack 2. 2.
User Manual
Page 8
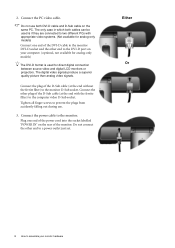
... outlet just yet. Connect the PC video cable. Connect the power cable to assemble your computer. (optional, not available for analog-only models) The DVI-D format is if they are connected to two different PCs with the ferrite filter) to prevent the plugs from accidently falling out during use both...all finger screws to the computer video D-Sub socket. Do not use . 3. Connect the plug of the monitor. The only case in which both DVI-D cable and D-Sub cable on the rear of the D-Sub cable (at the end with appropriate video systems. (Not available for direct digital connection between...
... outlet just yet. Connect the PC video cable. Connect the power cable to assemble your computer. (optional, not available for analog-only models) The DVI-D format is if they are connected to two different PCs with the ferrite filter) to prevent the plugs from accidently falling out during use both...all finger screws to the computer video D-Sub socket. Do not use . 3. Connect the plug of the monitor. The only case in which both DVI-D cable and D-Sub cable on the rear of the D-Sub cable (at the end with appropriate video systems. (Not available for direct digital connection between...

User Manual
Page 17
... 5. When you connect a digital video output using geometry menu items. To assist you in this endeavour, BenQ has provided a screen test image utility which you can always adjust the screen geometric settings manually using a digital (DVI) cable to your computer is to select Pixel Clock and press the ENTER key. If you...
... 5. When you connect a digital video output using geometry menu items. To assist you in this endeavour, BenQ has provided a screen test image utility which you can always adjust the screen geometric settings manually using a digital (DVI) cable to your computer is to select Pixel Clock and press the ENTER key. If you...
User Manual
Page 18
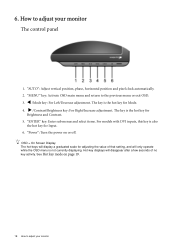
... a few seconds of no key activity. The key is the hot key for Input. 6. "ENTER" key: Enter sub menus and select items. For models with DVI inputs, this key is not currently displaying. 6. "Power": Turn the power on page 19. 18 How to adjust your monitor The control panel 1. Hot-key...
... a few seconds of no key activity. The key is the hot key for Input. 6. "ENTER" key: Enter sub menus and select items. For models with DVI inputs, this key is not currently displaying. 6. "Power": Turn the power on page 19. 18 How to adjust your monitor The control panel 1. Hot-key...
User Manual
Page 21
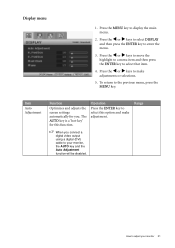
... MENU key. Range When you . To return to enter the menu. 3. The AUTO key is a 'hot-key' for you connect a digital video output using a digital (DVI) cable to make adjustment. Press the W or X keys to your monitor 21 How to select that item. 4. Display menu 1. Item Auto Adjustment Function Optimizes and...
... MENU key. Range When you . To return to enter the menu. 3. The AUTO key is a 'hot-key' for you connect a digital video output using a digital (DVI) cable to make adjustment. Press the W or X keys to your monitor 21 How to select that item. 4. Display menu 1. Item Auto Adjustment Function Optimizes and...

User Manual
Page 27
System menu Analog-only models do not have the Input function. 1. Range • DVI • D-sub Analog-only models do not have the Input function. Operation Press the W or X keys to change the input to that item. 4. How to ... the MENU key to make adjustments or selections. 5. Press the W or X keys to display the main menu. 2. Item Input Function Selects the D-sub (analog) or DVI (digital) input. Press the W or X keys to select SYSTEM and then press the ENTER key to change the settings. Use this to enter the menu. 3.
System menu Analog-only models do not have the Input function. 1. Range • DVI • D-sub Analog-only models do not have the Input function. Operation Press the W or X keys to change the input to that item. 4. How to ... the MENU key to make adjustments or selections. 5. Press the W or X keys to display the main menu. 2. Item Input Function Selects the D-sub (analog) or DVI (digital) input. Press the W or X keys to select SYSTEM and then press the ENTER key to change the settings. Use this to enter the menu. 3.

