
User Manual
Page 5
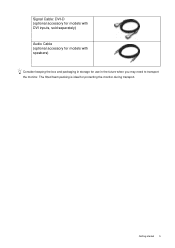
The fitted foam packing is ideal for use in storage for protecting the monitor during transport. Getting started 5 Signal Cable: DVI-D (optional accessory for models with DVI inputs, sold separately) Audio Cable (optional accessory for models with speakers) Consider keeping the box and packaging in the future when you may need to transport the monitor.
The fitted foam packing is ideal for use in storage for protecting the monitor during transport. Getting started 5 Signal Cable: DVI-D (optional accessory for models with DVI inputs, sold separately) Audio Cable (optional accessory for models with speakers) Consider keeping the box and packaging in the future when you may need to transport the monitor.

User Manual
Page 6
Back view Audio cable socket Models without speakers do not have the audio cable socket. AC power input jack DVI-D input socket Analog-only models do not have the earphone socket. D-Sub input socket 6 Getting to know your monitor Front view Earphone socket Models without speakers do not have the DVI-D input socket. Getting to know your monitor 2.
Back view Audio cable socket Models without speakers do not have the audio cable socket. AC power input jack DVI-D input socket Analog-only models do not have the earphone socket. D-Sub input socket 6 Getting to know your monitor Front view Earphone socket Models without speakers do not have the DVI-D input socket. Getting to know your monitor 2.

User Manual
Page 8
... Connect the audio cable between the socket on your computer. (optional, not available for analog-only models) Connect one end of the DVI-D cable to the monitor DVI-D socket and the other end to the computer video D-Sub socket. Either Or If you wish, you may connect an earphone into .... 8 Assembling your computer audio outlet. The digital video signals produce a superior quality picture than analog video signals. The only case in which both DVI-D cable and D-Sub cable on the side panel of the D-Sub cable (at the end with appropriate video systems. (Not available for analog-only...
... Connect the audio cable between the socket on your computer. (optional, not available for analog-only models) Connect one end of the DVI-D cable to the monitor DVI-D socket and the other end to the computer video D-Sub socket. Either Or If you wish, you may connect an earphone into .... 8 Assembling your computer audio outlet. The digital video signals produce a superior quality picture than analog video signals. The only case in which both DVI-D cable and D-Sub cable on the side panel of the D-Sub cable (at the end with appropriate video systems. (Not available for analog-only...

User Manual
Page 16
5. Please ensure that you can always adjust the screen geometric settings manually using a digital (DVI) cable to select Pixel Clock and press the ENTER key. If you wish, you can use auto.exe. However, we recommend that the connected graphic ... the monitor until the noise disappears. 16 Picture optimization If you connect a digital video output using geometry menu items. To assist you in this endeavour, BenQ has provided a screen test image utility which you use to the native resolution of your monitor, the AUTO key and the Auto Adjustment function will...
5. Please ensure that you can always adjust the screen geometric settings manually using a digital (DVI) cable to select Pixel Clock and press the ENTER key. If you wish, you can use auto.exe. However, we recommend that the connected graphic ... the monitor until the noise disappears. 16 Picture optimization If you connect a digital video output using geometry menu items. To assist you in this endeavour, BenQ has provided a screen test image utility which you use to the native resolution of your monitor, the AUTO key and the Auto Adjustment function will...

User Manual
Page 17
... with speakers on or off. 2. The key is also the hot key for Mode. 6. "ENTER" key: Enter sub menus and select items. For models with DVI inputs, this key is also the hot key for Input. t /Volume key: For Up/Increase adjustment. Hot-key displays will disappear after a few seconds of...
... with speakers on or off. 2. The key is also the hot key for Mode. 6. "ENTER" key: Enter sub menus and select items. For models with DVI inputs, this key is also the hot key for Input. t /Volume key: For Up/Increase adjustment. Hot-key displays will disappear after a few seconds of...

User Manual
Page 18
... models 1. The key is also the hot key for Mode. 6. OSD = On Screen Display. "ENTER" key: Enter sub menus and select items. For models with DVI inputs, this key is the hot key for Input. The hot-keys will only operate while the OSD menu is the hot key for adjusting...
... models 1. The key is also the hot key for Mode. 6. OSD = On Screen Display. "ENTER" key: Enter sub menus and select items. For models with DVI inputs, this key is the hot key for Input. The hot-keys will only operate while the OSD menu is the hot key for adjusting...

User Manual
Page 20
ON OFF 20 How to adjust your monitor Position Display Time OSD Lock ON OFF YES NO Input is only available for models with DVI inputs. SYSTEM Input OSD Settings DDC/CI Information Reset All D-sub DVI Language H. English French German Italian Spanish Polish/Japanese Czech/Traditional Chinese Hungarian/Simplified Chinese Serbo-croatian Romanian Dutch Russian Swedish Portuguese 5 Sec. 10 Sec. 15 Sec. 20 Sec. 25 Sec. 30 Sec. Position V.
ON OFF 20 How to adjust your monitor Position Display Time OSD Lock ON OFF YES NO Input is only available for models with DVI inputs. SYSTEM Input OSD Settings DDC/CI Information Reset All D-sub DVI Language H. English French German Italian Spanish Polish/Japanese Czech/Traditional Chinese Hungarian/Simplified Chinese Serbo-croatian Romanian Dutch Russian Swedish Portuguese 5 Sec. 10 Sec. 15 Sec. 20 Sec. 25 Sec. 30 Sec. Position V.
User Manual
Page 24
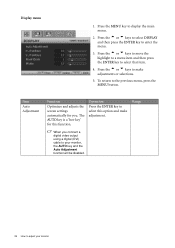
... for this option and make adjustments or selections. 5. Range When you . The AUTO key is a 'hot-key' for you connect a digital video output using a digital (DVI) cable to your monitor Press the MENU key to adjust your monitor, the AUTO key and the Auto Adjustment function will be disabled. 24 How...
... for this option and make adjustments or selections. 5. Range When you . The AUTO key is a 'hot-key' for you connect a digital video output using a digital (DVI) cable to your monitor Press the MENU key to adjust your monitor, the AUTO key and the Auto Adjustment function will be disabled. 24 How...

User Manual
Page 31
...-only models do not have the Input function. Press the t or u keys to display the main menu. 2. Item Input Function Selects the D-sub (analog) or DVI (digital) input. Use this to change the settings. Operation Press the t or u keys to change the input to your monitor 31 OSD Settings - Press the...
...-only models do not have the Input function. Press the t or u keys to display the main menu. 2. Item Input Function Selects the D-sub (analog) or DVI (digital) input. Use this to change the settings. Operation Press the t or u keys to change the input to your monitor 31 OSD Settings - Press the...
