BenQ DH551F Innovative Signage Support and Manuals
Get Help and Manuals for this BenQ item

View All Support Options Below
Free BenQ DH551F Innovative Signage manuals!
Problems with BenQ DH551F Innovative Signage?
Ask a Question
Free BenQ DH551F Innovative Signage manuals!
Problems with BenQ DH551F Innovative Signage?
Ask a Question
Popular BenQ DH551F Innovative Signage Manual Pages
User Manual - Page 2
... any language or computer language, in the contents thereof without obligation to notify any means, electronic, mechanical, magnetic, optical, chemical, manual or otherwise, without the prior written permission of BenQ Corporation. No part of this publication and to make changes from time to time in any form or by any person of this...
User Manual - Page 3
...of Contents
3
Table of Contents
Disclaimer 2 Copyright 2 Important safety instructions 4
Safety precautions and maintenance 4 Usage 6
Package content 9
Unpacking 9 Packing list 10 Overview 11
Setting up the display 13
Putting the display front side up 13 ...power cord 19 Using the remote control 20 OSD menu 21
Troubleshooting 25 Specifications 26 Product Dimensions 27
7/20/15
User Manual - Page 4
... To avoid the risk of shock or permanent damage to the set, do not put excessive pressure on the power box. •... not going to use of an approved power cord provided by BenQ at all times. Maintenance
• To protect your display from...is connected to the mains.
Read and follow these instructions when connecting and using your local service center. • Don't subject the display to...
User Manual - Page 5
... vents or prevent proper cooling of time. • Unplug the display if you are easily accessible. • Consult a service technician if the display does not operate normally after having followed the instructions in this manual. To avoid electric shock, do not expose it for normal operation. • When positioning the display, make sure...
User Manual - Page 13
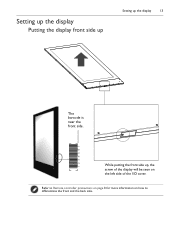
Setting up the display
Putting the display front side up
Setting up , the screw of the display will be seen on how to differentiate the front and the back side.
Refer to Remote controller precautions on page 8 for more information on the left side of the I/O cover. While putting the front side up the display
13
The barcode is near the front side.
User Manual - Page 16

Name
1 Connect the 12V (8 pin) power line
2 Connect the 24V (10 pin) power line 16
Setting up the display
Connecting power box to the display
Power box
1 12V*1 Yellow line (8 pin)
2 24V*1 Red line
(10 pin)
Double sided display
2
1
24V*1 Red line (10 pin)
12V*1 Yellow line (8 pin)
No.
User Manual - Page 17
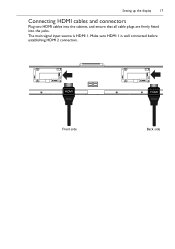
The main signal input source is well connected before establishing HDMI 2 connection. Make sure HDMI 1 is HDMI 1. Setting up the display
17
Connecting HDMI cables and connectors
Plug two HDMI cables into the cabinet, and ensure that all cable plugs are firmly fitted into the jacks.
HDMI
Front side
HDMI
Back side
User Manual - Page 18
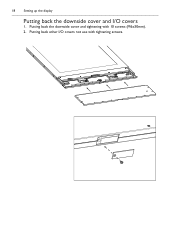
Putting back the downside cover and tightening with tightening screws. Putting back other I /O covers
1. 18
Setting up the display
Putting back the downside cover and I /O covers not use with 10 screws (M6x30mm).
2.
User Manual - Page 19
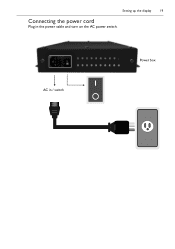
AC in the power cable and turn on the AC power switch.
Setting up the display
19
Connecting the power cord
Plug in / switch
Power box
User Manual - Page 20
20
Setting up the display
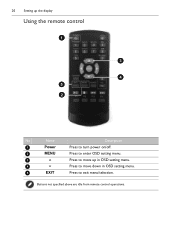
Using the remote control
1
3
4 5 2
No
Name
Description
1
Power
Press to turn power on/off.
2
MENU
Press to enter OSD setting menu.
3
Press to move up in OSD setting menu.
4
Press to move down in OSD setting menu.
5
EXIT
Press to exit menu/selection. Buttons not specified above are idle from remote control operations.
User Manual - Page 21
... one of the following, and then press "" or "" to exit. Description Item
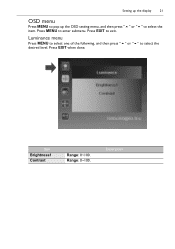
Brightness1 Contrast
Range: 0~100.
Setting up the display
21
OSD menu
Press MENU to pop up the OSD setting menu, and then press "" or "" to enter submenu. Press EXIT when done. Press MENU to select the...
User Manual - Page 22
Press EXIT when done.
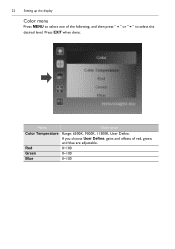
Name Color Temperature
Red Green Blue
Description
Range: 6500K, 9300K, 11500K, User Define. 22
Setting up the display
Color menu
Press MENU to select the desired level. If you choose User Define, gains and offsets of the following, and then press "" or "" to select one of red, green, and blue are adjustable. 0~100 0~100 0~100
User Manual - Page 23

Press EXIT when done. Name
Horizontal Vertical Transparency OSD Time Out OSD Rotation
Description
Default: 50 Default: 50 Default: 0 Default: 50 0(0˚), 1(90˚), 2(270˚), 3(360˚) Setting up the display
23
OSD setting menu
Press MENU to select one of the following, and then press "" or "" to select the desired level.
User Manual - Page 24
24
Setting up the display
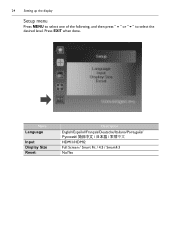
Setup menu
Press MENU to select one of the following, and then press "" or "" to select the desired level. Name Language
Input Display Size Reset:
Description
English/Español/Français/Deutsche/Italiano/Português HDMI1/HDMI2 Full Screen / Smart Fit / 4:3 / Smart4:3 No/Yes Press EXIT when done.
User Manual - Page 26
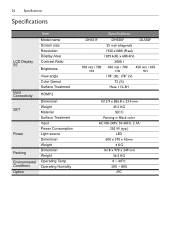
Operating Humidity
Specifications
DH551F
DH550F
DL550F
55 inch (diagonal)
1920 x1080 (Pixel)
1209.6(H)... 249 mm 56.5 KG 0 ~ 40°C
20% ~ 80% IPC 26
Specifications
Specifications
LCD Display 55"
Input Connectivity SET
Power Packing Environmental Conditions Option
Item
Model name Screen size Resolution Display Area Contrast Ratio
Brightness
View angle Color Gamut Surface Treatment
HDMI...
BenQ DH551F Innovative Signage Reviews
We have not received any reviews for BenQ yet.