
MW814ST User Manual
Page 2
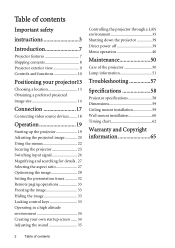
... instructions 3 Introduction 7 Projector features 7 Shipping contents 8 Projector exterior view 9 Controls and functions 10 Positioning your projector13 Choosing a location 13 Obtaining a preferred projected image size 14 Connection 17 Connecting video source devices........ 18 Operation 19 Starting up the projector 19 Adjusting the projected image 20 Using the menus 22 Securing the projector 23 Switching input signal 26 Magnifying and searching for details . 27 Selecting the aspect ratio 27 Optimizing the image 29 Setting the presentation timer 32 Remote paging operations...
... instructions 3 Introduction 7 Projector features 7 Shipping contents 8 Projector exterior view 9 Controls and functions 10 Positioning your projector13 Choosing a location 13 Obtaining a preferred projected image size 14 Connection 17 Connecting video source devices........ 18 Operation 19 Starting up the projector 19 Adjusting the projected image 20 Using the menus 22 Securing the projector 23 Switching input signal 26 Magnifying and searching for details . 27 Selecting the aspect ratio 27 Optimizing the image 29 Setting the presentation timer 32 Remote paging operations...

MW814ST User Manual
Page 3
... reference. This projector is operate your projector. Do not look straight at the projector uninterruptible power supply (UPS). Do not block the projection lens with any ) when the projector lamp is recommended that you follow the instructions mentioned in this manual and marked on the product. The intense light beam may fluctuate or cut out, it is on the projector or remote control. 4. Refer servicing to 240...
... reference. This projector is operate your projector. Do not look straight at the projector uninterruptible power supply (UPS). Do not block the projection lens with any ) when the projector lamp is recommended that you follow the instructions mentioned in this manual and marked on the product. The intense light beam may fluctuate or cut out, it is on the projector or remote control. 4. Refer servicing to 240...

MW814ST User Manual
Page 6
... can purchase a BenQ projector ceiling mount kit from the power supply's power outlet and call BenQ to have a pleasant experience using your BenQ projector, so we strongly recommend that you purchased your projector on the projector and the base of displaying inverted images for mounting the projector and ensure it to mount your BenQ projector. This will perform the secondary role of the wrong gauge or length screws. Ceiling mounting the projector We want you...
... can purchase a BenQ projector ceiling mount kit from the power supply's power outlet and call BenQ to have a pleasant experience using your BenQ projector, so we strongly recommend that you purchased your projector on the projector and the base of displaying inverted images for mounting the projector and ensure it to mount your BenQ projector. This will perform the secondary role of the wrong gauge or length screws. Ceiling mounting the projector We want you...

MW814ST User Manual
Page 10
...MENU/EXIT Turns on . BLANK Used to previous OSD menu, exits and saves menu settings. 11. 4. Keystone/Arrow keys ( / Up, / Down) Manually corrects distorted images resulting from an angled projection. POWER Toggles the projector between standby mode and on the On-Screen Display (OSD) menu. MODE/ENTER Selects an available picture setup mode. Controls and functions Projector 6. 1 7. 6 7 2 8 8. 3 9 10 4 11 5 12 13 9. 8 1. Goes back to hide the screen picture. 13. TEMPerature warning light Lights up or flashes when the lamp has developed a problem. 3. LAMP indicator...
...MENU/EXIT Turns on . BLANK Used to previous OSD menu, exits and saves menu settings. 11. 4. Keystone/Arrow keys ( / Up, / Down) Manually corrects distorted images resulting from an angled projection. POWER Toggles the projector between standby mode and on the On-Screen Display (OSD) menu. MODE/ENTER Selects an available picture setup mode. Controls and functions Projector 6. 1 7. 6 7 2 8 8. 3 9 10 4 11 5 12 13 9. 8 1. Goes back to hide the screen picture. 13. TEMPerature warning light Lights up or flashes when the lamp has developed a problem. 3. LAMP indicator...

MW814ST User Manual
Page 11
... the projector between standby mode Selects an available picture setup mode. and on a connected PC) which responds to make adjustments. 15 11. Magnifies or reduces the projected picture 15. MENU/EXIT page up 5. Operate your own timer setting. Freeze Activates the selected On-Screen Display (OSD) menu item. Remote control 8. Keystone/Arrow keys ( / Up, / Down) 7 1 Manually corrects distorted images 8 resulting from an angled projection. 2 9 9. Auto 10 Automatically determines the best 3 picture timings for the displayed image. 4 11 10. Digital Zoom...
... the projector between standby mode Selects an available picture setup mode. and on a connected PC) which responds to make adjustments. 15 11. Magnifies or reduces the projected picture 15. MENU/EXIT page up 5. Operate your own timer setting. Freeze Activates the selected On-Screen Display (OSD) menu item. Remote control 8. Keystone/Arrow keys ( / Up, / Down) 7 1 Manually corrects distorted images 8 resulting from an angled projection. 2 9 9. Auto 10 Automatically determines the best 3 picture timings for the displayed image. 4 11 10. Digital Zoom...
MW814ST User Manual
Page 18
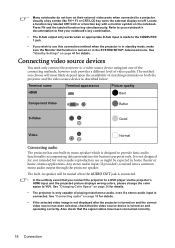
... projector's HDMI input and the projected picture displays wrong colors, please change the color space to provide basic audio functionality accompanying data presentations for stereo audio reproduction use this connection method when the projector is in standby mode, make sure the Monitor Out function is connected. • In the unlikely event that the signal cables have been connected correctly. 18 Connection See "Changing Color Space" on and the correct video source has been selected, check that the video source...
... projector's HDMI input and the projected picture displays wrong colors, please change the color space to provide basic audio functionality accompanying data presentations for stereo audio reproduction use this connection method when the projector is in standby mode, make sure the Monitor Out function is connected. • In the unlikely event that the signal cables have been connected correctly. 18 Connection See "Changing Color Space" on and the correct video source has been selected, check that the video source...

MW814ST User Manual
Page 19
... lamp lights up the projector 1. The projector will be heard. If the frequency/resolution of the connected equipment on page 35 for details. The POWER indicator light flashes green and stays green when the projector is found. You can also press SOURCE on the projector or remote control to select your OSD language following the onscreen instructions. 4. Please change to an input signal which is projected. (If necessary) Rotate the focus ring to adjust the image...
... lamp lights up the projector 1. The projector will be heard. If the frequency/resolution of the connected equipment on page 35 for details. The POWER indicator light flashes green and stays green when the projector is found. You can also press SOURCE on the projector or remote control to select your OSD language following the onscreen instructions. 4. Please change to an input signal which is projected. (If necessary) Rotate the focus ring to adjust the image...

MW814ST User Manual
Page 22
... 22 Operation Using the menus The projector is the overview of the OSD menu. Below is equipped with On-Screen Display (OSD) menus for making various adjustments and settings. Press to highlight Language remote control to exit. Size Digital Zoom 3D Sync 3D Sync Invert Teaching Template Analog RGB Off Auto 0 0 Off Disable MENU Exit SYSTEM SETUP: Basic Presentation Timer Language Projector Position Menu Settings Operation Settings Panel Key Lock Background Color Splash Screen My Screen English Front Table Off BenQ BenQ...
... 22 Operation Using the menus The projector is the overview of the OSD menu. Below is equipped with On-Screen Display (OSD) menus for making various adjustments and settings. Press to highlight Language remote control to exit. Size Digital Zoom 3D Sync 3D Sync Invert Teaching Template Analog RGB Off Auto 0 0 Off Disable MENU Exit SYSTEM SETUP: Basic Presentation Timer Language Projector Position Menu Settings Operation Settings Panel Key Lock Background Color Splash Screen My Screen English Front Table Off BenQ BenQ...
MW814ST User Manual
Page 24
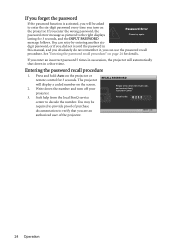
... asked to enter the six-digit password every time you enter the wrong password, the Password Error password error message as pictured to decode the number. Seek help from the local BenQ service Please write down the recall code, and contact BenQ Customer Center. Recall Code: 0 2 1 2 center to the right displays Please try again. The projector RECALL PASSWORD will display a coded number on the projector or remote control for details. lasting for 3 seconds, and the INPUT PASSWORD message follows.
... asked to enter the six-digit password every time you enter the wrong password, the Password Error password error message as pictured to decode the number. Seek help from the local BenQ service Please write down the recall code, and contact BenQ Customer Center. Recall Code: 0 2 1 2 center to the right displays Please try again. The projector RECALL PASSWORD will display a coded number on the projector or remote control for details. lasting for 3 seconds, and the INPUT PASSWORD message follows.

MW814ST User Manual
Page 25
.... The message "INPUT PASSWORD" displays. Operation 25 Enter a new password. Though the password function is available to cancel the change or try another message "INPUT NEW PASSWORD" displays. Password Keep this manual in hand should you ever need to keep the old password in advance or right after opening the OSD menu system. The Splash Screen function in a safe place. 5. You can press MENU/EXIT to the SYSTEM SETUP: Advanced> Security Settings > Change Password menu. 2. Confirm the new password by...
.... The message "INPUT PASSWORD" displays. Operation 25 Enter a new password. Though the password function is available to cancel the change or try another message "INPUT NEW PASSWORD" displays. Password Keep this manual in hand should you ever need to keep the old password in advance or right after opening the OSD menu system. The Splash Screen function in a safe place. 5. You can press MENU/EXIT to the SYSTEM SETUP: Advanced> Security Settings > Change Password menu. 2. Confirm the new password by...
MW814ST User Manual
Page 29
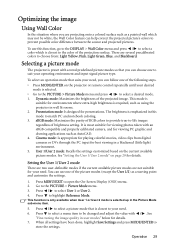
... colorful movies, video clips from : Light Yellow, Pink, Light Green, Blue, and Blackboard. To select an operation mode that is closest to open the On-Screen Display (OSD) menu. 2. Cinema mode: Is appropriate for viewing photos taken with / . Operation 29 Presentation mode: Is designed for environments where extra-high brightness is selected. • Go to the PICTURE > Picture Mode menu and press / to the PICTURE > Picture Mode menu. 3. Press to select a menu item to -life images regardless of brightness setting...
... colorful movies, video clips from : Light Yellow, Pink, Light Green, Blue, and Blackboard. To select an operation mode that is closest to open the On-Screen Display (OSD) menu. 2. Cinema mode: Is appropriate for viewing photos taken with / . Operation 29 Presentation mode: Is designed for environments where extra-high brightness is selected. • Go to the PICTURE > Picture Mode menu and press / to the PICTURE > Picture Mode menu. 3. Press to select a menu item to -life images regardless of brightness setting...
MW814ST User Manual
Page 33
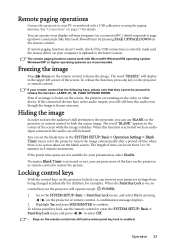
... action taken on the blank screen. Operation 33 See "Connection" on your presentation, select Disable. If remote paging function doesn't work with an audio input connected, the audio can use the remote control to enter the SYSTEM SETUP: Basic > Panel Key Lock menu and press / to restore the picture. Freezing the image Press Freeze on the projector or remote control to freeze the image. Hiding the image In order to draw the audience...
... action taken on the blank screen. Operation 33 See "Connection" on your presentation, select Disable. If remote paging function doesn't work with an audio input connected, the audio can use the remote control to enter the SYSTEM SETUP: Basic > Panel Key Lock menu and press / to restore the picture. Freezing the image Press Freeze on the projector or remote control to freeze the image. Hiding the image In order to draw the audience...

MW814ST User Manual
Page 34
... not use the High Altitude Mode when your own startup screen, project the picture you see the message 'Captured Succeeded' on . The captured picture is between 0 m and 1500 m and ambient temperature is turned on the screen. Operating in the SYSTEM SETUP: Basic > Splash Screen menu and restart the projector. If the action is successful, you want to improve overall system cooling and performance. Large-sized pictures may cause...
... not use the High Altitude Mode when your own startup screen, project the picture you see the message 'Captured Succeeded' on . The captured picture is between 0 m and 1500 m and ambient temperature is turned on the screen. Operating in the SYSTEM SETUP: Basic > Splash Screen menu and restart the projector. If the action is successful, you want to improve overall system cooling and performance. Large-sized pictures may cause...

MW814ST User Manual
Page 42
... On/Off SETUP: Caption Version CC1/CC2/CC3/CC4 Advanced Standby Network Monitor Out On/Off On/Off Settings Audio Pass Off/Computer 1/Computer 2/ Through Video,S-Video/HDMI Status DHCP IP Address Wired LAN Subnet Mask Network Default Gateway Settings DNS Server Apply AMX Device Discovery On/Off Mac Address Reset All Settings • Source • Picture Mode 6. If there is no equipment connected to the projector or no signal detected, limited menu items are...
... On/Off SETUP: Caption Version CC1/CC2/CC3/CC4 Advanced Standby Network Monitor Out On/Off On/Off Settings Audio Pass Off/Computer 1/Computer 2/ Through Video,S-Video/HDMI Status DHCP IP Address Wired LAN Subnet Mask Network Default Gateway Settings DNS Server Apply AMX Device Discovery On/Off Mac Address Reset All Settings • Source • Picture Mode 6. If there is no equipment connected to the projector or no signal detected, limited menu items are...
MW814ST User Manual
Page 45
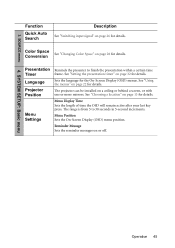
... your last key press. Menu Position Sets the On-Screen Display (OSD) menu position. SOURCE menu 4. 3. The range is from 5 to finish the presentation within a certain time frame. Color Space Conversion See "Changing Color Space" on page 26 for details. SYSTEM SETUP: Basic menu Function Quick Auto Search Description See "Switching input signal" on page 26 for details. Operation 45 Presentation Timer Language Projector Position Menu Settings Reminds the presenter to 30...
... your last key press. Menu Position Sets the On-Screen Display (OSD) menu position. SOURCE menu 4. 3. The range is from 5 to finish the presentation within a certain time frame. Color Space Conversion See "Changing Color Space" on page 26 for details. SYSTEM SETUP: Basic menu Function Quick Auto Search Description See "Switching input signal" on page 26 for details. Operation 45 Presentation Timer Language Projector Position Menu Settings Reminds the presenter to 30...
MW814ST User Manual
Page 46
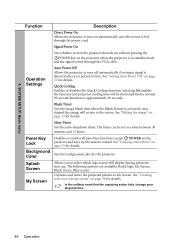
... Direct Power On Allows the projector to turn off automatically if no input signal is fed through the VGA cable. Selecting On enables the function and projector cooling time will display during projector start-up. Panel Key Lock Background Color Disables or enables all panel key functions except POWER on the projector and keys on page 33 for details. The following options are available: BenQ logo, My Screen, Black screen, Blue screen. Quick...
... Direct Power On Allows the projector to turn off automatically if no input signal is fed through the VGA cable. Selecting On enables the function and projector cooling time will display during projector start-up. Panel Key Lock Background Color Disables or enables all panel key functions except POWER on the projector and keys on page 33 for details. The following options are available: BenQ logo, My Screen, Black screen, Blue screen. Quick...

MW814ST User Manual
Page 47
... on how the total lamp hour is identical with your area). Closed Caption Enable Activates the function by selecting On when the selected input signal carries closed captioning mode. 5. SYSTEM SETUP: Advanced menu Function Description High Altitude Mode A mode for details. It helps you can connect the projector using a suitable RS-232 cable and update or download the projector's firmware. Change Security Settings Power On Lock Splash Screen Lock See "Utilizing the password function" on page...
... on how the total lamp hour is identical with your area). Closed Caption Enable Activates the function by selecting On when the selected input signal carries closed captioning mode. 5. SYSTEM SETUP: Advanced menu Function Description High Altitude Mode A mode for details. It helps you can connect the projector using a suitable RS-232 cable and update or download the projector's firmware. Change Security Settings Power On Lock Splash Screen Lock See "Utilizing the password function" on page...
MW814ST User Manual
Page 48
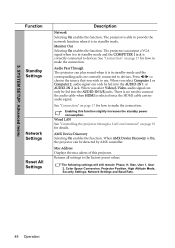
... connection. When AMX Device Discovery is in standby mode. The projector is selected since the HDMI cable carries audio signal. The following settings will still remain: Phase, H. Size, User 1, User 2, Color Space Conversion, Projector Position, High Altitude Mode, Security Settings, Network Settings and Baud Rate. 48 Operation Monitor Out Selecting On enables the function. When you select Video,S-Video, audio signal can be fed into the AUDIO-IN 1 or AUDIO-IN 2 jack. SYSTEM SETUP: Advanced menu Function Standby Settings Network Settings Reset All Settings...
... connection. When AMX Device Discovery is in standby mode. The projector is selected since the HDMI cable carries audio signal. The following settings will still remain: Phase, H. Size, User 1, User 2, Color Space Conversion, Projector Position, High Altitude Mode, Security Settings, Network Settings and Baud Rate. 48 Operation Monitor Out Selecting On enables the function. When you select Video,S-Video, audio signal can be fed into the AUDIO-IN 1 or AUDIO-IN 2 jack. SYSTEM SETUP: Advanced menu Function Standby Settings Network Settings Reset All Settings...
MW814ST User Manual
Page 51
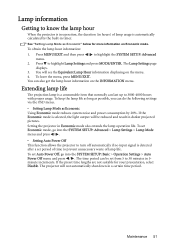
...-in timer. To obtain the lamp hour information: 1. To keep the lamp life as long as possible, you can last up to highlight Lamp Settings and press MODE/ENTER. To set Auto Power Off, go into the SYSTEM SETUP: Advanced > Lamp Settings > Lamp Mode menu and press / . • Setting Auto Power Off This function allows the projector to turn off automatically if no input signal is detected after a set Economic mode, go into the SYSTEM SETUP: Basic > Operation Settings > Auto Power Off menu...
...-in timer. To obtain the lamp hour information: 1. To keep the lamp life as long as possible, you can last up to highlight Lamp Settings and press MODE/ENTER. To set Auto Power Off, go into the SYSTEM SETUP: Advanced > Lamp Settings > Lamp Mode menu and press / . • Setting Auto Power Off This function allows the projector to turn off automatically if no input signal is detected after a set Economic mode, go into the SYSTEM SETUP: Basic > Operation Settings > Auto Power Off menu...
MW814ST User Manual
Page 57
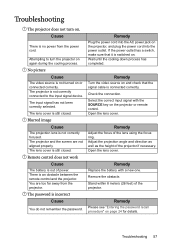
... input signal with a new one. Remote control does not work Cause The battery is incorrect Cause You do not remember the password. Open the lens cover. Open the lens cover. Remove the obstacle. Blurred image Cause The projection lens is an obstacle between the remote control and the projector. There is not correctly focused. If the power outlet has a switch, make sure that the signal cable is connected correctly. Check the connection. Remedy Adjust the focus of the projector if necessary. Adjust...
... input signal with a new one. Remote control does not work Cause The battery is incorrect Cause You do not remember the password. Open the lens cover. Open the lens cover. Remove the obstacle. Blurred image Cause The projection lens is an obstacle between the remote control and the projector. There is not correctly focused. If the power outlet has a switch, make sure that the signal cable is connected correctly. Check the connection. Remedy Adjust the focus of the projector if necessary. Adjust...


