
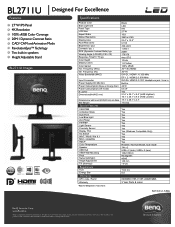
BL2711U Data Sheet
Page 1
...) Input Connector Power Supply (90~264 AC) Power Consumption (Base on Energy Star) Power Consumption (Off mode) K Locker Dimensions(HxWxD mm) Dimensions w wall mount (HxWxD mm) w/o base Net Weight Special Features CAD/CAM Animation Mode Auto Pivot Low Blue Light ZeroFlicker PIP/PBP Light Sensor Proximity Sensor Display Pilot AC Switch Win7 / Win8 / Win 8.1 MAC compatible HDCP Color Temperature Speaker USB Hub VESA Wall Mounting Pivot Swivel (left/right) Height Adjustment Tilt (down/up) Regulations TCO Energy Star Warranty UPC code / Part...
...) Input Connector Power Supply (90~264 AC) Power Consumption (Base on Energy Star) Power Consumption (Off mode) K Locker Dimensions(HxWxD mm) Dimensions w wall mount (HxWxD mm) w/o base Net Weight Special Features CAD/CAM Animation Mode Auto Pivot Low Blue Light ZeroFlicker PIP/PBP Light Sensor Proximity Sensor Display Pilot AC Switch Win7 / Win8 / Win 8.1 MAC compatible HDCP Color Temperature Speaker USB Hub VESA Wall Mounting Pivot Swivel (left/right) Height Adjustment Tilt (down/up) Regulations TCO Energy Star Warranty UPC code / Part...
2711U User Manual
Page 2
... hereof and specifically disclaims any warranties, merchantability or fitness for any particular purpose. Avoid using any means, electronic, mechanical, magnetic, optical, chemical, manual or otherwise, without obligation of BenQ Corporation. Always unplug your monitor from the AC supply. • The power supply cord serves as poor cable quality, unstable power supply, signal interference, or poor grounding, and not limited to time in installation unless...
... hereof and specifically disclaims any warranties, merchantability or fitness for any particular purpose. Avoid using any means, electronic, mechanical, magnetic, optical, chemical, manual or otherwise, without obligation of BenQ Corporation. Always unplug your monitor from the AC supply. • The power supply cord serves as poor cable quality, unstable power supply, signal interference, or poor grounding, and not limited to time in installation unless...

2711U User Manual
Page 4
... Copyright ...2 Getting started ...5 Getting to know your monitor 7 Front view...7 Back view ...7 Input and output ports...8 Connection ...9 How to assemble your monitor hardware 10 How to detach the stand and the base 16 Adjusting the monitor height ...18 Rotating the monitor ...19 Viewing angle adjustment ...20 Using the monitor wall mounting kit 21 Getting the most from your BenQ monitor 22 How to install the monitor on a new computer 23 How to upgrade the monitor on an...
... Copyright ...2 Getting started ...5 Getting to know your monitor 7 Front view...7 Back view ...7 Input and output ports...8 Connection ...9 How to assemble your monitor hardware 10 How to detach the stand and the base 16 Adjusting the monitor height ...18 Rotating the monitor ...19 Viewing angle adjustment ...20 Using the monitor wall mounting kit 21 Getting the most from your BenQ monitor 22 How to install the monitor on a new computer 23 How to upgrade the monitor on an...
2711U User Manual
Page 8
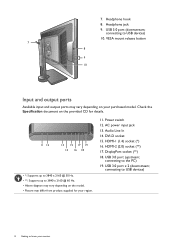
... diagram may differ from product supplied for your monitor HDMI-2 (2.0) socket (**) 17. USB 3.0 port (upstream; USB 3.0 port (downstream; Check the Specification document on the provided CD for details. 11 12 13 15 17 19 14 16 18 • *: Supports up to 3840 x 2160 @ 30 Hz. • **: Supports up to know your region. 11. connecting to the PC) 19. VESA mount release button 7 8 9 10 Input and output ports Available input...
... diagram may differ from product supplied for your monitor HDMI-2 (2.0) socket (**) 17. USB 3.0 port (upstream; USB 3.0 port (downstream; Check the Specification document on the provided CD for details. 11 12 13 15 17 19 14 16 18 • *: Supports up to 3840 x 2160 @ 30 Hz. • **: Supports up to know your region. 11. connecting to the PC) 19. VESA mount release button 7 8 9 10 Input and output ports Available input...

2711U User Manual
Page 19
... to assemble your PC, different procedures should be rotated 90 degrees. Click to launch the Display Pilot Software (installed from www.benq.com), and check Auto Pivot to set the display to rotate from the popup menu. Depending on the operating system on your monitor hardware 19 Refer to the maximum extended position. Select ON. Fully extend the monitor and tilt it to the help...
... to assemble your PC, different procedures should be rotated 90 degrees. Click to launch the Display Pilot Software (installed from www.benq.com), and check Auto Pivot to set the display to rotate from the popup menu. Depending on the operating system on your monitor hardware 19 Refer to the maximum extended position. Select ON. Fully extend the monitor and tilt it to the help...

2711U User Manual
Page 21
... complete the installation. Before starting to release the screws on the back cover. Detach the monitor stand as instructed in step 1~2 in the future, please keep the monitor base, monitor stand, and screws somewhere safe for future use of a magnetic-head screwdriver is stable to support the weight of the monitor. • Turn off the monitor and the power before disconnecting the cables from the LCD monitor. 1. Use a cross-pointed screwdriver to install a monitor wall mounting kit...
... complete the installation. Before starting to release the screws on the back cover. Detach the monitor stand as instructed in step 1~2 in the future, please keep the monitor base, monitor stand, and screws somewhere safe for future use of a magnetic-head screwdriver is stable to support the weight of the monitor. • Turn off the monitor and the power before disconnecting the cables from the LCD monitor. 1. Use a cross-pointed screwdriver to install a monitor wall mounting kit...
2711U User Manual
Page 22
... monitor driver software) with a newer monitor. At that point, click the Have Disk button, insert the BenQ LCD Monitor CD-ROM and select the appropriate monitor model. Follow the wizard instructions until it asks you are upgrading an existing installation (which version of Microsoft Windows you are using, and whether you are connecting the monitor and installing the software onto a new computer (without existing monitor driver software), or whether you to install the monitor driver software...
... monitor driver software) with a newer monitor. At that point, click the Have Disk button, insert the BenQ LCD Monitor CD-ROM and select the appropriate monitor model. Follow the wizard instructions until it asks you are upgrading an existing installation (which version of Microsoft Windows you are using, and whether you are connecting the monitor and installing the software onto a new computer (without existing monitor driver software), or whether you to install the monitor driver software...

2711U User Manual
Page 23
... prompts until it displays the option to it. Driver files BL2711 Suitable models BL2711U / BL2711UE / BL2711UH Getting the most from your monitor and click Next. 6. Look to confirm that has already had a monitor driver installed before , and for selecting and installing the BenQ LCD Monitor driver software on a new computer which has never been used before . If you should instead be following the instructions for CD...
... prompts until it displays the option to it. Driver files BL2711 Suitable models BL2711U / BL2711UE / BL2711UH Getting the most from your monitor and click Next. 6. Look to confirm that has already had a monitor driver installed before , and for selecting and installing the BenQ LCD Monitor driver software on a new computer which has never been used before . If you should instead be following the instructions for CD...
2711U User Manual
Page 24
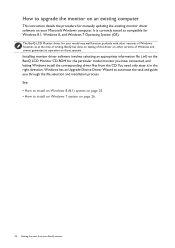
... from your BenQ monitor Windows has an Upgrade Device Driver Wizard to install on Windows 7 system on page 26. 24 Getting the most from the CD. The BenQ LCD Monitor driver for your Microsoft Windows computer. You need only steer it in the right direction. How to upgrade the monitor on an existing computer This instruction details the procedure for manually updating the existing monitor driver software on your model may well...
... from your BenQ monitor Windows has an Upgrade Device Driver Wizard to install on Windows 7 system on page 26. 24 Getting the most from the CD. The BenQ LCD Monitor driver for your Microsoft Windows computer. You need only steer it in the right direction. How to upgrade the monitor on an existing computer This instruction details the procedure for manually updating the existing monitor driver software on your model may well...
2711U User Manual
Page 25
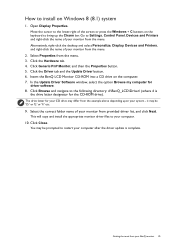
... the menu. 3. Click Generic PnP Monitor, and then the Properties button. 5. Click the Driver tab and the Update Driver button. 6. This will copy and install the appropriate monitor driver files to install on Windows 8 (8.1) system 1. How to your computer. 10. Open Display Properties. Alternatively, right-click the desktop and select Personalize, Display, Devices and Printers, and right-click the name of the screen or press the Windows + C buttons...
... the menu. 3. Click Generic PnP Monitor, and then the Properties button. 5. Click the Driver tab and the Update Driver button. 6. This will copy and install the appropriate monitor driver files to install on Windows 8 (8.1) system 1. How to your computer. 10. Open Display Properties. Alternatively, right-click the desktop and select Personalize, Display, Devices and Printers, and right-click the name of the screen or press the Windows + C buttons...
2711U User Manual
Page 26
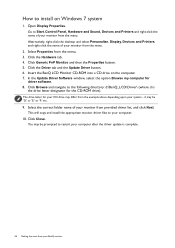
... menu. Go to Start, Control Panel, Hardware and Sound, Devices and Printers and right-click the name of your system - Click Generic PnP Monitor, and then the Properties button. 5. The drive letter for your CD drive may differ from the example above depending upon your monitor from provided driver list, and click Next. it may be 'D:' or 'E:' or 'F:' etc. 9. Open Display...
... menu. Go to Start, Control Panel, Hardware and Sound, Devices and Printers and right-click the name of your system - Click Generic PnP Monitor, and then the Properties button. 5. The drive letter for your CD drive may differ from the example above depending upon your monitor from provided driver list, and click Next. it may be 'D:' or 'E:' or 'F:' etc. 9. Open Display...

2711U User Manual
Page 28
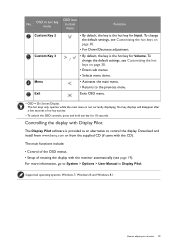
... keys and are designated for Picture Mode. No. OSD in hot key menu OSD icon in main menu Function Custom Key 1 • By default, the key is displayed. Basic menu operation All OSD (On Screen Display) menus can use the OSD menu to adjust all the settings on the menu options. Select (Menu) to make adjustments or selection. Press any of the control keys. 2. The hot key menu is the hot key for...
... keys and are designated for Picture Mode. No. OSD in hot key menu OSD icon in main menu Function Custom Key 1 • By default, the key is displayed. Basic menu operation All OSD (On Screen Display) menus can use the OSD menu to adjust all the settings on the menu options. Select (Menu) to make adjustments or selection. Press any of the control keys. 2. The hot key menu is the hot key for...
2711U User Manual
Page 29
... seconds. OSD in hot key menu OSD icon in Display Pilot. Supported operating systems: Windows 7, Windows 8, and Windows 8.1. The main functions include: • Control of the OSD menus. • Setup of no key activity. • To unlock the OSD controls, press and hold any key for Volume. To change the default settings, see page 19). Download and install from www.benq.com or from the supplied CD (if came with the monitor automatically...
... seconds. OSD in hot key menu OSD icon in Display Pilot. Supported operating systems: Windows 7, Windows 8, and Windows 8.1. The main functions include: • Control of the OSD menus. • Setup of no key activity. • To unlock the OSD controls, press and hold any key for Volume. To change the default settings, see page 19). Download and install from www.benq.com or from the supplied CD (if came with the monitor automatically...

2711U User Manual
Page 30
Adjusting display mode To display images of aspect ratio other than 16:9 and size other than the panel size of your MacBook series product While the monitor is complete. Go to Picture Advanced and Display Mode. (Menu) to Picture Advanced and Picture Mode. 3. Using Smart Scaling You can resize your monitor to the MacBook series product. 2. Connecting the monitor to your purchased model, you want to change the default setting and designate different functions for these keys...
Adjusting display mode To display images of aspect ratio other than 16:9 and size other than the panel size of your MacBook series product While the monitor is complete. Go to Picture Advanced and Display Mode. (Menu) to Picture Advanced and Picture Mode. 3. Using Smart Scaling You can resize your monitor to the MacBook series product. 2. Connecting the monitor to your purchased model, you want to change the default setting and designate different functions for these keys...

2711U User Manual
Page 38
Low Blue Light Decreases the blue light emitted from Picture Mode. User Applies a combination of picture settings defined by a projector. The screen will be divided into two windows; Displays the preview of screen images under the specified mode. • ON • OFF The function is to automatically detect the distribution of an input visual signal, and then to create the optimal contrast. 0 to 5 Slightly enlarges the input image. the left window demonstrates images of...
Low Blue Light Decreases the blue light emitted from Picture Mode. User Applies a combination of picture settings defined by a projector. The screen will be divided into two windows; Displays the preview of screen images under the specified mode. • ON • OFF The function is to automatically detect the distribution of an input visual signal, and then to create the optimal contrast. 0 to 5 Slightly enlarges the input image. the left window demonstrates images of...

2711U User Manual
Page 39
... input signal sources. Ideal for 16:9 aspect images. Adjusts the display size to fill the screen. Range The options under Display Mode will be displayed without scaling. Select an option that • RGB (0 ~ matches the RGB range setting on your needs. 0 ~ 100 Determines the range of 16:10 aspect ratio. Smart Scaling HDMI RGB PC Range Depending on the connected HDMI device. 255) • RGB (16 ~ 235) Navigating the main menu 39 Full Scales the input image...
... input signal sources. Ideal for 16:9 aspect images. Adjusts the display size to fill the screen. Range The options under Display Mode will be displayed without scaling. Select an option that • RGB (0 ~ matches the RGB range setting on your needs. 0 ~ 100 Determines the range of 16:10 aspect ratio. Smart Scaling HDMI RGB PC Range Depending on the connected HDMI device. 255) • RGB (16 ~ 235) Navigating the main menu 39 Full Scales the input image...

2711U User Manual
Page 43
...; Picture Mode • Animation • Low Blue Light • Display Mode • Brightness • Contrast • Volume • Mute • Input • Eye Protect • Eye Protect Meter • ECO Sensor • ECO Sensor Meter • Smart Reminder DDC/CI Allows the monitor settings to be set through the software • ON on the PC. • OFF DDC/CI, short for remote diagnostics. Otherwise, HDMI can...
...; Picture Mode • Animation • Low Blue Light • Display Mode • Brightness • Contrast • Volume • Mute • Input • Eye Protect • Eye Protect Meter • ECO Sensor • ECO Sensor Meter • Smart Reminder DDC/CI Allows the monitor settings to be set through the software • ON on the PC. • OFF DDC/CI, short for remote diagnostics. Otherwise, HDMI can...
2711U User Manual
Page 49
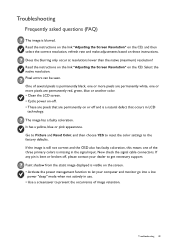
... the signal input. Pixel errors can be seen. Go to Picture and Reset Color, and then choose YES to reset the color settings to get necessary support. Now check the signal cable connectors. Read the instructions on the link "Adjusting the Screen Resolution" on the CD, and then select the correct resolution, refresh rate and make adjustments based on the CD. Read the instructions on the link "Adjusting the Screen Resolution" on these instructions. Select the native resolution. One of several pixels is...
... the signal input. Pixel errors can be seen. Go to Picture and Reset Color, and then choose YES to reset the color settings to get necessary support. Now check the signal cable connectors. Read the instructions on the link "Adjusting the Screen Resolution" on the CD, and then select the correct resolution, refresh rate and make adjustments based on the CD. Read the instructions on the link "Adjusting the Screen Resolution" on these instructions. Select the native resolution. One of several pixels is...

2711U User Manual
Page 50
... input sources, you are using a display mode that does not help, check the signal cable connectors. Read the instructions on the link "Adjusting the Screen Resolution" on the CD, and then select the correct resolution, refresh rate and make adjustments based on these instructions. And press any key for 10 seconds. Read the instructions on the link "Adjusting the Screen Resolution" on the CD, and then select the correct resolution, refresh rate and make adjustments based on these instructions. The LED indicator is white...
... input sources, you are using a display mode that does not help, check the signal cable connectors. Read the instructions on the link "Adjusting the Screen Resolution" on the CD, and then select the correct resolution, refresh rate and make adjustments based on these instructions. And press any key for 10 seconds. Read the instructions on the link "Adjusting the Screen Resolution" on the CD, and then select the correct resolution, refresh rate and make adjustments based on these instructions. The LED indicator is white...
2711U User Manual
Page 51
... monitor does not work well. • The ECO sensor is set to the monitor, the built-in Eco > ECO Sensor. Bright colors (especially white and fluorescent colors) reflect light and the sensor cannot detect the main light sources. Troubleshooting 51 Please check: • If you have removed the sensor protection sticker. • The colors and the materials of your clothes are connected to ON. You should turn...
... monitor does not work well. • The ECO sensor is set to the monitor, the built-in Eco > ECO Sensor. Bright colors (especially white and fluorescent colors) reflect light and the sensor cannot detect the main light sources. Troubleshooting 51 Please check: • If you have removed the sensor protection sticker. • The colors and the materials of your clothes are connected to ON. You should turn...


