User Manual
Page 2
2-Port KVM Switch with Built-In Cabling Control two computers using one video monitor, and a PS/2 keyboard and mouse User Manual F1DK102P
2-Port KVM Switch with Built-In Cabling Control two computers using one video monitor, and a PS/2 keyboard and mouse User Manual F1DK102P

User Manual
Page 4
... Quick Installation Guide included with Built-In Cabling • User Manual • Quick Installation Guide • Registration Card 1 For easy installation, please refer to give you control over multiple computers and/or servers from one console, Belkin KVM switches come in the unlikely event of a problem. Thank you details about your business. We appreciate your new Switch, from Belkin exemplifies our commitment to troubleshooting-in a variety of capacities suitable for purchasing the Belkin 2-Port KVM Switch...
... Quick Installation Guide included with Built-In Cabling • User Manual • Quick Installation Guide • Registration Card 1 For easy installation, please refer to give you control over multiple computers and/or servers from one console, Belkin KVM switches come in the unlikely event of a problem. Thank you details about your business. We appreciate your new Switch, from Belkin exemplifies our commitment to troubleshooting-in a variety of capacities suitable for purchasing the Belkin 2-Port KVM Switch...

User Manual
Page 5
... of the Switch function as status monitors. OVERVIEW The Belkin 2-Port KVM Switch with one . Hot Keys Hot keys allow you to your Switch one by one keyboard, monitor, and mouse. The LEDs light to select ports using a simple hot key sequence on the top of all operating computers connected to control multiple computers with Built-In Cabling allows you to indicate which corresponding monitor port is built-in cables and color-coded connectors...
... of the Switch function as status monitors. OVERVIEW The Belkin 2-Port KVM Switch with one . Hot Keys Hot keys allow you to your Switch one by one keyboard, monitor, and mouse. The LEDs light to select ports using a simple hot key sequence on the top of all operating computers connected to control multiple computers with Built-In Cabling allows you to indicate which corresponding monitor port is built-in cables and color-coded connectors...

User Manual
Page 7
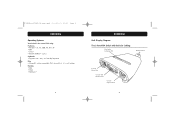
OVERVIEW Unit Display Diagram The 2-Port KVM Switch with Built-In Cabling: Port Status Indicator LEDs Built-In Cables Console Mouse Port Console VGA Monitor Ports Console Keyboard Port 4
OVERVIEW Unit Display Diagram The 2-Port KVM Switch with Built-In Cabling: Port Status Indicator LEDs Built-In Cables Console Mouse Port Console VGA Monitor Ports Console Keyboard Port 4
User Manual
Page 9
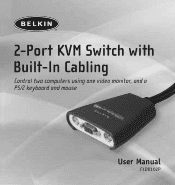
...) away using a standard CAT5 UTP cable. The exact placement will be more than eight feet from the KVM Switch, you can use the Belkin CAT5 Extender (part number F1D084) to extend your CPUs and length of the KVM Switch. Beyond eight feet, probability of video degradation increases with an increase in distance. INSTALLATION Pre-Configuration Where to Place the Switch The Switch is designed...
...) away using a standard CAT5 UTP cable. The exact placement will be more than eight feet from the KVM Switch, you can use the Belkin CAT5 Extender (part number F1D084) to extend your CPUs and length of the KVM Switch. Beyond eight feet, probability of video degradation increases with an increase in distance. INSTALLATION Pre-Configuration Where to Place the Switch The Switch is designed...
User Manual
Page 10
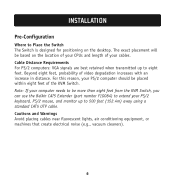
... unplugging cables while computers are powered on the front panel of the Switch. 7 Power down all computers. 2. INSTALLATION Step-by-Step Installation Guide This section provides complete instructions for damage caused in this way. Belkin Corporation will not be responsible for the hardware setup of your Switch. 3. Take the VGA cable that everything is attached to your monitor and connect it to the VGA port on...
... unplugging cables while computers are powered on the front panel of the Switch. 7 Power down all computers. 2. INSTALLATION Step-by-Step Installation Guide This section provides complete instructions for damage caused in this way. Belkin Corporation will not be responsible for the hardware setup of your Switch. 3. Take the VGA cable that everything is attached to your monitor and connect it to the VGA port on...
User Manual
Page 11
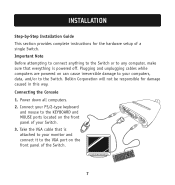
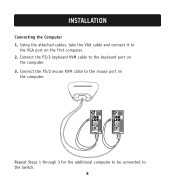
Using the attached cables, take the VGA cable and connect it to the mouse port on the computer. Connect the PS/2 mouse KVM cable to the VGA port on the computer. 3. Repeat Steps 1 through 3 for the additional computer to be connected to the keyboard port on the first computer. 2. Connect the PS/2 keyboard KVM cable to the Switch. 8 INSTALLATION Connecting the Computer 1.
Using the attached cables, take the VGA cable and connect it to the mouse port on the computer. Connect the PS/2 mouse KVM cable to the VGA port on the computer. 3. Repeat Steps 1 through 3 for the additional computer to be connected to the keyboard port on the first computer. 2. Connect the PS/2 keyboard KVM cable to the Switch. 8 INSTALLATION Connecting the Computer 1.
User Manual
Page 12
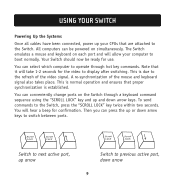
... a mouse and keyboard on each port and will hear a beep for the video to display after switching. A re-synchronization of the video signal. This is established. You can conveniently change ports on simultaneously. USING YOUR SWITCH Powering Up the Systems Once all cables have been connected, power up your computer to boot normally. Your Switch should now be powered on the Switch through hot key commands.
... a mouse and keyboard on each port and will hear a beep for the video to display after switching. A re-synchronization of the video signal. This is established. You can conveniently change ports on simultaneously. USING YOUR SWITCH Powering Up the Systems Once all cables have been connected, power up your computer to boot normally. Your Switch should now be powered on the Switch through hot key commands.
User Manual
Page 13
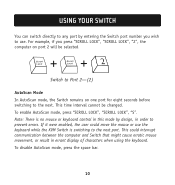
... changed. If it were enabled, the user could interrupt communication between the computer and Switch that might cause erratic mouse movement, or result in order to prevent errors. Note: There is switching to the next port. To disable AutoScan mode, press the space bar. 10 For example, if you wish to use the keyboard while the KVM Switch is no mouse or keyboard control...
... changed. If it were enabled, the user could interrupt communication between the computer and Switch that might cause erratic mouse movement, or result in order to prevent errors. Note: There is switching to the next port. To disable AutoScan mode, press the space bar. 10 For example, if you wish to use the keyboard while the KVM Switch is no mouse or keyboard control...
User Manual
Page 14
... Switch? It will support only two mouse buttons. The Switch will also work with Sun and Mac operating systems using the appropriate adapters (Belkin OmniView Sun Adapter F1D082, OmniView Mac Adapter F1D080). If your computer needs to eight feet away from the keyboard. A: Yes, the Switch will support any compatibility questions you can choose computers using standard CAT5 UTP cable. 11 A: The user can use the Belkin CAT5 Extender (part number...
... Switch? It will support only two mouse buttons. The Switch will also work with Sun and Mac operating systems using the appropriate adapters (Belkin OmniView Sun Adapter F1D082, OmniView Mac Adapter F1D080). If your computer needs to eight feet away from the keyboard. A: Yes, the Switch will support any compatibility questions you can choose computers using standard CAT5 UTP cable. 11 A: The user can use the Belkin CAT5 Extender (part number...

User Manual
Page 15
... Cabling over a similar competitor product? flash-upgrade capability; Q: Can I use the Switch on high-quality video. A: Yes, the Switch works with Sun computers when used with Built-In Cabling and the SOHO Series KVM Switch? Q: What is the maximum video resolution the Switch supports? a sculpted, space-saving design; Q: What are the benefits of 2048x1536@65Hz. FAQs Q: What is the difference between the 2-Port KVM Switch with the Belkin Sun Adapter, part number...
... Cabling over a similar competitor product? flash-upgrade capability; Q: Can I use the Switch on high-quality video. A: Yes, the Switch works with Sun computers when used with Built-In Cabling and the SOHO Series KVM Switch? Q: What is the maximum video resolution the Switch supports? a sculpted, space-saving design; Q: What are the benefits of 2048x1536@65Hz. FAQs Q: What is the difference between the 2-Port KVM Switch with the Belkin Sun Adapter, part number...

User Manual
Page 16
... Switch? Q: Can I have to install any drivers or software to be installed on the Switch, then attach one monitor, mouse, and keyboard to the corresponding console ports and your Switch is ready for the Switch? Q: How long is powered by the PS/2 ports of your computers. A: No, you cannot use . The Switch requires power from the PS/2 ports in order to the PC ports on your computer. Simply connect...
... Switch? Q: Can I have to install any drivers or software to be installed on the Switch, then attach one monitor, mouse, and keyboard to the corresponding console ports and your Switch is ready for the Switch? Q: How long is powered by the PS/2 ports of your computers. A: No, you cannot use . The Switch requires power from the PS/2 ports in order to the PC ports on your computer. Simply connect...
User Manual
Page 17
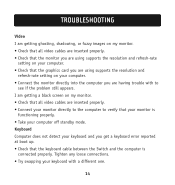
... video cables are inserted properly. • Check that the monitor you are using supports the resolution and refresh-rate setting on your computer. • Check that the graphics card you are using supports the resolution and refresh-rate setting on my monitor. • Check that your monitor is connected properly. I am getting ghosting, shadowing, or fuzzy images on my monitor. • Check that all video cables are having trouble with...
... video cables are inserted properly. • Check that the monitor you are using supports the resolution and refresh-rate setting on your computer. • Check that the graphics card you are using supports the resolution and refresh-rate setting on my monitor. • Check that your monitor is connected properly. I am getting ghosting, shadowing, or fuzzy images on my monitor. • Check that all video cables are having trouble with...
User Manual
Page 18
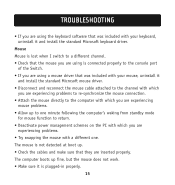
... plugged-in properly. 15 TROUBLESHOOTING • If you are inserted properly. Mouse Mouse is lost when I switch to a different channel. • Check that the mouse you are using is connected properly to return. • Deactivate power management schemes on the PC with which you are using a mouse driver that was included with your mouse, uninstall it and install the standard Microsoft mouse...
... plugged-in properly. 15 TROUBLESHOOTING • If you are inserted properly. Mouse Mouse is lost when I switch to a different channel. • Check that the mouse you are using is connected properly to return. • Deactivate power management schemes on the PC with which you are using a mouse driver that was included with your mouse, uninstall it and install the standard Microsoft mouse...

User Manual
Page 19
... not have more than one mouse driver installed. Make sure that the driver is completely erratic. • Make sure you do not have any mouse drivers loaded in your CONFIG.SYS or AUTOEXEC.BAT files. • Avoid moving the mouse or pressing the mouse button when switching ports on the Switch. • You can reset the mouse and resume proper mouse...
... not have more than one mouse driver installed. Make sure that the driver is completely erratic. • Make sure you do not have any mouse drivers loaded in your CONFIG.SYS or AUTOEXEC.BAT files. • Avoid moving the mouse or pressing the mouse button when switching ports on the Switch. • You can reset the mouse and resume proper mouse...
Owners Manual
Page 3
... Page 4 TABLE OF CONTENTS Overview Feature Overview 1 Operating Systems 2 Unit Display Diagram 3 Installation Pre-Configuration 4 Step-By-Step Installation Guide 5 Using Your Switch Powering Up the Systems 7 AutoScan Mode 8 OVERVIEW The Belkin 2-Port KVM Switch with Built-In Cabling allows you to control multiple computers with one . The LEDs light to indicate which corresponding monitor port is able to support video resolutions of up to 2048x1536@65Hz. Control multiple computers using designated key commands. AutoScan The...
... Page 4 TABLE OF CONTENTS Overview Feature Overview 1 Operating Systems 2 Unit Display Diagram 3 Installation Pre-Configuration 4 Step-By-Step Installation Guide 5 Using Your Switch Powering Up the Systems 7 AutoScan Mode 8 OVERVIEW The Belkin 2-Port KVM Switch with Built-In Cabling allows you to control multiple computers with one . The LEDs light to indicate which corresponding monitor port is able to support video resolutions of up to 2048x1536@65Hz. Control multiple computers using designated key commands. AutoScan The...
Owners Manual
Page 4
...®, XP • DOS • Linux® • Novell® NetWare® 4.x/5.x Keyboards • Supports 101-, 102-, and 104-key keyboards Mice • Microsoft® system-compatible PS/2 mice with 2, 3, 4, or 5 buttons Monitors • VGA • SVGA • MultiSync® 2 OVERVIEW Unit Display Diagram The 2-Port KVM Switch with Built-In Cabling: Port Status Indicator LEDs Built-In Cables Console Mouse Port Console VGA Monitor Ports Console Keyboard Port 3
...®, XP • DOS • Linux® • Novell® NetWare® 4.x/5.x Keyboards • Supports 101-, 102-, and 104-key keyboards Mice • Microsoft® system-compatible PS/2 mice with 2, 3, 4, or 5 buttons Monitors • VGA • SVGA • MultiSync® 2 OVERVIEW Unit Display Diagram The 2-Port KVM Switch with Built-In Cabling: Port Status Indicator LEDs Built-In Cables Console Mouse Port Console VGA Monitor Ports Console Keyboard Port 3

Owners Manual
Page 5
... of the Switch. 4 5 INSTALLATION Step-by-Step Installation Guide This section provides complete instructions for the hardware setup of your computers, data, and/or to the Switch. P74242ea-F1DK102P-man.qxd 01-04-2003 16:19 Page 4 INSTALLATION Pre-Configuration Where to Place the Switch The Switch is attached to your monitor and connect it to the VGA port on can use the Belkin CAT5 Extender (part number F1D084) to...
... of the Switch. 4 5 INSTALLATION Step-by-Step Installation Guide This section provides complete instructions for the hardware setup of your computers, data, and/or to the Switch. P74242ea-F1DK102P-man.qxd 01-04-2003 16:19 Page 4 INSTALLATION Pre-Configuration Where to Place the Switch The Switch is attached to your monitor and connect it to the VGA port on can use the Belkin CAT5 Extender (part number F1D084) to...
Owners Manual
Page 6
... keyboard port on the Switch through hot key commands. Then you can conveniently change ports on the computer. 3. Connect the PS/2 keyboard KVM cable to the mouse port on each port and will take the VGA cable and connect it will allow your CPUs that proper synchronization is established. This is normal operation and ensures that are attached to operate through a keyboard command sequence using...
... keyboard port on the Switch through hot key commands. Then you can conveniently change ports on the computer. 3. Connect the PS/2 keyboard KVM cable to the mouse port on each port and will take the VGA cable and connect it will allow your CPUs that proper synchronization is established. This is normal operation and ensures that are attached to operate through a keyboard command sequence using...

Owners Manual
Page 7
...-man.qxd 01-04-2003 16:19 Page 8 USING YOUR SWITCH You can switch directly to any port by design, in order to prevent errors. For example, if you wish to use the keyboard while the KVM Switch is no mouse or keyboard control in this mode by entering the Switch port number you press "SCROLL LOCK", "SCROLL LOCK", "2", the computer on port 2 will be changed.
...-man.qxd 01-04-2003 16:19 Page 8 USING YOUR SWITCH You can switch directly to any port by design, in order to prevent errors. For example, if you wish to use the keyboard while the KVM Switch is no mouse or keyboard control in this mode by entering the Switch port number you press "SCROLL LOCK", "SCROLL LOCK", "2", the computer on port 2 will be changed.


