
User Manual
Page 1
The OmniView™ SE 4-Port User Manual P72464 F1D104
The OmniView™ SE 4-Port User Manual P72464 F1D104

User Manual
Page 2
.../2 MAC Adapter™ • No software required • One year product warranty Package Contents OmniView™ SE 4-Port 9VDC, 600mA power supply This manual Registration card F1D104 F1D065-PWR P72464 P72009 1 The OmniView™ SE puts you in image quality. And if you wish to control a Macintosh computer, simply add the Belkin MAC Adapter™ for each computer automatically • Front-panel status LEDs • Works...
.../2 MAC Adapter™ • No software required • One year product warranty Package Contents OmniView™ SE 4-Port 9VDC, 600mA power supply This manual Registration card F1D104 F1D065-PWR P72464 P72009 1 The OmniView™ SE puts you in image quality. And if you wish to control a Macintosh computer, simply add the Belkin MAC Adapter™ for each computer automatically • Front-panel status LEDs • Works...

User Manual
Page 3
F (-20 ~ 60 deg. C) 0~80% RH, non-condensing 2 Technical Specifications Console Connectors: Keyboard: Mouse: Monitor: 6 pin Mini DIN female 6 pin Mini DIN female (for PS/2 mouse) DB9 male (for spare serial mouse) HDDB15 female Computer Port Connectors: Keyboard: Mouse: Monitor: 6 pin Mini DIN female 6 pin Mini DIN female (for PS/2 mouse) DB9 male (for serial mouse) HDDB15 male Dimensions: Width: Height: Depth: 9.5" (237 mm) 2.3" (58 mm) 6.0" (153 mm) Weight: Operating Temp: Storage Temp: Humidity: 2.5 lbs (1.1 kg) 32 to 140 deg. F (0~40 deg. C) -4 to 104 deg.
F (-20 ~ 60 deg. C) 0~80% RH, non-condensing 2 Technical Specifications Console Connectors: Keyboard: Mouse: Monitor: 6 pin Mini DIN female 6 pin Mini DIN female (for PS/2 mouse) DB9 male (for spare serial mouse) HDDB15 female Computer Port Connectors: Keyboard: Mouse: Monitor: 6 pin Mini DIN female 6 pin Mini DIN female (for PS/2 mouse) DB9 male (for serial mouse) HDDB15 male Dimensions: Width: Height: Depth: 9.5" (237 mm) 2.3" (58 mm) 6.0" (153 mm) Weight: Operating Temp: Storage Temp: Humidity: 2.5 lbs (1.1 kg) 32 to 140 deg. F (0~40 deg. C) -4 to 104 deg.

User Manual
Page 4
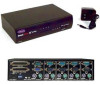
Product Detail FRONT PANEL Current Active Port LED Indicators Current Active Bank LED Indicators Bank Select / Scan Button Port Select Button REAR PANEL SLAVE INPUT DB25 Daisy-chain port MASTER INPUT SLAVE OUTPUT DB25 Daisy-chain port CONSOLE connectors PC PORT connectors Serial mouse output VGA signal output DC power jack VGA monitor connector DIP switches Keyboard connector Optional serial mouse connector PS/2 mouse connector Keyboard output PS/2 mouse output 3
Product Detail FRONT PANEL Current Active Port LED Indicators Current Active Bank LED Indicators Bank Select / Scan Button Port Select Button REAR PANEL SLAVE INPUT DB25 Daisy-chain port MASTER INPUT SLAVE OUTPUT DB25 Daisy-chain port CONSOLE connectors PC PORT connectors Serial mouse output VGA signal output DC power jack VGA monitor connector DIP switches Keyboard connector Optional serial mouse connector PS/2 mouse connector Keyboard output PS/2 mouse output 3

User Manual
Page 5
... of mouse port your computer uses. Below are the Belkin part numbers and their descriptions. for monitor port HDDB15 male/female with thumbscrews Part# A3H981-XX • PS/2 to PS/2 keyboard adapter 5 pin DIN female/6 pin Mini DIN male Part# F2N017 5 pin DIN Female 6 pin Mini DIN Male Other Cables and Adapters: • High-resolution/high-refresh rate VGA cable for use with ferrite Part # F1D108...
... of mouse port your computer uses. Below are the Belkin part numbers and their descriptions. for monitor port HDDB15 male/female with thumbscrews Part# A3H981-XX • PS/2 to PS/2 keyboard adapter 5 pin DIN female/6 pin Mini DIN male Part# F2N017 5 pin DIN Female 6 pin Mini DIN Male Other Cables and Adapters: • High-resolution/high-refresh rate VGA cable for use with ferrite Part # F1D108...

User Manual
Page 6
... connect anything to the HDDB15 female port on the back of the OmniView™ SE labeled with the monitor symbol at the CONSOLE section. NOTE: "ON" is powered off another unit, use the MASTER bank setting. Using the attached cable, or the one OmniView™ SE, use a unique slave setting. DIP switches 1 & 2 set scantime. See the USAGE section regarding multiple OmniView™ SE units. Belkin...
... connect anything to the HDDB15 female port on the back of the OmniView™ SE labeled with the monitor symbol at the CONSOLE section. NOTE: "ON" is powered off another unit, use the MASTER bank setting. Using the attached cable, or the one OmniView™ SE, use a unique slave setting. DIP switches 1 & 2 set scantime. See the USAGE section regarding multiple OmniView™ SE units. Belkin...

User Manual
Page 7
Back of PC F2N025-XX-T 6 Back of OmniView™ SE Back of OmniView™ SE PS/2 Style Keyboard PS/2 Mouse 5. Hardware Installation (continued) 4. Connect the keyboard and mouse to the OmniView™ SE. Connect the first computer's VGA cable to the OmniView™ SE. If you have an AT-style keyboard, you will need an AT-PS/2 adapter (Belkin Part# F2N017). Using the VGA cable (Belkin Part# F2N025-XX-T or A3H981-XX), connect the male end of the cable to the VGA port on the computer, and the female end on the PC1 VGA port at the back of OmniView™ SE.
Back of PC F2N025-XX-T 6 Back of OmniView™ SE Back of OmniView™ SE PS/2 Style Keyboard PS/2 Mouse 5. Hardware Installation (continued) 4. Connect the keyboard and mouse to the OmniView™ SE. Connect the first computer's VGA cable to the OmniView™ SE. If you have an AT-style keyboard, you will need an AT-PS/2 adapter (Belkin Part# F2N017). Using the VGA cable (Belkin Part# F2N025-XX-T or A3H981-XX), connect the male end of the cable to the VGA port on the computer, and the female end on the PC1 VGA port at the back of OmniView™ SE.

User Manual
Page 8
... If using a PS/2 cable (Belkin Part# F2N036-XX), connect one end to the PS/2 keyboard port on the computer, and the other end to PS/2 keyboard adapter (Belkin Part# F2N017). Plug this into any available AC outlet. Connect the first computer's mouse cable to the power supply connector at...the keyboard and mouse cables go to the OmniView™ SE. You should see the LED or Port 1 on the back of PC 8. Double check all the connections. Hardware Installation (continued) 6. If using a PS/2 cable (Belkin Part# F2N036-XX), connect one end to the PS/2 mouse port on the computer, ...
... If using a PS/2 cable (Belkin Part# F2N036-XX), connect one end to the PS/2 keyboard port on the computer, and the other end to PS/2 keyboard adapter (Belkin Part# F2N017). Plug this into any available AC outlet. Connect the first computer's mouse cable to the power supply connector at...the keyboard and mouse cables go to the OmniView™ SE. You should see the LED or Port 1 on the back of PC 8. Double check all the connections. Hardware Installation (continued) 6. If using a PS/2 cable (Belkin Part# F2N036-XX), connect one end to the PS/2 mouse port on the computer, ...

User Manual
Page 9
... work, as well as the MASTER (BANK 0). The DIP switches must be set as the image displayed on the monitor. You can be daisy-chained to additional units for control over more information. BANK numbers range from 1 through 3 are using the OmniView™ SE in the process of the cable connections. BANK 0 is in a single-unit configuration, it must be set...
... work, as well as the MASTER (BANK 0). The DIP switches must be set as the image displayed on the monitor. You can be daisy-chained to additional units for control over more information. BANK numbers range from 1 through 3 are using the OmniView™ SE in the process of the cable connections. BANK 0 is in a single-unit configuration, it must be set...

User Manual
Page 10
...8482; PRO is an 8-Port, 19" (48.3cm) rackmountable OmniView™, having the same features as the MASTER unit, 15 more OmniView™ units (SE and/or PRO) can be used as well. BANKs 4 to the master. The OmniView™ PRO is used by OmniView™ SE ...units. Daisy-Chaining the OmniView™ SE: 9 Only BANKs 1 to cascade with an OmniView™ PRO ™ Bank 0 (Master) 1 2 3 4 5 6 7 8 CONSOLE Keyboard, mouse and monitor Bank 1 (slave) Bank 2 (slave) 9 10 11 12 13 ...
...8482; PRO is an 8-Port, 19" (48.3cm) rackmountable OmniView™, having the same features as the MASTER unit, 15 more OmniView™ units (SE and/or PRO) can be used as well. BANKs 4 to the master. The OmniView™ PRO is used by OmniView™ SE ...units. Daisy-Chaining the OmniView™ SE: 9 Only BANKs 1 to cascade with an OmniView™ PRO ™ Bank 0 (Master) 1 2 3 4 5 6 7 8 CONSOLE Keyboard, mouse and monitor Bank 1 (slave) Bank 2 (slave) 9 10 11 12 13 ...

User Manual
Page 11
...8226; Verify that the MASTER unit has detected the new slave by pressing the BANK/SCAN and CHANNEL buttons simultaneously. DO NOT POWER UP THE COMPUTERS YET. • Connect the power supply to initialize the unit. This is necessary to the OmniView™ SE, and plug it detected... the unit's bank address setting. • Using the F1D108-CBL daisy-chain cable, connect one end to the "Master Input / Slave Output" of times to cycle through the preexisting slave units before reaching the newly added unit. • Now you can power up and working properly. Refer to the diagram above...
...8226; Verify that the MASTER unit has detected the new slave by pressing the BANK/SCAN and CHANNEL buttons simultaneously. DO NOT POWER UP THE COMPUTERS YET. • Connect the power supply to initialize the unit. This is necessary to the OmniView™ SE, and plug it detected... the unit's bank address setting. • Using the F1D108-CBL daisy-chain cable, connect one end to the "Master Input / Slave Output" of times to cycle through the preexisting slave units before reaching the newly added unit. • Now you can power up and working properly. Refer to the diagram above...

User Manual
Page 12
Daisy-Chained Operation (continued) Daisy-Chaining the OmniView™ SE: Cable 1 MASTER (Bank 0) Cable 2 slave (Bank 1) Cable 3 slave (Bank 2) slave (Bank 3) 11
Daisy-Chained Operation (continued) Daisy-Chaining the OmniView™ SE: Cable 1 MASTER (Bank 0) Cable 2 slave (Bank 1) Cable 3 slave (Bank 2) slave (Bank 3) 11

User Manual
Page 13
... button cycles you through all the active BANKs (if there are the different commands: Switch to PREVIOUS ACTIVE port (on the same BANK) Switch to NEXT ACTIVE port (on the same BANK) Switch to the PREVIOUS BANK (by default, selects first active port on that BANK) Switch to the NEXT BANK (by default, selects first active port on BANK X. (x={0-3}, y={1-4}) 12 Keyboard "Hot" Key commands...
... button cycles you through all the active BANKs (if there are the different commands: Switch to PREVIOUS ACTIVE port (on the same BANK) Switch to NEXT ACTIVE port (on the same BANK) Switch to the PREVIOUS BANK (by default, selects first active port on that BANK) Switch to the NEXT BANK (by default, selects first active port on BANK X. (x={0-3}, y={1-4}) 12 Keyboard "Hot" Key commands...

User Manual
Page 14
... necessary to the next port, data flow is PC # 8. Otherwise, if the user is moving the mouse or using the table below , that is interrupted and will be "0". Usage (continued) You can switch directly to a SCAN_TIME interval you press [SCROLL LOCK] [SCROLL LOCK] [2] [2], the computer on PORT 2 of AutoScan mode, press the [SPACEBAR]. 13 Set DIP switches 1 & 2 using the keyboard when the...
... necessary to the next port, data flow is PC # 8. Otherwise, if the user is moving the mouse or using the table below , that is interrupted and will be "0". Usage (continued) You can switch directly to a SCAN_TIME interval you press [SCROLL LOCK] [SCROLL LOCK] [2] [2], the computer on PORT 2 of AutoScan mode, press the [SPACEBAR]. 13 Set DIP switches 1 & 2 using the keyboard when the...

User Manual
Page 15
... driver is for information on my monitor. A: • Check the cables and make sure that the PS/2 mouse port (or IRQ) is enabled. • Make sure the mouse is working properly. Replace your computer/motherboard documentation making sure that the power adapter is plugged in the correct ports. • Check your VGA cables with coaxial, double-shielded cables such as Belkin A3H981-XX. • Check to a KVM switch. A: • Check...
... driver is for information on my monitor. A: • Check the cables and make sure that the PS/2 mouse port (or IRQ) is enabled. • Make sure the mouse is working properly. Replace your computer/motherboard documentation making sure that the power adapter is plugged in the correct ports. • Check your VGA cables with coaxial, double-shielded cables such as Belkin A3H981-XX. • Check to a KVM switch. A: • Check...

User Manual
Page 16
... console) is set for about 2-3 seconds, and plugging it is a true PS/2 mouse. If the mouse pointer still does not move , then there maybe no IRQ or base address conflicts with more than 2 operational buttons, use generic PS/2 mouse drivers. A: • Check the cables and make sure they are no serial mouse drivers installed, or the serial port on the front panel. • Switch...
... console) is set for about 2-3 seconds, and plugging it is a true PS/2 mouse. If the mouse pointer still does not move , then there maybe no IRQ or base address conflicts with more than 2 operational buttons, use generic PS/2 mouse drivers. A: • Check the cables and make sure they are no serial mouse drivers installed, or the serial port on the front panel. • Switch...

User Manual
Page 17
.... Troubleshooting (continued) work just as long as a second mouse) at the optional serial mouse input port. A serial- This is set for a Standard Serial or Microsoft®-compatible serial mouse. • Avoid using PS/2 mouse ports, you can plug in a serial mouse (as it in your config.sys or autoexec.bat files. • Avoid moving the mouse or pressing the mouse buttons when switching ports. • Reset the...
.... Troubleshooting (continued) work just as long as a second mouse) at the optional serial mouse input port. A serial- This is set for a Standard Serial or Microsoft®-compatible serial mouse. • Avoid using PS/2 mouse ports, you can plug in a serial mouse (as it in your config.sys or autoexec.bat files. • Avoid moving the mouse or pressing the mouse buttons when switching ports. • Reset the...

User Manual
Page 18
... by turning the equipment off and on a circuit different from state to you may cause harmful interference to part 15 of the following measures: • Reorient or relocate the receiving antenna. • Increase separation between the equipment and receiver. • Connect the equipment into an outlet on , the user is authorized to make any Belkin serial number...
... by turning the equipment off and on a circuit different from state to you may cause harmful interference to part 15 of the following measures: • Reorient or relocate the receiving antenna. • Increase separation between the equipment and receiver. • Connect the equipment into an outlet on , the user is authorized to make any Belkin serial number...


