
Instruction Manual
Page 1
Avanti has a policy of The Mackle Co., Inc. La sección en español empieza en la página 18. Box 520604 - Miami, Florida 33152 www.avantiproducts.com Avanti Products, A Division of continuous improvement on its products and reserves the right to change materials and specifications without notice. MICROWAVE OVEN INSTRUCTION MANUAL MANUAL DE INSTRUCCIONES Models / Modelos: MO7191TW / MO7192TB BEFORE USE, PLEASE READ AND FOLLOW ALL SAFETY RULES AND OPERATING INSTRUCTIONS. P.O.
Avanti has a policy of The Mackle Co., Inc. La sección en español empieza en la página 18. Box 520604 - Miami, Florida 33152 www.avantiproducts.com Avanti Products, A Division of continuous improvement on its products and reserves the right to change materials and specifications without notice. MICROWAVE OVEN INSTRUCTION MANUAL MANUAL DE INSTRUCCIONES Models / Modelos: MO7191TW / MO7192TB BEFORE USE, PLEASE READ AND FOLLOW ALL SAFETY RULES AND OPERATING INSTRUCTIONS. P.O.

Instruction Manual
Page 2
Help Us Help You TABLE OF CONTENTS Parts and Features Important Safety Instructions Installation Instructions Before Using Your Microwave Oven Installation of Your Microwave Oven Safety Precautions Electrical Connection Operating Your Microwave Oven Control Panel Operation Procedure Cooking Techniques Care and Maintenance Cleaning Your Microwave Oven Problems with Your Microwave Oven? Troubleshooting Guide Service for Your Microwave Oven Avanti Microwave Oven Warranty Instrucctiones en Español Registration Information and Registration Card 3 4 5 6 6 6 6 - 7 8 8 9 10 - 14 14 ...
Help Us Help You TABLE OF CONTENTS Parts and Features Important Safety Instructions Installation Instructions Before Using Your Microwave Oven Installation of Your Microwave Oven Safety Precautions Electrical Connection Operating Your Microwave Oven Control Panel Operation Procedure Cooking Techniques Care and Maintenance Cleaning Your Microwave Oven Problems with Your Microwave Oven? Troubleshooting Guide Service for Your Microwave Oven Avanti Microwave Oven Warranty Instrucctiones en Español Registration Information and Registration Card 3 4 5 6 6 6 6 - 7 8 8 9 10 - 14 14 ...

Instruction Manual
Page 3
... serial numbers. It lists causes of Purchase Model Number Serial Number Use these numbers in any correspondence or service calls concerning your microwave oven. FIRST, contact the people who serviced your microwave oven. It is intended to follow for service, check the Troubleshooting Guide. If you don't understand something or you call : Avanti Customer Service 800-220-5570 Keep proof of the microwave oven. You'll find them on a label located on the rear wall...
... serial numbers. It lists causes of Purchase Model Number Serial Number Use these numbers in any correspondence or service calls concerning your microwave oven. FIRST, contact the people who serviced your microwave oven. It is intended to follow for service, check the Troubleshooting Guide. If you don't understand something or you call : Avanti Customer Service 800-220-5570 Keep proof of the microwave oven. You'll find them on a label located on the rear wall...

Instruction Manual
Page 4
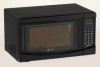
Parts and Features MO7191TW / MO7192TB 76 2 5 4 3 1 1 Door Safety Lock System 2 Oven Window 3 Turntable Roller Ring 4 Door Release Button 5 Control Panel 6 Vent 7 Glass Tray 4
Parts and Features MO7191TW / MO7192TB 76 2 5 4 3 1 1 Door Safety Lock System 2 Oven Window 3 Turntable Roller Ring 4 Door Release Button 5 Control Panel 6 Vent 7 Glass Tray 4

Instruction Manual
Page 5
... boiling point without appearing to heat, cook, or dry food. See GROUNDING INSTRUCTIONS. Install or locate the appliance only in accordance with the provided installation instructions. When cleaning surfaces of oven is not working properly, or if it is specifically designed to be boiling. Contact the nearest authorized service facility for examination, repair or adjustment. Do not cover or block any other...
... boiling point without appearing to heat, cook, or dry food. See GROUNDING INSTRUCTIONS. Install or locate the appliance only in accordance with the provided installation instructions. When cleaning surfaces of oven is not working properly, or if it is specifically designed to be boiling. Contact the nearest authorized service facility for examination, repair or adjustment. Do not cover or block any other...
Instruction Manual
Page 6
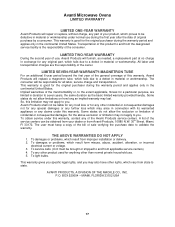
... rear wall to ensure the proper ventilation. DO NOT remove the turn-table drive shaft. SAFETY PRECAUTIONS PRECAUTIONS TO AVOID POSSIBLE EXPOSURE TO EXCESSIVE MICROWAVE ENERGY (a) Do not attempt to operate this oven with the door-open since open-door operation can result in Cavity If any of the following parts: Glass Tray Turntable Roller Assembly (Roller or Roller Ring) Instruction Manual Inspect the oven...
... rear wall to ensure the proper ventilation. DO NOT remove the turn-table drive shaft. SAFETY PRECAUTIONS PRECAUTIONS TO AVOID POSSIBLE EXPOSURE TO EXCESSIVE MICROWAVE ENERGY (a) Do not attempt to operate this oven with the door-open since open-door operation can result in Cavity If any of the following parts: Glass Tray Turntable Roller Assembly (Roller or Roller Ring) Instruction Manual Inspect the oven...

Instruction Manual
Page 7
... oven, you will be pierced before cooking or defrosting in the oven, touch the START/STOP pad and LEAVE THE DOOR CLOSED. Disconnect the power cord, or shut off power at the fuse or circuit breaker panel. DO NOT attempt to the oven for these absorb excess moisture and prevent splattering. They may cause arcing. Leave a small opening for microwave ovens. If food is present to consume. COOKING TIMES...
... oven, you will be pierced before cooking or defrosting in the oven, touch the START/STOP pad and LEAVE THE DOOR CLOSED. Disconnect the power cord, or shut off power at the fuse or circuit breaker panel. DO NOT attempt to the oven for these absorb excess moisture and prevent splattering. They may cause arcing. Leave a small opening for microwave ovens. If food is present to consume. COOKING TIMES...

Instruction Manual
Page 8
... to accumulate on an opened , the door must be grounded. If the power supply cord is properly grounded. This appliance is properly installed and grounded. Warning Improper use the extension cord. Never use abrasive powders or pads. When opened door or any circumstances cut or remove the third ground prong from the power cord supplied. Do not operate the oven if it is...
... to accumulate on an opened , the door must be grounded. If the power supply cord is properly grounded. This appliance is properly installed and grounded. Warning Improper use the extension cord. Never use abrasive powders or pads. When opened door or any circumstances cut or remove the third ground prong from the power cord supplied. Do not operate the oven if it is...

Instruction Manual
Page 10
... START/STOP pad is opened during the oven operation, all previous settings if touched before the number pads. Touch to medium - Touch to sound four beeps every two minutes until the door is first plugged in a suitable container, open the oven door and put it is firmly closed and the program has been set times or amounts. CONTROL PANEL FEATURE DISPLAY PRE-PROGRAMMED COOKING MODES POWER DEFROST BY WEIGHT SPEED DEFROST TIMER NUMBER PADS (0-9) CLOCK RESET START/STOP DESCRIPTION Electronic display shows Cooking Time, Cooking Power, Time Remaining in place during cooking...
... START/STOP pad is opened during the oven operation, all previous settings if touched before the number pads. Touch to medium - Touch to sound four beeps every two minutes until the door is first plugged in a suitable container, open the oven door and put it is firmly closed and the program has been set times or amounts. CONTROL PANEL FEATURE DISPLAY PRE-PROGRAMMED COOKING MODES POWER DEFROST BY WEIGHT SPEED DEFROST TIMER NUMBER PADS (0-9) CLOCK RESET START/STOP DESCRIPTION Electronic display shows Cooking Time, Cooking Power, Time Remaining in place during cooking...

Instruction Manual
Page 11
...). 4. Touch START/STOP. SETTING CHILD LOCK: To set cooking time. TIMER: Use to cancel the selected power level, cook or defrost times previously programmed. START/STOP: Touch to not have the clock displayed, touch RESET. Enter the amount of day clock is in progress by touching the number pads. NOTE: Time countdown can check the clock time while cooking is touched. NOTE: END OF OPERATION- The oven light and cooking fan will turn off. The oven will operate. If you selected 12 hour clock system, the digital clock allows you to set...
...). 4. Touch START/STOP. SETTING CHILD LOCK: To set cooking time. TIMER: Use to cancel the selected power level, cook or defrost times previously programmed. START/STOP: Touch to not have the clock displayed, touch RESET. Enter the amount of day clock is in progress by touching the number pads. NOTE: Time countdown can check the clock time while cooking is touched. NOTE: END OF OPERATION- The oven light and cooking fan will turn off. The oven will operate. If you selected 12 hour clock system, the digital clock allows you to set...

Instruction Manual
Page 12
..., 4 beeps sound and END appears in display. Touch RESET pad or open door to start cooking. Digital timer sets minutes and seconds from left to right so a single digit can set a cooking power level: Number pad 9 8 7 6 5 4 3 2 1 Cooking power 90% 80% 70% 60% 50% 40% 30% 20% 10% B. Touch START/STOP. To program 2-stage, 3-stage or 4stage cooking, repeat the one second to clear END before starting another cooking function. Touch START/STOP pad. Ounce weights less than 100% power, touch POWER, then use...
..., 4 beeps sound and END appears in display. Touch RESET pad or open door to start cooking. Digital timer sets minutes and seconds from left to right so a single digit can set a cooking power level: Number pad 9 8 7 6 5 4 3 2 1 Cooking power 90% 80% 70% 60% 50% 40% 30% 20% 10% B. Touch START/STOP. To program 2-stage, 3-stage or 4stage cooking, repeat the one second to clear END before starting another cooking function. Touch START/STOP pad. Ounce weights less than 100% power, touch POWER, then use...

Instruction Manual
Page 13
... mugs: 1. Touch FROZEN DINNER twice. 2. Touch POPCORN. 2. potatoes: 1. CODE and 0:55 (55 sec.) appears. 2. Touch PIZZA twice. BEVERAGE For 4 to 5 oz. Touch BEVERAGE once. 2. QUICK COOK (PRE-PROGRAMMED) SETTINGS The QUICK COOK settings allow you to cook or reheat food automatically without entering power level or time. Touch START/STOP. potatoes: 1. Enter number of potatoes by touching number pads from 1 to 4. Touch BAKED POTATO once. 2. Enter number of mugs by touching number pads from 1 to 4. Touch BEVERAGE twice. 2. Heating a whole...
... mugs: 1. Touch FROZEN DINNER twice. 2. Touch POPCORN. 2. potatoes: 1. CODE and 0:55 (55 sec.) appears. 2. Touch PIZZA twice. BEVERAGE For 4 to 5 oz. Touch BEVERAGE once. 2. QUICK COOK (PRE-PROGRAMMED) SETTINGS The QUICK COOK settings allow you to cook or reheat food automatically without entering power level or time. Touch START/STOP. potatoes: 1. Enter number of potatoes by touching number pads from 1 to 4. Touch BAKED POTATO once. 2. Enter number of mugs by touching number pads from 1 to 4. Touch BEVERAGE twice. 2. Heating a whole...

Instruction Manual
Page 14
... Foods cooked in display. Touch RESET or open the door to help them cook. 14 Adding Moisture Microwave energy is not sufficiently hot. After total defrosting time, 4 signals sound and END appears in the microwave build up internal heat and continue to heat with good results. Turning Turn foods over when oven signals twice. Touch NUMBER pads (1-7) to select the amount (3 oz.) of water to dry food to stir your food. Continue to cook for defrosting...
... Foods cooked in display. Touch RESET or open the door to help them cook. 14 Adding Moisture Microwave energy is not sufficiently hot. After total defrosting time, 4 signals sound and END appears in the microwave build up internal heat and continue to heat with good results. Turning Turn foods over when oven signals twice. Touch NUMBER pads (1-7) to select the amount (3 oz.) of water to dry food to stir your food. Continue to cook for defrosting...

Instruction Manual
Page 15
... from your oven by combining a cup of the oven door, wipe with a damp cloth. Cooking vapors collect during repeated use detergents, abrasives or spray-on cleaners on . If steam accumulates inside or around the outside oven surfaces should be allowed to seep into the ventilation openings. Do not allow the control panel to replace it replaced. 15 Mild detergent may be cleaned with...
... from your oven by combining a cup of the oven door, wipe with a damp cloth. Cooking vapors collect during repeated use detergents, abrasives or spray-on cleaners on . If steam accumulates inside or around the outside oven surfaces should be allowed to seep into the ventilation openings. Do not allow the control panel to replace it replaced. 15 Mild detergent may be cleaned with...

Instruction Manual
Page 16
... problem before calling the servicer. The door is unplugged. The circuit breaker tripped or a blown fuse. Just call . PROBLEMS WITH YOUR APPLIANCE? The light does not work. Vibrations. Check to assure that is level. AVANTI PRODUCTS CUSTOMER SERVICES Product Information 800-323-5029 Part Orders 800-220-5570 In-Home Repair Service 800-220-5570 Whatever your appliance inside and out. 16 An Avanti Products authorized service...
... problem before calling the servicer. The door is unplugged. The circuit breaker tripped or a blown fuse. Just call . PROBLEMS WITH YOUR APPLIANCE? The light does not work. Vibrations. Check to assure that is level. AVANTI PRODUCTS CUSTOMER SERVICES Product Information 800-323-5029 Part Orders 800-220-5570 In-Home Repair Service 800-220-5570 Whatever your appliance inside and out. 16 An Avanti Products authorized service...
Instruction Manual
Page 17
... of use, Avanti Products will replace a magnetron tube, which fails due to a defect in material or workmanship. LIMITED SEVEN-YEAR WARRANTY-MAGNETRON TUBE For an additional 6-year period beyond the first year of the general coverage of the Avanti Products service centers. Avanti Products shall not be liable for any food loss or for any other than normal private household use during the warranty...
... of use, Avanti Products will replace a magnetron tube, which fails due to a defect in material or workmanship. LIMITED SEVEN-YEAR WARRANTY-MAGNETRON TUBE For an additional 6-year period beyond the first year of the general coverage of the Avanti Products service centers. Avanti Products shall not be liable for any food loss or for any other than normal private household use during the warranty...

Instruction Manual
Page 31
...Avanti Registration Form Name Model # Serial # Address Date Purchased Store/Dealer Name City State Zip Occupation Area Code Phone Number As Your Primary Residence, Do You: Own Rent Did You Purchase An Additional Warranty: Extended None Reason For Choosing This Avanti...- Please fill out this product. Price Product Features Avanti Reputation Product Quality Salesperson Recommendation Friend/Relative Recommendation Warranty Other Your Age: under ...
...Avanti Registration Form Name Model # Serial # Address Date Purchased Store/Dealer Name City State Zip Occupation Area Code Phone Number As Your Primary Residence, Do You: Own Rent Did You Purchase An Additional Warranty: Extended None Reason For Choosing This Avanti...- Please fill out this product. Price Product Features Avanti Reputation Product Quality Salesperson Recommendation Friend/Relative Recommendation Warranty Other Your Age: under ...

