Instruction Manual
Page 8
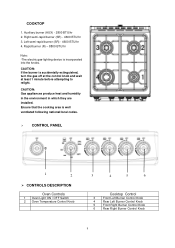
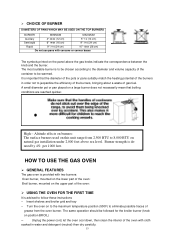
...are installed. Rapid burner (R) - 8800 BTU/hr Note: -The electric gas-lighting device is accidentally extinguished, turn the gas off at the control knob and wait at least 1 minute before attempting to relight. Left semi-rapid burner (SR) - 4600 BTU/hr 4. CAUTION: If the burner is... incorporated into the knobs. COOKTOP 1. Auxiliary burner (AUX) - 2800 BTU/hr 2. Ensure that the cooking area is well ventilated following national/local codes. CONTROL PANEL 1...
...are installed. Rapid burner (R) - 8800 BTU/hr Note: -The electric gas-lighting device is accidentally extinguished, turn the gas off at the control knob and wait at least 1 minute before attempting to relight. Left semi-rapid burner (SR) - 4600 BTU/hr 4. CAUTION: If the burner is... incorporated into the knobs. COOKTOP 1. Auxiliary burner (AUX) - 2800 BTU/hr 2. Ensure that the cooking area is well ventilated following national/local codes. CONTROL PANEL 1...
Instruction Manual
Page 11
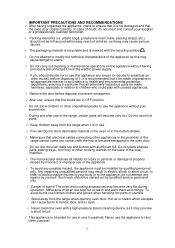
... packaging material is recyclable and is marked with unused appliances. √ Remove the door before disposal to prevent entrapment.. √ After use, ensure that the knobs are kept out of burns! Do not touch hot parts. √ Keep children away from the range when it is in use the appliance for...
... packaging material is recyclable and is marked with unused appliances. √ Remove the door before disposal to prevent entrapment.. √ After use, ensure that the knobs are kept out of burns! Do not touch hot parts. √ Keep children away from the range when it is in use the appliance for...
Instruction Manual
Page 14
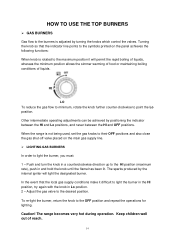
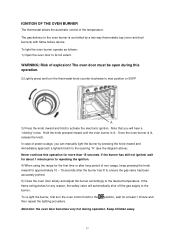
... their OFF positions and also close the gas shut-off valve placed on the panel achieves the following functions: When knob is adjusted by turning the knobs which control the valves. In the event that the indicator line points to the symbols printed on the main gas supply line. ... LIGHTING GAS BURNERS In order to light the burner in the HI position, try again with the knob in and hold the knob until the flame has been lit. Turning the knob so that the local gas supply conditions make it will light the designated burner. Other intermediate operating adjustments can...
... their OFF positions and also close the gas shut-off valve placed on the panel achieves the following functions: When knob is adjusted by turning the knobs which control the valves. In the event that the indicator line points to the symbols printed on the main gas supply line. ... LIGHTING GAS BURNERS In order to light the burner in the HI position, try again with the knob in and hold the knob until the flame has been lit. Turning the knob so that the local gas supply conditions make it will light the designated burner. Other intermediate operating adjustments can...
Instruction Manual
Page 15
...) - The most suitable burner is to be chosen according to the diameter and volume capacity of the container to be followed for the broiler burner (knob on the upper part of the oven: USING THE OVEN FOR THE FIRST TIME It is provided with cloth soaked in order not to... detergent (neutral) then dry carefully. 15 High - Altitude effects on burners: The surface burners used on natural gas installation under 2,000 feet above the gas knobs indicate the correspondence between the...
...) - The most suitable burner is to be chosen according to the diameter and volume capacity of the container to be followed for the broiler burner (knob on the upper part of the oven: USING THE OVEN FOR THE FIRST TIME It is provided with cloth soaked in order not to... detergent (neutral) then dry carefully. 15 High - Altitude effects on burners: The surface burners used on natural gas installation under 2,000 feet above the gas knobs indicate the correspondence between the...

Instruction Manual
Page 16
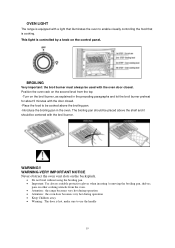
To regulate the temperature, set the gas knobs to their positions and also close the gas shut-off valve placed on the control panel indicate the increasing oven temperature value (°F). The probe ... line. The gas flow to the burner is assured by a thermostat which allows to turn on the knob Corresponding Temperature in °F temperature in the control of time, set the chosen number onto the control knob indicator. OVEN BURNER Carries out normal "oven cooking". GAS OVEN SETTING Number printed on the broil...
To regulate the temperature, set the gas knobs to their positions and also close the gas shut-off valve placed on the control panel indicate the increasing oven temperature value (°F). The probe ... line. The gas flow to the burner is assured by a thermostat which allows to turn on the knob Corresponding Temperature in °F temperature in the control of time, set the chosen number onto the control knob indicator. OVEN BURNER Carries out normal "oven cooking". GAS OVEN SETTING Number printed on the broil...
Instruction Manual
Page 17
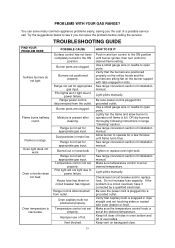
...see the diagram above). Keep children away. 17 The oven door must be open during operation. Hold the knob pressed inward until the oven burner is lit, release the knob. IGNITION OF THE OVEN BURNER The thermostat allows the automatic control of power outage, you will automatically shut off...two way thermostatic tap (oven and broil burners) with flame-failure device. The gas delivery to the oven burner is controlled by pressing the knob inward and immediately approach a lighted match to the then repeat the lighting procedure. To light the oven burner operate as follows: 1) Open ...
...see the diagram above). Keep children away. 17 The oven door must be open during operation. Hold the knob pressed inward until the oven burner is lit, release the knob. IGNITION OF THE OVEN BURNER The thermostat allows the automatic control of power outage, you will automatically shut off...two way thermostatic tap (oven and broil burners) with flame-failure device. The gas delivery to the oven burner is controlled by pressing the knob inward and immediately approach a lighted match to the then repeat the lighting procedure. To light the oven burner operate as follows: 1) Open ...

Instruction Manual
Page 18
...food, when the oven has reached the desired temperature. Keep children away. 18 Note that you can manually light the burner by pressing the knob inward and immediately approach a lighted match to ensure the gas valve has been accurately primed. 5) Slowly close the oven door. Once the ...oven burner is lit. To re-light the burner, first turn the thermostat knob clockwise to the broil position. Attention: the oven door becomes very hot during this operation for approximately 10 - 15 seconds after the burner ...
...food, when the oven has reached the desired temperature. Keep children away. 18 Note that you can manually light the burner by pressing the knob inward and immediately approach a lighted match to ensure the gas valve has been accurately primed. 5) Slowly close the oven door. Once the ...oven burner is lit. To re-light the burner, first turn the thermostat knob clockwise to the broil position. Attention: the oven door becomes very hot during this operation for approximately 10 - 15 seconds after the burner ...
Instruction Manual
Page 19
... broil burner. WARNING!! OVEN LIGHT The range is equipped with a light that illuminates the oven to enable visually controlling the food that is controlled by a knob on the control panel. WARNING-VERY IMPORTANT NOTICE Never obstruct the oven vent slots on the backsplash. • Do not broil without using the broiling...
... broil burner. WARNING!! OVEN LIGHT The range is equipped with a light that illuminates the oven to enable visually controlling the food that is controlled by a knob on the control panel. WARNING-VERY IMPORTANT NOTICE Never obstruct the oven vent slots on the backsplash. • Do not broil without using the broiling...
Instruction Manual
Page 24
... outlet. Vent blocked. Be sure power cord is set at the desired temperature. See range conversion section of installation manual. Make sure the temperature control knob is plugged into a grounded outlet. Keep foil clear of oven sides. TROUBLESHOOTING GUIDE FIND YOUR PROBLEM HERE Surface burners do not light. Flame is inaccurate...
... outlet. Vent blocked. Be sure power cord is set at the desired temperature. See range conversion section of installation manual. Make sure the temperature control knob is plugged into a grounded outlet. Keep foil clear of oven sides. TROUBLESHOOTING GUIDE FIND YOUR PROBLEM HERE Surface burners do not light. Flame is inaccurate...
Parts and Accessories
Page 1
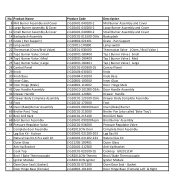
... - Pan Support Lamp switch Thermostat Valve ( Oven / Broil Valve ) Tap ( Burner Valve ) Small Tap ( Burner Valve ) Med Tap ( Burner Valve ) Large Control Panel Knob Knob Base Inner Glass Door Hinge Male Door Handle Assembly Drawer Handle Drawer Body Complete Assembly Foot Oven (Bake) Burner Broiler Pan (also called 'Bake Tray... Valve) 23 Tap ( Burner Valve ) Small 24 Tap ( Burner Valve ) Med 25 Tap ( Burner Valve ) Large 28 Control Panel 29 Knob 30 Knob Base 33 Inner Glass 39 Door Hinge (Male) 43 Door Handle Assembly 46 Drawer Handle 47 Drawer Body Complete Assembly 56 Foot 58 Oven (Bake...
... - Pan Support Lamp switch Thermostat Valve ( Oven / Broil Valve ) Tap ( Burner Valve ) Small Tap ( Burner Valve ) Med Tap ( Burner Valve ) Large Control Panel Knob Knob Base Inner Glass Door Hinge Male Door Handle Assembly Drawer Handle Drawer Body Complete Assembly Foot Oven (Bake) Burner Broiler Pan (also called 'Bake Tray... Valve) 23 Tap ( Burner Valve ) Small 24 Tap ( Burner Valve ) Med 25 Tap ( Burner Valve ) Large 28 Control Panel 29 Knob 30 Knob Base 33 Inner Glass 39 Door Hinge (Male) 43 Door Handle Assembly 46 Drawer Handle 47 Drawer Body Complete Assembly 56 Foot 58 Oven (Bake...