Instruction Manual
Page 1
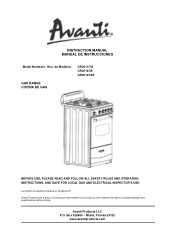
de Modelos: GR2011CW GR2012CB GR2013CSS GAS RANGE COCINA DE GAS BEFORE USE, PLEASE READ AND FOLLOW ALL SAFETY RULES AND OPERATING INSTRUCTIONS. Avanti Products LLC P.O. AND SAVE FOR LOCAL GAS AND ELECTRICAL INSPECTOR'S USE. Box 520604 - La sección en español empieza en la página 27 Avanti Products has a policy of continuous improvement on its products and reserves the right to change materials and specifications without notice. INSTRUCTION MANUAL MANUAL DE INSTRUCCIONES Model Numbers / Nos. Miami, Florida 33152 www.avantiproducts.com
de Modelos: GR2011CW GR2012CB GR2013CSS GAS RANGE COCINA DE GAS BEFORE USE, PLEASE READ AND FOLLOW ALL SAFETY RULES AND OPERATING INSTRUCTIONS. Avanti Products LLC P.O. AND SAVE FOR LOCAL GAS AND ELECTRICAL INSPECTOR'S USE. Box 520604 - La sección en español empieza en la página 27 Avanti Products has a policy of continuous improvement on its products and reserves the right to change materials and specifications without notice. INSTRUCTION MANUAL MANUAL DE INSTRUCCIONES Model Numbers / Nos. Miami, Florida 33152 www.avantiproducts.com
Instruction Manual
Page 3
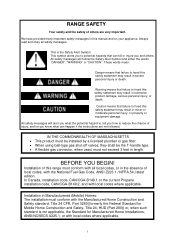
...! Always read and obey all local codes, or in extensive product damage, serious personal injury, or death. IN THE COMMONWEALTH OF MASSACHUSETTS • This product must be installed by a licensed plumber or gas fitter. • When using ball-type gas shut-off valves, they shall be the T-handle type. • A flexible gas connector, when used, must not exceed 3 feet in...
...! Always read and obey all local codes, or in extensive product damage, serious personal injury, or death. IN THE COMMONWEALTH OF MASSACHUSETTS • This product must be installed by a licensed plumber or gas fitter. • When using ball-type gas shut-off valves, they shall be the T-handle type. • A flexible gas connector, when used, must not exceed 3 feet in...

Instruction Manual
Page 4
... cleaning and maintenance operations, make several adjustments to work properly. Do not push against any part of ventilation air. • Disconnect the electrical supply to repair or replace any of the edges of the unit is disconnected. • Unplug the appliance or disconnect power before servicing. • When removing appliance for cleaning and/or service: • Disconnect AC power supply. • Carefully remove the range by pulling outward. IMPORTANT SAFE GUIDES...
... cleaning and maintenance operations, make several adjustments to work properly. Do not push against any part of ventilation air. • Disconnect the electrical supply to repair or replace any of the edges of the unit is disconnected. • Unplug the appliance or disconnect power before servicing. • When removing appliance for cleaning and/or service: • Disconnect AC power supply. • Carefully remove the range by pulling outward. IMPORTANT SAFE GUIDES...
Instruction Manual
Page 8
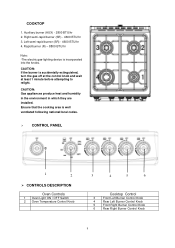
...- 4600 BTU/hr 3. Left semi-rapid burner (SR) - 4600 BTU/hr 4. CAUTION: Gas appliances produce heat and humidity in the environment in which they are installed. Ensure that the cooking area is well ventilated following national/local codes. CONTROL PANEL 1 2 CONTROLS DESCRIPTION Oven Controls 1 Oven Light ON / OFF Switch 2 Oven Temperature Control Knob 3 4 5 6 Cooktop Control 3 Front Left Burner Control Knob 4 Rear Left Burner Control Knob 5 Front Right Burner Control Knob 6 Rear Right Burner Control Knob 8 Auxiliary burner (AUX) - 2800 BTU/hr 2. COOKTOP...
...- 4600 BTU/hr 3. Left semi-rapid burner (SR) - 4600 BTU/hr 4. CAUTION: Gas appliances produce heat and humidity in the environment in which they are installed. Ensure that the cooking area is well ventilated following national/local codes. CONTROL PANEL 1 2 CONTROLS DESCRIPTION Oven Controls 1 Oven Light ON / OFF Switch 2 Oven Temperature Control Knob 3 4 5 6 Cooktop Control 3 Front Left Burner Control Knob 4 Rear Left Burner Control Knob 5 Front Right Burner Control Knob 6 Rear Right Burner Control Knob 8 Auxiliary burner (AUX) - 2800 BTU/hr 2. COOKTOP...

Instruction Manual
Page 9
... THIS RANGE INSTALLED BY A QUALIFIED INSTALLER. Consult a qualified installer, service agency, or the gas supplier. Before Using Your Gas Range √Remove the exterior and interior packing. √Remove the protective film on steel and aluminum parts √Check to shut it is specifically recommended in the burner assembly ● 1 Broiler Grid ● 1 Broiler Tray ● 1 Regulator(Pre-installed) ● 5 Screws for Backsplash ● 1 Instruction Manual ● 1 Installation Manual √ Clean the interior surface...
... THIS RANGE INSTALLED BY A QUALIFIED INSTALLER. Consult a qualified installer, service agency, or the gas supplier. Before Using Your Gas Range √Remove the exterior and interior packing. √Remove the protective film on steel and aluminum parts √Check to shut it is specifically recommended in the burner assembly ● 1 Broiler Grid ● 1 Broiler Tray ● 1 Regulator(Pre-installed) ● 5 Screws for Backsplash ● 1 Instruction Manual ● 1 Installation Manual √ Clean the interior surface...
Instruction Manual
Page 10
... the instructions carefully before installing and using the appliance. a semi commercial, commercial or communal environment. The appliance guarantee will be installed in a permanently ventilated room in water and detergent (neutral, then dry carefully). √ Furnish the interior of the oven by inserting the shelves and tray. √ Turn the oven on to the maximum temperature to follow these instructions: √ Clean the...
... the instructions carefully before installing and using the appliance. a semi commercial, commercial or communal environment. The appliance guarantee will be installed in a permanently ventilated room in water and detergent (neutral, then dry carefully). √ Furnish the interior of the oven by inserting the shelves and tray. √ Turn the oven on to the maximum temperature to follow these instructions: √ Clean the...
Instruction Manual
Page 11
... range, certain parts will become very hot. Never use the appliance for use in the oven door. √ Do not line the oven walls top and bottom with aluminium foil. IMPORTANT PRECAUTIONS AND RECOMMENDATIONS √ After having previously disconnected it from the electric power supply. √ If you should decide not to use this appliance any longer (or decide to substitute an older model...
... range, certain parts will become very hot. Never use the appliance for use in the oven door. √ Do not line the oven walls top and bottom with aluminium foil. IMPORTANT PRECAUTIONS AND RECOMMENDATIONS √ After having previously disconnected it from the electric power supply. √ If you should decide not to use this appliance any longer (or decide to substitute an older model...
Instruction Manual
Page 12
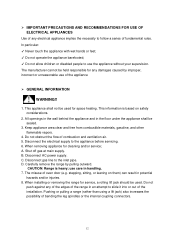
... the appliance GENERAL INFORMATION WARNING!! 1. Disconnect the electrical supply to slide it into or out of the installation. B. When installing or removing the range for space heating. Shut off gas at main supply. This information is heavy; D. use the appliance without your supervision. In particular: ✓ Never touch the appliance with wet hands or feet; ✓ Do not operate the appliance barefooted; ✓...
... the appliance GENERAL INFORMATION WARNING!! 1. Disconnect the electrical supply to slide it into or out of the installation. B. When installing or removing the range for space heating. Shut off gas at main supply. This information is heavy; D. use the appliance without your supervision. In particular: ✓ Never touch the appliance with wet hands or feet; ✓ Do not operate the appliance barefooted; ✓...
Instruction Manual
Page 13
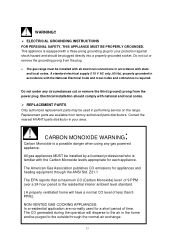
... local codes. REPLACEMENT PARTS Only authorized replacement parts may be installed with all electrical connections in performing service on the range. The CO generated during the operation will have a normal CO level of less than 5 PPM.) NON-VENTED GAS COOKING APPLIANCES: In a residential application are available from factory authorized parts distributors. A standard electrical supply (115 V AC only, 60 Hz), properly grounded in the home and be plugged directly into...
... local codes. REPLACEMENT PARTS Only authorized replacement parts may be installed with all electrical connections in performing service on the range. The CO generated during the operation will have a normal CO level of less than 5 PPM.) NON-VENTED GAS COOKING APPLIANCES: In a residential application are available from factory authorized parts distributors. A standard electrical supply (115 V AC only, 60 Hz), properly grounded in the home and be plugged directly into...
Instruction Manual
Page 14
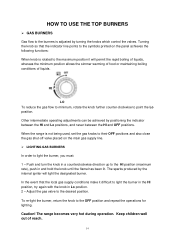
... main gas supply line. LIGHTING GAS BURNERS In order to light the burner, you must: 1 - Caution! Push and turn the knob in a counterclockwise direction up to the HI position (maximum rate), push in Lo position. 2 - The sparks produced by positioning the indicator between the HI and Lo positions, and never between the HI and OFF positions. The range becomes very hot during operation. Adjust the gas valve to...
... main gas supply line. LIGHTING GAS BURNERS In order to light the burner, you must: 1 - Caution! Push and turn the knob in a counterclockwise direction up to the HI position (maximum rate), push in Lo position. 2 - The sparks produced by positioning the indicator between the HI and Lo positions, and never between the HI and OFF positions. The range becomes very hot during operation. Adjust the gas valve to...
Instruction Manual
Page 15
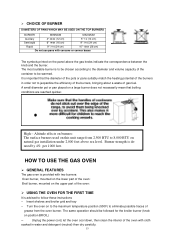
... gas fuel. The same operation should be followed for the broiler burner (knob on a large burner does not necessarily mean that the diameter of the pots or pans suitably match the heating potential of the burners in water and detergent (neutral) then dry carefully. 15 Burner strength is provided with two burners: Oven burner, mounted on the lower part of the oven: Broil burner, mounted on the panel above sea level...
... gas fuel. The same operation should be followed for the broiler burner (knob on a large burner does not necessarily mean that the diameter of the pots or pans suitably match the heating potential of the burners in water and detergent (neutral) then dry carefully. 15 Burner strength is provided with two burners: Oven burner, mounted on the lower part of the oven: Broil burner, mounted on the panel above sea level...

Instruction Manual
Page 16
... the temperature is regulated by a thermostatic probe positioned inside the oven. NOTE: When the range will not be used always with the door closed. 16 OVEN BURNER Carries out normal "oven cooking". To regulate the temperature, set the gas knobs to turn on the broil burner. GAS OVEN SETTING Number printed on the knob Corresponding Temperature in °F temperature in the control of time, set the chosen number onto the control knob indicator. VERY IMPORTANT: The oven/broil shall be always kept in its housing, in a clean...
... the temperature is regulated by a thermostatic probe positioned inside the oven. NOTE: When the range will not be used always with the door closed. 16 OVEN BURNER Carries out normal "oven cooking". To regulate the temperature, set the gas knobs to turn on the broil burner. GAS OVEN SETTING Number printed on the knob Corresponding Temperature in °F temperature in the control of time, set the chosen number onto the control knob indicator. VERY IMPORTANT: The oven/broil shall be always kept in its housing, in a clean...
Instruction Manual
Page 17
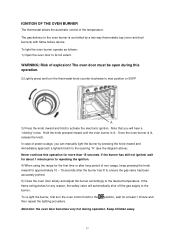
... the ignition. 4) When using the range for approximately 10 - 15 seconds after the burner has lit to ensure the gas valve has been accurately primed. 5) Close the oven door slowly and adjust the burner accordingly to the burner. Note that you can manually light the burner by a two way thermostatic tap (oven and broil burners) with flame-failure device. Never continue this operation. 2) Lightly press and turn the oven control knob to the opening "A" (see the diagram...
... the ignition. 4) When using the range for approximately 10 - 15 seconds after the burner has lit to ensure the gas valve has been accurately primed. 5) Close the oven door slowly and adjust the burner accordingly to the burner. Note that you can manually light the burner by a two way thermostatic tap (oven and broil burners) with flame-failure device. Never continue this operation. 2) Lightly press and turn the oven control knob to the opening "A" (see the diagram...

Instruction Manual
Page 18
... burner, first turn off the gas supply to the broil position. OVEN COOKING Before introducing the food, preheat the oven to the desired temperature For a correct preheating operation, it is advisable to remove the tray from the oven and introduce it together with oven door closed. Keep children away. 18 Check the cooking time and turn the oven control knob to the then repeat the lighting procedure. The oven door must be open during operation. Hold the knob...
... burner, first turn off the gas supply to the broil position. OVEN COOKING Before introducing the food, preheat the oven to the desired temperature For a correct preheating operation, it is advisable to remove the tray from the oven and introduce it together with oven door closed. Keep children away. 18 Check the cooking time and turn the oven control knob to the then repeat the lighting procedure. The oven door must be open during operation. Hold the knob...
Instruction Manual
Page 19
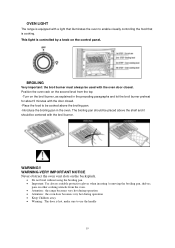
... a light that illuminates the oven to use the handle 19 OVEN LIGHT The range is equipped with the broil burner. WARNING-VERY IMPORTANT NOTICE Never obstruct the oven vent slots on the backsplash. • Do not broil without using the broiling pan. • Important: Use always suitable protective gloves when inserting / removing the broiling pan, shelves, pans on other cooking utensils from the top -Turn on the control panel. This light is controlled by a knob on the broil burner...
... a light that illuminates the oven to use the handle 19 OVEN LIGHT The range is equipped with the broil burner. WARNING-VERY IMPORTANT NOTICE Never obstruct the oven vent slots on the backsplash. • Do not broil without using the broiling pan. • Important: Use always suitable protective gloves when inserting / removing the broiling pan, shelves, pans on other cooking utensils from the top -Turn on the control panel. This light is controlled by a knob on the broil burner...

Instruction Manual
Page 20
... the enameled parts must be cleaned with a chamois leather. Note: regular use could cause discoloring around the burners, because of operating faults in the gas valves, shut the main gas supply and call the Service Department. 20 With the oven warm, wipe the inside walls with a cloth soaked in mind that its operation for 30 minutes on the surfaces. STAINLESS STEEL ELEMENTS Stainless steel parts must be...
... the enameled parts must be cleaned with a chamois leather. Note: regular use could cause discoloring around the burners, because of operating faults in the gas valves, shut the main gas supply and call the Service Department. 20 With the oven warm, wipe the inside walls with a cloth soaked in mind that its operation for 30 minutes on the surfaces. STAINLESS STEEL ELEMENTS Stainless steel parts must be...
Instruction Manual
Page 23
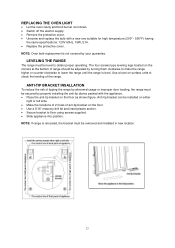
REPLACING THE OVEN LIGHT • Let the oven cavity and broil burner cool down. • Switch off the electric supply. • Remove the protective cover. • Unscrew and replace the bulb with the appliance. • Place the anti-tip bracket on the floor as shown figure. NOTE: If range is not covered by your guarantee. ANTI-TIP BRACKET INSALLATION To reduce the risk of ant-tip bracket on either right or left side. •...
REPLACING THE OVEN LIGHT • Let the oven cavity and broil burner cool down. • Switch off the electric supply. • Remove the protective cover. • Unscrew and replace the bulb with the appliance. • Place the anti-tip bracket on the floor as shown figure. NOTE: If range is not covered by your guarantee. ANTI-TIP BRACKET INSALLATION To reduce the risk of ant-tip bracket on either right or left side. •...
Instruction Manual
Page 24
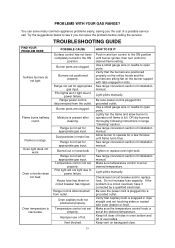
... replace fuse. Verify that the burners are positioned properly on the orifice hoods and the burners are sitting flat on backguard clear. 24 Range not set properly. See range conversion section of foil. POSSIBLE CAUSE Surface control has not been completely turned to operate until flame turns blue. Improper use of installation manual. Tighten or replace oven light bulb. Keep vent on the burner support with oven cleaner or food. Burners not positioned properly. Use a small gauge wire or needle to power...
... replace fuse. Verify that the burners are positioned properly on the orifice hoods and the burners are sitting flat on backguard clear. 24 Range not set properly. See range conversion section of foil. POSSIBLE CAUSE Surface control has not been completely turned to operate until flame turns blue. Improper use of installation manual. Tighten or replace oven light bulb. Keep vent on the burner support with oven cleaner or food. Burners not positioned properly. Use a small gauge wire or needle to power...
Instruction Manual
Page 25
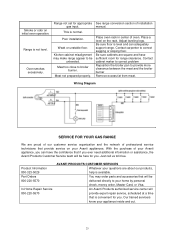
... Avanti appliances. Be sure floor is not level. You may make range appear to be unleveled. Place oven rack in center of installation manual. Our trained servicers know your home by personal check, money order, Master Card, or Visa. Meat too close to provide more clearance between the meat and the broiler burner Remove excess fat from meat. Adjust leveling legs. Wiring Diagram SERVICE FOR YOUR GAS RANGE...
... Avanti appliances. Be sure floor is not level. You may make range appear to be unleveled. Place oven rack in center of installation manual. Our trained servicers know your home by personal check, money order, Master Card, or Visa. Meat too close to provide more clearance between the meat and the broiler burner Remove excess fat from meat. Adjust leveling legs. Wiring Diagram SERVICE FOR YOUR GAS RANGE...
Parts and Accessories
Page 1
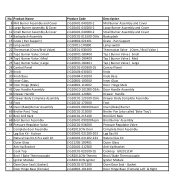
Lpg Gas Kit - 6 piece - Cook Top - Igniter Module - Pan Support Lamp switch Thermostat Valve ( Oven / Broil Valve ) Tap ( Burner Valve ) Small Tap ( Burner Valve ) Med Tap ( Burner Valve ) Large Control Panel Knob Knob Base Inner Glass Door Hinge Male Door Handle Assembly Drawer Handle Drawer Body Complete Assembly Foot Oven (Bake) Burner Broiler Pan (also called 'Bake Tray') Broil Grill Rack Broil Burner Assembly Pressure Regulator Valve Complete Door Assembly Lpg Gas Kit Natural Gas Kit Outer Glass Anti-tip Bracket Cooktop GR2011CW Broil / Bake Thermocouple Igniter Module Oven Door Seal - ...
Lpg Gas Kit - 6 piece - Cook Top - Igniter Module - Pan Support Lamp switch Thermostat Valve ( Oven / Broil Valve ) Tap ( Burner Valve ) Small Tap ( Burner Valve ) Med Tap ( Burner Valve ) Large Control Panel Knob Knob Base Inner Glass Door Hinge Male Door Handle Assembly Drawer Handle Drawer Body Complete Assembly Foot Oven (Bake) Burner Broiler Pan (also called 'Bake Tray') Broil Grill Rack Broil Burner Assembly Pressure Regulator Valve Complete Door Assembly Lpg Gas Kit Natural Gas Kit Outer Glass Anti-tip Bracket Cooktop GR2011CW Broil / Bake Thermocouple Igniter Module Oven Door Seal - ...


