
Installation Guide
Page 1
Released: 9-15-05 128-7472 1 of 16 Xpress® Satellite Radio Receiver XMC10 Car Cradle Installation Guide -1-
Released: 9-15-05 128-7472 1 of 16 Xpress® Satellite Radio Receiver XMC10 Car Cradle Installation Guide -1-
Installation Guide
Page 2
CONTENTS Congratulations 3 Cautions and Warnings 4 Contents XMC10 5 Accessory Kit 5 Installation/Wiring Precautions 6 Setting Up and Installing Your Kit 7 Interconnect Diagram 6 Using Other Manufacturer's Mounts 9 Installing the Xpress XM® Into the Cradle 9 Connection Options 10 Mounting the Vehicle Antenna 12 Warranty 15 -2- 128-7472 2 of 16
CONTENTS Congratulations 3 Cautions and Warnings 4 Contents XMC10 5 Accessory Kit 5 Installation/Wiring Precautions 6 Setting Up and Installing Your Kit 7 Interconnect Diagram 6 Using Other Manufacturer's Mounts 9 Installing the Xpress XM® Into the Cradle 9 Connection Options 10 Mounting the Vehicle Antenna 12 Warranty 15 -2- 128-7472 2 of 16
Installation Guide
Page 4
... unit to all safe driving and traffic regulations. 4. If the unit is not installed in accordance with the interference limits relative to radio or television reception. This unit complies with these warnings and safety considerations, serious accidents and/or personal injury can be avoided. -4-...7472 4 of the FCC Rules regarding installation in a position that you are responsible as airbags, etc. 3. Do not install the XMC10 car cradle in a residential environment. Do not install the unit where it could cause harmful interference to a Class B digital device, applicable under Part 15 ...
... unit to all safe driving and traffic regulations. 4. If the unit is not installed in accordance with the interference limits relative to radio or television reception. This unit complies with these warnings and safety considerations, serious accidents and/or personal injury can be avoided. -4-...7472 4 of the FCC Rules regarding installation in a position that you are responsible as airbags, etc. 3. Do not install the XMC10 car cradle in a residential environment. Do not install the unit where it could cause harmful interference to a Class B digital device, applicable under Part 15 ...
Installation Guide
Page 5
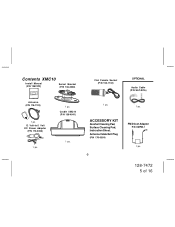
Cradle XMC10 (P/N 136-4041) 1 pc. 1 pc. Contents XMC10 Install Manual (P/N 1287472) Swivel Bracket (P/N 136-4048) CLA Female Socket (P/N 154-1132) OPTIONAL Audio Cable (P/N SAT-RCA) Antenna (P/N 118-1133) 1 pc. 12 Volt-to-5 Volt DC Power Adapter (P/N 112-3456) 1 pc. 1 pc. ACCESSORY KIT Alcohol Cleaning Pad, Surface Cleaning Pad, Instruction Sheet, Antenna Cable Exit Plug (P/N 170-0054) -5- 1 pc. FM Direct Adapter P/N XMFM-1 1 pc. 128-7472 5 of 16
Cradle XMC10 (P/N 136-4041) 1 pc. 1 pc. Contents XMC10 Install Manual (P/N 1287472) Swivel Bracket (P/N 136-4048) CLA Female Socket (P/N 154-1132) OPTIONAL Audio Cable (P/N SAT-RCA) Antenna (P/N 118-1133) 1 pc. 12 Volt-to-5 Volt DC Power Adapter (P/N 112-3456) 1 pc. 1 pc. ACCESSORY KIT Alcohol Cleaning Pad, Surface Cleaning Pad, Instruction Sheet, Antenna Cable Exit Plug (P/N 170-0054) -5- 1 pc. FM Direct Adapter P/N XMFM-1 1 pc. 128-7472 5 of 16
Installation Guide
Page 6
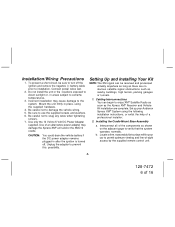
...unit in the locations exposed to direct sunlight or, in areas subject to enjoy XM® Satellite Radio as soon as the Xpress XM® Receiver and Vehicle Kit installation are no obvious satellite signal obstructions such as shown on the adjacent page to use the supplied screws ...-7472 6 of the components as nearby buildings, high terrain, parking garages or tunnels. 1. Installing the Cradle Mount Base Assembly a. Locate a firm, reasonably flat surface within your Audiovox Xpress XM® System using the supplied hardware. 4. Be careful not to snag any wires when tightening screws. ...
...unit in the locations exposed to direct sunlight or, in areas subject to enjoy XM® Satellite Radio as soon as the Xpress XM® Receiver and Vehicle Kit installation are no obvious satellite signal obstructions such as shown on the adjacent page to use the supplied screws ...-7472 6 of the components as nearby buildings, high terrain, parking garages or tunnels. 1. Installing the Cradle Mount Base Assembly a. Locate a firm, reasonably flat surface within your Audiovox Xpress XM® System using the supplied hardware. 4. Be careful not to snag any wires when tightening screws. ...
Installation Guide
Page 7
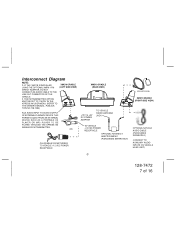
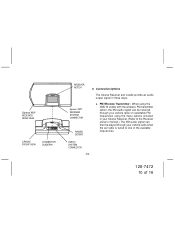
... FM TRANSMITTER. THE FM TRANSMITTER OPTION MUST BE SET TO "FM ON" IN THE XPRESS XM USER MENU. (REFER TO THE OWNER'S MANUAL, PUBLICATION NO.128-7454.) XMC10 CRADLE (LEFT SIDE VIEW) AUX AUDIO INPUT TO AUDIO OUTPUT OF EXTERNAL PLAYBACK DEVICE. OR CLA FEMALE SOCKET WIRES ...TO VEHICLE +12 VDC POWER RECEPTACLE XMC10 CRADLE (REAR VIEW) +12V to +5V DC POWER ADAPTER TO VEHICLE RADIO ANTENNA JACK TO VEHICLE +12 VDC POWER RECEPTACLE OPTIONAL FM DIRECT ADAPTER XMFM-1 (PURCHASED SEPARATELY) XM ANTENNA XMC10 CRADLE (RIGHT SIDE VIEW) OPTIONAL SAT-RCA AUDIO CABLE (PURCHASED ...
... FM TRANSMITTER. THE FM TRANSMITTER OPTION MUST BE SET TO "FM ON" IN THE XPRESS XM USER MENU. (REFER TO THE OWNER'S MANUAL, PUBLICATION NO.128-7454.) XMC10 CRADLE (LEFT SIDE VIEW) AUX AUDIO INPUT TO AUDIO OUTPUT OF EXTERNAL PLAYBACK DEVICE. OR CLA FEMALE SOCKET WIRES ...TO VEHICLE +12 VDC POWER RECEPTACLE XMC10 CRADLE (REAR VIEW) +12V to +5V DC POWER ADAPTER TO VEHICLE RADIO ANTENNA JACK TO VEHICLE +12 VDC POWER RECEPTACLE OPTIONAL FM DIRECT ADAPTER XMFM-1 (PURCHASED SEPARATELY) XM ANTENNA XMC10 CRADLE (RIGHT SIDE VIEW) OPTIONAL SAT-RCA AUDIO CABLE (PURCHASED ...
Installation Guide
Page 8
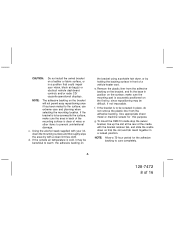
...mounting pad is cold, it has been mated to prevent unintentional damage. If the bracket is clear of the cradle with a clean lint-free cloth. f. To mount the XMC10 cradle atop the swivel bracket, line up the slot at the rear of wires or other items to the surface;...mounting surface and thoroughly wipe the area dry with the bracket retainer tab, and slide the cradle down so that could impair your vision, block air bag(s) or obstruct vehicle dashboard controls and/or radio CD/ cassetteoperational displays. use extreme care and planning when selecting the mounting location. d. g....
...mounting pad is cold, it has been mated to prevent unintentional damage. If the bracket is clear of the cradle with a clean lint-free cloth. f. To mount the XMC10 cradle atop the swivel bracket, line up the slot at the rear of wires or other items to the surface;...mounting surface and thoroughly wipe the area dry with the bracket retainer tab, and slide the cradle down so that could impair your vision, block air bag(s) or obstruct vehicle dashboard controls and/or radio CD/ cassetteoperational displays. use extreme care and planning when selecting the mounting location. d. g....
Installation Guide
Page 9
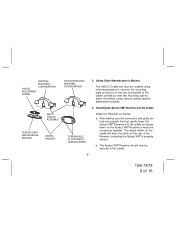
... PLASTIC LINER AND ADHESIVE BACKING SWIVEL BRACKET SIDE (HORIZONTAL) MOUNTING CONFIGURATION 3. The raised detent on the cradle will enter the notch on the rear and bottom of the Receiver, indicating the Xpress XM® is properly seated. After making sure the connectors and guide pin hole are properly lined up, gently lower the...
... PLASTIC LINER AND ADHESIVE BACKING SWIVEL BRACKET SIDE (HORIZONTAL) MOUNTING CONFIGURATION 3. The raised detent on the cradle will enter the notch on the rear and bottom of the Receiver, indicating the Xpress XM® is properly seated. After making sure the connectors and guide pin hole are properly lined up, gently lower the...
Installation Guide
Page 10
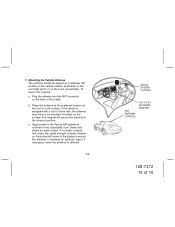
... the available frequencies. Xpress XM® RECEIVER REAR VIEW CRADLE FRONT VIEW CONNECTOR GUIDE PIN RECEIVER NOTCH Xpress XM® RECEIVER SYSTEM CONNECTOR RAISED DETENT 5. Connection Options The Xpress Receiver and Cradle provide an audio output signal in your Xpress Receiver. (Refer to the Receiver owner's manual.) The XM audio signal can then be received through your vehicle radio on selectable FM frequencies...
... the available frequencies. Xpress XM® RECEIVER REAR VIEW CRADLE FRONT VIEW CONNECTOR GUIDE PIN RECEIVER NOTCH Xpress XM® RECEIVER SYSTEM CONNECTOR RAISED DETENT 5. Connection Options The Xpress Receiver and Cradle provide an audio output signal in your Xpress Receiver. (Refer to the Receiver owner's manual.) The XM audio signal can then be received through your vehicle radio on selectable FM frequencies...
Installation Guide
Page 11
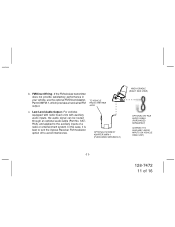
... to avoid interference. TO VEHICLE RADIO ANTENNA JACK c. OPTIONAL FM DIRECT ADAPTER XMFM-1 (PURCHASED SEPARATELY) XMC10 CRADLE (RIGHT SIDE VIEW) OPTIONAL SAT-RCA AUDIO CABLE (PURCHASED SEPARATELY) (CONNECT TO AUXILIARY AUDIO INPUTS ON VEHICLE HEAD UNIT.) -11- 128-7472 11 of a radio or entertainment system. FM Direct ... Low-Level Audio Output - In this case, it is best to turn the Xpress Receiver FM modulator option off to the auxiliary inputs of 16 For vehicles equipped with radio head units with auxiliary audio inputs, the audio signal can be routed through an optional audio...
... to avoid interference. TO VEHICLE RADIO ANTENNA JACK c. OPTIONAL FM DIRECT ADAPTER XMFM-1 (PURCHASED SEPARATELY) XMC10 CRADLE (RIGHT SIDE VIEW) OPTIONAL SAT-RCA AUDIO CABLE (PURCHASED SEPARATELY) (CONNECT TO AUXILIARY AUDIO INPUTS ON VEHICLE HEAD UNIT.) -11- 128-7472 11 of a radio or entertainment system. FM Direct ... Low-Level Audio Output - In this case, it is best to turn the Xpress Receiver FM modulator option off to the auxiliary inputs of 16 For vehicles equipped with radio head units with auxiliary audio inputs, the audio signal can be routed through an optional audio...
Installation Guide
Page 12
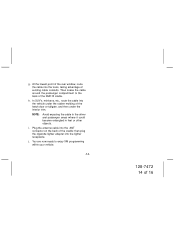
7. Place the antenna at the preferred location on the back of the cradle. The magnet will secure the antenna in the associated User Guide and obtain an audio output. If no audio is heard, first check the signal ... roof (high point) or on the surface. Plug the antenna into the ANT connector on the roof or trunk surface. seek p. If the vehicle is receiving an optimum signal. Mounting the Vehicle Antenna The antenna should be mounted off-center on the trunk (convertible). c. b. To mount the antenna: a. If necessary, move...
7. Place the antenna at the preferred location on the back of the cradle. The magnet will secure the antenna in the associated User Guide and obtain an audio output. If no audio is heard, first check the signal ... roof (high point) or on the surface. Plug the antenna into the ANT connector on the roof or trunk surface. seek p. If the vehicle is receiving an optimum signal. Mounting the Vehicle Antenna The antenna should be mounted off-center on the trunk (convertible). c. b. To mount the antenna: a. If necessary, move...

Installation Guide
Page 13
... avoid any obstructions that could crimp, kink or twist the cable; After determining the optimum position, turn off Xpress XM power, disconnect the power adapter from the antenna position to the cradle. Route the cable from the vehicle cigarette lighter receptacle and disconnect the antenna cable. Plan the routing of the antenna...
... avoid any obstructions that could crimp, kink or twist the cable; After determining the optimum position, turn off Xpress XM power, disconnect the power adapter from the antenna position to the cradle. Route the cable from the vehicle cigarette lighter receptacle and disconnect the antenna cable. Plan the routing of the antenna...
Installation Guide
Page 14
... feet or other objects. j. h. Then snake the cable around the passenger compartment to enjoy XM programming within your vehicle. -14- 128-7472 14 of the XMC10 cradle. Plug the antenna cable into the trunk, taking advantage of the cradle; At the lowest point of the rear window, route the cable into the ANT...
... feet or other objects. j. h. Then snake the cable around the passenger compartment to enjoy XM programming within your vehicle. -14- 128-7472 14 of the XMC10 cradle. Plug the antenna cable into the trunk, taking advantage of the cradle; At the lowest point of the rear window, route the cable into the ANT...