Installation Guide
Page 2
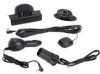
CONTENTS Congratulations 3 Cautions and Warnings 4 Contents XMC10 5 Accessory Kit 5 Installation/Wiring Precautions 6 Setting Up and Installing Your Kit 7 Interconnect Diagram 6 Using Other Manufacturer's Mounts 9 Installing the Xpress XM® Into the Cradle 9 Connection Options 10 Mounting the Vehicle Antenna 12 Warranty 15 -2- 128-7472 2 of 16
CONTENTS Congratulations 3 Cautions and Warnings 4 Contents XMC10 5 Accessory Kit 5 Installation/Wiring Precautions 6 Setting Up and Installing Your Kit 7 Interconnect Diagram 6 Using Other Manufacturer's Mounts 9 Installing the Xpress XM® Into the Cradle 9 Connection Options 10 Mounting the Vehicle Antenna 12 Warranty 15 -2- 128-7472 2 of 16
Installation Guide
Page 3
...Audiovox Xpress XM® receiver must be used with an accessory kit, such as the Audiovox Home Kit, Boom Box or Vehicle Kit as required by your vehicle or in the industry with over 20 dedicated channels of 16 All rights reserved. XM® is America's #1 Satellite Radio... costs and other trademarks are sold separately. XM® is a trademark of XM® Satellite Radio. Required subscription for purchasing the Audiovox Xpress XM® Satellite Car Kit. Only available in XM® Satellite Radio. XM® Satellite Radio service gives you the power to over 2...
...Audiovox Xpress XM® receiver must be used with an accessory kit, such as the Audiovox Home Kit, Boom Box or Vehicle Kit as required by your vehicle or in the industry with over 20 dedicated channels of 16 All rights reserved. XM® is America's #1 Satellite Radio... costs and other trademarks are sold separately. XM® is a trademark of XM® Satellite Radio. Required subscription for purchasing the Audiovox Xpress XM® Satellite Car Kit. Only available in XM® Satellite Radio. XM® Satellite Radio service gives you the power to over 2...
Installation Guide
Page 6
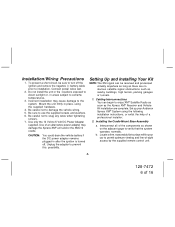
... (-) battery cable prior to installation. Set up your car to the system. Locate a firm, reasonably flat surface within your Audiovox Xpress XM® System using the supplied hardware. 4. Interconnect all of an alternative power adapter may cause damage to permit optimum viewing and...help of 16 Use of the components as shown on the adjacent page to enjoy XM® Satellite Radio as soon as the Xpress XM® Receiver and Vehicle Kit installation are no obvious satellite signal obstructions such as there are complete. Cabling Interconnections You can be sure to...
... (-) battery cable prior to installation. Set up your car to the system. Locate a firm, reasonably flat surface within your Audiovox Xpress XM® System using the supplied hardware. 4. Interconnect all of an alternative power adapter may cause damage to permit optimum viewing and...help of 16 Use of the components as shown on the adjacent page to enjoy XM® Satellite Radio as soon as the Xpress XM® Receiver and Vehicle Kit installation are no obvious satellite signal obstructions such as there are complete. Cabling Interconnections You can be sure to...
Installation Guide
Page 7
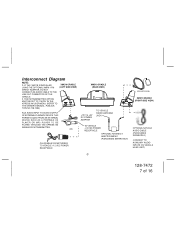
... EXTERNAL DEVICE SUCH AS A PORTABLE CD PLAYER OR MP3 PLAYER TO BE PLAYED THROUGH THE XPRESS XM WIRELESS FM TRANSMITTER. THE FM TRANSMITTER OPTION MUST BE SET TO "FM ON" IN THE XPRESS XM USER MENU. (REFER TO THE OWNER'S MANUAL, PUBLICATION NO.128-7454.) XMC10 CRADLE (LEFT SIDE... +12 VDC POWER RECEPTACLE XMC10 CRADLE (REAR VIEW) +12V to +5V DC POWER ADAPTER TO VEHICLE RADIO ANTENNA JACK TO VEHICLE +12 VDC POWER RECEPTACLE OPTIONAL FM DIRECT ADAPTER XMFM-1 (PURCHASED SEPARATELY) XM ANTENNA XMC10 CRADLE (RIGHT SIDE VIEW) OPTIONAL SAT-RCA AUDIO CABLE (PURCHASED SEPARATELY) (CONNECT TO AUXILIARY...
... EXTERNAL DEVICE SUCH AS A PORTABLE CD PLAYER OR MP3 PLAYER TO BE PLAYED THROUGH THE XPRESS XM WIRELESS FM TRANSMITTER. THE FM TRANSMITTER OPTION MUST BE SET TO "FM ON" IN THE XPRESS XM USER MENU. (REFER TO THE OWNER'S MANUAL, PUBLICATION NO.128-7454.) XMC10 CRADLE (LEFT SIDE... +12 VDC POWER RECEPTACLE XMC10 CRADLE (REAR VIEW) +12V to +5V DC POWER ADAPTER TO VEHICLE RADIO ANTENNA JACK TO VEHICLE +12 VDC POWER RECEPTACLE OPTIONAL FM DIRECT ADAPTER XMFM-1 (PURCHASED SEPARATELY) XM ANTENNA XMC10 CRADLE (RIGHT SIDE VIEW) OPTIONAL SAT-RCA AUDIO CABLE (PURCHASED SEPARATELY) (CONNECT TO AUXILIARY...
Installation Guide
Page 9
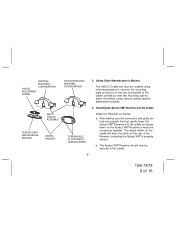
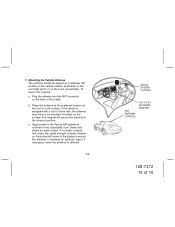
... the rear of the cradle provideyou with two mounting options within the vehicle using other manufacturer's mounts; b. The Xpress XM® Receiver should now be installed using various vehicle-specific aftermarket brackets. 4. The raised detent on the cradle will enter the notch... on the rear and bottom of the Receiver, indicating the Xpress XM® is properly seated. VERTICAL MOUNTING SWIVEL CONFIGURATION ADJUSTMENT SCREW XMC10 CRADLE ASSEMBLY PLASTIC LINER AND ADHESIVE BACKING SWIVEL...
... the rear of the cradle provideyou with two mounting options within the vehicle using other manufacturer's mounts; b. The Xpress XM® Receiver should now be installed using various vehicle-specific aftermarket brackets. 4. The raised detent on the cradle will enter the notch... on the rear and bottom of the Receiver, indicating the Xpress XM® is properly seated. VERTICAL MOUNTING SWIVEL CONFIGURATION ADJUSTMENT SCREW XMC10 CRADLE ASSEMBLY PLASTIC LINER AND ADHESIVE BACKING SWIVEL...
Installation Guide
Page 10
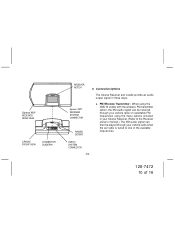
... played through your vehicle radio on selectable FM frequencies using the menu options included in three ways: a. Connection Options The Xpress Receiver and Cradle provide an audio output signal in your Xpress Receiver. (Refer to the Receiver owner's manual.) The XM audio signal can be received through your vehicle radio when the car radio is tuned to one...
... played through your vehicle radio on selectable FM frequencies using the menu options included in three ways: a. Connection Options The Xpress Receiver and Cradle provide an audio output signal in your Xpress Receiver. (Refer to the Receiver owner's manual.) The XM audio signal can be received through your vehicle radio when the car radio is tuned to one...
Installation Guide
Page 12
... antenna should be mounted off-center on the back of the cradle. If the vehicle is receiving an optimum signal. Place the antenna at the preferred location on the trunk (convertible). Apply power to the Xpress XM system as outlined in the desired position. s. To mount the antenna: a. The magnet will secure...
... antenna should be mounted off-center on the back of the cradle. If the vehicle is receiving an optimum signal. Place the antenna at the preferred location on the trunk (convertible). Apply power to the Xpress XM system as outlined in the desired position. s. To mount the antenna: a. The magnet will secure...

Installation Guide
Page 13
... the cable under the rear window molding; use protective grommets wherever rough openings are encountered. f. d. ANTENNA -13- After determining the optimum position, turn off Xpress XM power, disconnect the power adapter from the antenna position to the interior of the antenna cable to the cradle. make adjustments and take up slack...
... the cable under the rear window molding; use protective grommets wherever rough openings are encountered. f. d. ANTENNA -13- After determining the optimum position, turn off Xpress XM power, disconnect the power adapter from the antenna position to the interior of the antenna cable to the cradle. make adjustments and take up slack...
Installation Guide
Page 14
... back of the XMC10 cradle. You are now ready to the back of the cradle; Then snake the cable around the passenger compartment to enjoy XM programming within your vehicle. -14- 128-7472 14 of existing cable conduits. Plug the antenna cable into the trunk, taking advantage of 16 In SUV...
... back of the XMC10 cradle. You are now ready to the back of the cradle; Then snake the cable around the passenger compartment to enjoy XM programming within your vehicle. -14- 128-7472 14 of existing cable conduits. Plug the antenna cable into the trunk, taking advantage of 16 In SUV...
