
Owners Manual
Page 4
... This Unit does NOT allow copying from DVD to VCR tape Important Safety Instruction 1-2 Disc Formats 5 Parts and Functions 6-9 Front Panel 6 Rear Panel 7 Using the Remote Control 7 Remote Control 8-9 Display 10 Front Panel Display 10 Display Information 10 Connections 11-18 Connecting your TV 11 Cable TV Connections 12-15 For better reception of...
... This Unit does NOT allow copying from DVD to VCR tape Important Safety Instruction 1-2 Disc Formats 5 Parts and Functions 6-9 Front Panel 6 Rear Panel 7 Using the Remote Control 7 Remote Control 8-9 Display 10 Front Panel Display 10 Display Information 10 Connections 11-18 Connecting your TV 11 Cable TV Connections 12-15 For better reception of...
Owners Manual
Page 7
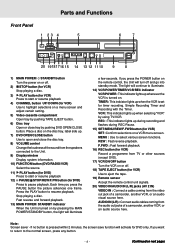
... 11) PLAY button (for DVD) Press to start or resume playback 4) CHANNEL button UP/ DOWN (for VCR) Use to eject the tape. 19) Remote sensor Accept the remote control unit signals. 20) VIDEO IN/AUDIO IN (L/R) jacks (AV 2 IN) VIDEO IN : Connect a cable coming from the audio out jacks of a ... the VCR is pressed within 2 minutes, the screen save function will illuminate a few seconds. Each time you press the POWER button on the remote control, the Unit will continue to illuminate. 14) VCR POWER/TIMER/VCR/REC indicator VCR POWER : This indicator lights up during recording and flashes during...
... 11) PLAY button (for DVD) Press to start or resume playback 4) CHANNEL button UP/ DOWN (for VCR) Use to eject the tape. 19) Remote sensor Accept the remote control unit signals. 20) VIDEO IN/AUDIO IN (L/R) jacks (AV 2 IN) VIDEO IN : Connect a cable coming from the audio out jacks of a ... the VCR is pressed within 2 minutes, the screen save function will illuminate a few seconds. Each time you press the POWER button on the remote control, the Unit will continue to illuminate. 14) VCR POWER/TIMER/VCR/REC indicator VCR POWER : This indicator lights up during recording and flashes during...

Owners Manual
Page 8
...(NICKEL-CADMIUM) batteries. - 7 - (Continued on the Unit. • When there is a strong ambient light source, the performance of the Remote Control is not going to be degraded, causing unreliable operation. • The recommended effective distance for a long time, remove the batteries to replace the ... Replacement When batteries become weak, the operating distance of the infrared REMOTE SENSOR may be used for remote operation is about 16 feet (5 meters). To install Batteries 1. Notes: • If the Remote Control is greatly reduced and you will need to avoid damage caused by...
...(NICKEL-CADMIUM) batteries. - 7 - (Continued on the Unit. • When there is a strong ambient light source, the performance of the Remote Control is not going to be degraded, causing unreliable operation. • The recommended effective distance for a long time, remove the batteries to replace the ... Replacement When batteries become weak, the operating distance of the infrared REMOTE SENSOR may be used for remote operation is about 16 feet (5 meters). To install Batteries 1. Notes: • If the Remote Control is greatly reduced and you will need to avoid damage caused by...
Owners Manual
Page 9
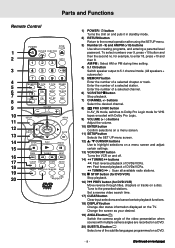
... on a DVD. - 8 - (Continued on the TV. Change the screen as your desired. 19) ANGLE button Switch the camera angle of DVDs/VCRs. Parts and Functions Remote Control 1 2 3 4 5 6 7 8 9 10 11 12 13 14 15 16 17 18 19 20 POWER OPEN/ C LO SE R ETUR N FU NC TIO N G O TO AM /PM M EMO RY 5.1 CH...
... on a DVD. - 8 - (Continued on the TV. Change the screen as your desired. 19) ANGLE button Switch the camera angle of DVDs/VCRs. Parts and Functions Remote Control 1 2 3 4 5 6 7 8 9 10 11 12 13 14 15 16 17 18 19 20 POWER OPEN/ C LO SE R ETUR N FU NC TIO N G O TO AM /PM M EMO RY 5.1 CH...
Owners Manual
Page 10
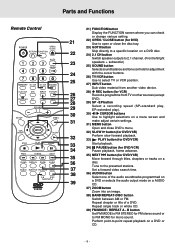
...on a DVD disc. 24) 2.1 CH button Switch speaker outputs to 2.1 channel. (Front left/right speakers + subwoofer) 25) SOUND button Selects sound balance and tone controls for adjustment with the cursor buttons. 26) TV/VCR button Use to select TV or VCR position. 27) INPUT button Dub video material from TV... FM. Repeat chapter or title of the audio soundtracks programmed on a DVD or selects the audio output mode on a DVD or CD. - 9 - Parts and Functions Remote Control POWER OPEN/ C LO SE R ETUR N FU NC TIO N G O TO AM /PM M EMO RY 5.1 CH 2.1 CH SOUND VCR STOP CH+ INPUT TV/VCR PRO ...
...on a DVD disc. 24) 2.1 CH button Switch speaker outputs to 2.1 channel. (Front left/right speakers + subwoofer) 25) SOUND button Selects sound balance and tone controls for adjustment with the cursor buttons. 26) TV/VCR button Use to select TV or VCR position. 27) INPUT button Dub video material from TV... FM. Repeat chapter or title of the audio soundtracks programmed on a DVD or selects the audio output mode on a DVD or CD. - 9 - Parts and Functions Remote Control POWER OPEN/ C LO SE R ETUR N FU NC TIO N G O TO AM /PM M EMO RY 5.1 CH 2.1 CH SOUND VCR STOP CH+ INPUT TV/VCR PRO ...
Owners Manual
Page 14
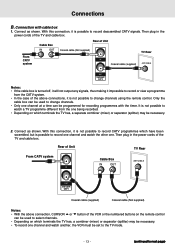
... not possible to next page) Connect as shown. From CATV system Cable Box IN OUT Rear of the VCR or the numbered buttons on the remote control can be used to select channels. • Depending on which terminals the TV has, a separate combiner (mixer) or separator (splitter) may be necessary. ...have been scrambled, but is not possible to change channels. • Only one channel at a time can be used to change channels using the remote control. Only the cable box can be necessary. 2. Then plug in the power cords of the TV and cable box. With this connection, it ...
... not possible to next page) Connect as shown. From CATV system Cable Box IN OUT Rear of the VCR or the numbered buttons on the remote control can be used to select channels. • Depending on which terminals the TV has, a separate combiner (mixer) or separator (splitter) may be necessary. ...have been scrambled, but is not possible to change channels. • Only one channel at a time can be used to change channels using the remote control. Only the cable box can be necessary. 2. Then plug in the power cords of the TV and cable box. With this connection, it ...

Owners Manual
Page 19
....18002526123.com Turning on the Unit and TV 1)Press the MAIN POWER button to turn the Unit ON, or 2)Press the /POWER button on the remote control while the Unit is in standby mode. 3)Turn on the TV by pressing its POWER button. 4)Select the channel on your TV corresponding to the...
....18002526123.com Turning on the Unit and TV 1)Press the MAIN POWER button to turn the Unit ON, or 2)Press the /POWER button on the remote control while the Unit is in standby mode. 3)Turn on the TV by pressing its POWER button. 4)Select the channel on your TV corresponding to the...
Owners Manual
Page 20
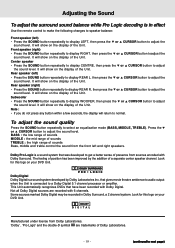
... to audio output when the Unit is connected to adjust the sound level. Some sources marked Dolby Digital may be recorded in effect Use the remote control to make the following changes to speaker balance: Front speaker (left) • Press the SOUND button repeatedly to display LEFT, then press the...display CENTRE, then press the or CURSOR button to adjust the sound level. It will show on the display of sounds Bass, middle and treble control the sound from the front left ) • Press the SOUND button repeatedly to display REAR L, then press the or CURSOR button to adjust ...
... to audio output when the Unit is connected to adjust the sound level. Some sources marked Dolby Digital may be recorded in effect Use the remote control to make the following changes to speaker balance: Front speaker (left) • Press the SOUND button repeatedly to display LEFT, then press the...display CENTRE, then press the or CURSOR button to adjust the sound level. It will show on the display of sounds Bass, middle and treble control the sound from the front left ) • Press the SOUND button repeatedly to display REAR L, then press the or CURSOR button to adjust ...

Owners Manual
Page 21
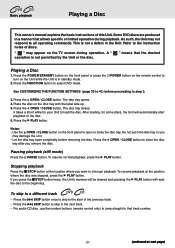
When the disc is stopped, you can press 5.1 CH and 2.1 CH buttons on the remote control to the audio/sound output from Front Left and Front Right speaker plus the Subwoofer. You can only set 5.1 CH, 2.1 CH when the disc is ...
When the disc is stopped, you can press 5.1 CH and 2.1 CH buttons on the remote control to the audio/sound output from Front Left and Front Right speaker plus the Subwoofer. You can only set 5.1 CH, 2.1 CH when the disc is ...
Owners Manual
Page 22
...this Unit. Stopping playback Press the STOP button at the position where the disc was stopped, press the PLAY button. Place the disc on the remote control to See CUSTOMIZING THE FUNCTION SETTINGS (page 33 to 41) before removing the disc. To resume playback at the location where you remove the disc... of the previous track. • Press the SKIP button to skip to the next track. • For audio CD disc, use the number buttons (remote control only) to jump straight to the beginning. Press the POWER/STANDBY button on the front panel or press the turn on the front panel to...
...this Unit. Stopping playback Press the STOP button at the position where the disc was stopped, press the PLAY button. Place the disc on the remote control to See CUSTOMIZING THE FUNCTION SETTINGS (page 33 to 41) before removing the disc. To resume playback at the location where you remove the disc... of the previous track. • Press the SKIP button to skip to the next track. • For audio CD disc, use the number buttons (remote control only) to jump straight to the beginning. Press the POWER/STANDBY button on the front panel or press the turn on the front panel to...
Owners Manual
Page 32
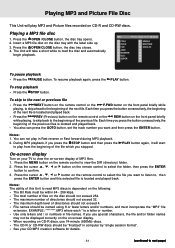
...4. Notes: 1. PLAY button again, it will start On-screen display Turn on -screen display of the previous file. Press the MENU button on the remote control to view the on your CD/MP3 creation software for details. - 31 - (continued to confirm. 3. Insert a MP3 file disc on the disc should... to the beginning of the next file is located and played back. • Press the PREV (Previous) button on the remote control or the REW button on the remote control to select the file you press the button consecutively, the beginning of the next file. EXAMPLE: ********.MP3 where each * is...
...4. Notes: 1. PLAY button again, it will start On-screen display Turn on -screen display of the previous file. Press the MENU button on the remote control to view the on your CD/MP3 creation software for details. - 31 - (continued to confirm. 3. Insert a MP3 file disc on the disc should... to the beginning of the next file is located and played back. • Press the PREV (Previous) button on the remote control or the REW button on the remote control to select the file you press the button consecutively, the beginning of the next file. EXAMPLE: ********.MP3 where each * is...
Owners Manual
Page 33
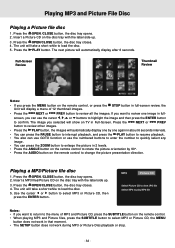
...cursor or button to review other images. If you selected will automatically display one by 90°. • Press the AUDIO button on the remote control to change the picture presentation direction. The image you want to return to the menu of 12 thumbnail images. • Press the NEXT ... Review Notes: • If you can press the ZOOM button to enlarge the picture in 2 levels. • Press the ANGLE button on the remote control. • When playing MP3 and Picture files, press the SUBTITLE button to rotate the picture orientation by one image in that moment. • The...
...cursor or button to review other images. If you selected will automatically display one by 90°. • Press the AUDIO button on the remote control to change the picture presentation direction. The image you want to return to the menu of 12 thumbnail images. • Press the NEXT ... Review Notes: • If you can press the ZOOM button to enlarge the picture in 2 levels. • Press the ANGLE button on the remote control. • When playing MP3 and Picture files, press the SUBTITLE button to rotate the picture orientation by one image in that moment. • The...
