Owners Manual
Page 5
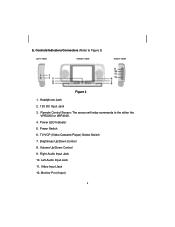
E. Power LED Indicator 5. Volume Up/Down Control 9. Remote Control Sensor: The sensor will relay commands to Figure 3) Figure 3 1. TV/VCP (Video Cassette Player) Select Switch 7. Monitor Port (Input) 4 Controls/Indicators/Connectors (Refer to the either the VPB3000 or VBP4000. 4. Power Switch 6. Right Audio Input Jack 10. Headphone Jack 2. 12V DC Input Jack 3. Brightness Up/Down Control 8. Left Audio Input Jack 11. Video Input Jack 12.
E. Power LED Indicator 5. Volume Up/Down Control 9. Remote Control Sensor: The sensor will relay commands to Figure 3) Figure 3 1. TV/VCP (Video Cassette Player) Select Switch 7. Monitor Port (Input) 4 Controls/Indicators/Connectors (Refer to the either the VPB3000 or VBP4000. 4. Power Switch 6. Right Audio Input Jack 10. Headphone Jack 2. 12V DC Input Jack 3. Brightness Up/Down Control 8. Left Audio Input Jack 11. Video Input Jack 12.

Owners Manual
Page 6
...can be connected to Figure 5) Figure 5 Using the cigarette lighter adapter supplied, plug the connector end into the DC 12V IN jack on the side of the Monitor. This can be done with the Monitor inside or outside the pouch. 3 5 3 Plug the cigarette lighter adapter into a 120 VAC power receptacle. Option 2... be done with the VBPEX5, plug the connector end into the DC 12V IN jack on the side of the Monitor. Option 1 Indoor Power (Refer to Figure 4) Figure 4 c Using the AC/DC adapter supplied with the Monitor inside or outside the pouch. Plug the AC/DC adapter into the...
...can be connected to Figure 5) Figure 5 Using the cigarette lighter adapter supplied, plug the connector end into the DC 12V IN jack on the side of the Monitor. This can be done with the Monitor inside or outside the pouch. 3 5 3 Plug the cigarette lighter adapter into a 120 VAC power receptacle. Option 2... be done with the VBPEX5, plug the connector end into the DC 12V IN jack on the side of the Monitor. Option 1 Indoor Power (Refer to Figure 4) Figure 4 c Using the AC/DC adapter supplied with the Monitor inside or outside the pouch. Plug the AC/DC adapter into the...
Owners Manual
Page 8
... source such as Camcorder, Video Game, DVDPlayer,VideoCassettePlayeretc.intotheyellow Video In jack. Figure 8 I. NOTE: If connecting the Monitor to the VBP4000 be used with the Monitor. Refer to Figure 8) Optional wired headphones may be certain to slide the TV/VCP select switch located on the side...the Monitor and both internal speakers will light. 2.When connecting the VBPEX5 Monitor to the VBP3000, slide the TV/ VCP switch to the appropriate position for a power source to be turned off. Using Headphones (Refer to Figure 4 and Figure 5. Simply plug in the headset to DC 12V ...
... source such as Camcorder, Video Game, DVDPlayer,VideoCassettePlayeretc.intotheyellow Video In jack. Figure 8 I. NOTE: If connecting the Monitor to the VBP4000 be used with the Monitor. Refer to Figure 8) Optional wired headphones may be certain to slide the TV/VCP select switch located on the side...the Monitor and both internal speakers will light. 2.When connecting the VBPEX5 Monitor to the VBP3000, slide the TV/ VCP switch to the appropriate position for a power source to be turned off. Using Headphones (Refer to Figure 4 and Figure 5. Simply plug in the headset to DC 12V ...