
Owners Manual
Page 1
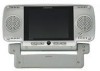
Owner's Manual VBPEX5 5" LCD MONITOR
Owner's Manual VBPEX5 5" LCD MONITOR
Owners Manual
Page 2
... put pressure on headphones always adjust the volume setting to the lowest position. Do not use any solvents or cleaning materials when cleaning the video Monitor. Warnings Do not use any abrasive cleaners, they may become dirty or damaged. Use only a lightly dampened lint free cloth to wipe the screen if...
... put pressure on headphones always adjust the volume setting to the lowest position. Do not use any solvents or cleaning materials when cleaning the video Monitor. Warnings Do not use any abrasive cleaners, they may become dirty or damaged. Use only a lightly dampened lint free cloth to wipe the screen if...

Owners Manual
Page 3
...the system in the front seat while operating your home and is in accordance with water for selecting the VBPEX5, 5 inch Liquid Crystal Display (LCD ) Monitor. Pouch 126-1170 One 2 There are no user-serviceable parts inside. Please read the entire manual prior to DC Power Adapter 136-1830 One... 4. Do not operate or store the unit close to the VBP3000 and VBP4000, (Please contact Audiovox's retailers). A. The VBPEX5 can be connected to strong magnetic fields. Do not spill or spray liquid of heat. When the system is ...
...the system in the front seat while operating your home and is in accordance with water for selecting the VBPEX5, 5 inch Liquid Crystal Display (LCD ) Monitor. Pouch 126-1170 One 2 There are no user-serviceable parts inside. Please read the entire manual prior to DC Power Adapter 136-1830 One... 4. Do not operate or store the unit close to the VBP3000 and VBP4000, (Please contact Audiovox's retailers). A. The VBPEX5 can be connected to strong magnetic fields. Do not spill or spray liquid of heat. When the system is ...
Owners Manual
Page 4
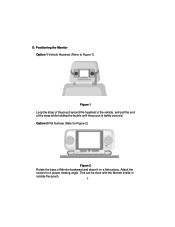
INSTALLATION INSTRUCTIONS D. This can be done with the Monitor inside or outside the pouch. 2 3 Option 2 Flat Surface (Refer to Figure 1) Figure 1 Loop the strap of the pouch around the headrest in the vehicle, and pull the end of Monitor backward and place it on a flat surface. Adjust the screen for a proper viewing angle. Positioning the Monitor Option 1 Vehicle Headrest (Refer to Figure 2) Figure 2 Rotate the base of the strap while holding the buckle until the pouch is tightly secured.
INSTALLATION INSTRUCTIONS D. This can be done with the Monitor inside or outside the pouch. 2 3 Option 2 Flat Surface (Refer to Figure 1) Figure 1 Loop the strap of the pouch around the headrest in the vehicle, and pull the end of Monitor backward and place it on a flat surface. Adjust the screen for a proper viewing angle. Positioning the Monitor Option 1 Vehicle Headrest (Refer to Figure 2) Figure 2 Rotate the base of the strap while holding the buckle until the pouch is tightly secured.
Owners Manual
Page 5
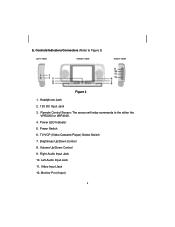
Headphone Jack 2. 12V DC Input Jack 3. Remote Control Sensor: The sensor will relay commands to Figure 3) Figure 3 1. Monitor Port (Input) 4 Video Input Jack 12. E. Brightness Up/Down Control 8. TV/VCP (Video Cassette Player) Select Switch 7. Controls/Indicators/Connectors (Refer to the either the VPB3000 or VBP4000. 4. Right Audio Input Jack 10. Power Switch 6. Volume Up/Down Control 9. Left Audio Input Jack 11. Power LED Indicator 5.
Headphone Jack 2. 12V DC Input Jack 3. Remote Control Sensor: The sensor will relay commands to Figure 3) Figure 3 1. Monitor Port (Input) 4 Video Input Jack 12. E. Brightness Up/Down Control 8. TV/VCP (Video Cassette Player) Select Switch 7. Controls/Indicators/Connectors (Refer to the either the VPB3000 or VBP4000. 4. Right Audio Input Jack 10. Power Switch 6. Volume Up/Down Control 9. Left Audio Input Jack 11. Power LED Indicator 5.

Owners Manual
Page 6
... the supplied DIN cable, there is no need for a power source to be connected to Figure 4) Figure 4 c Using the AC/DC adapter supplied with the Monitor inside or outside the pouch. This can be done with the VBPEX5, plug the connector end into the DC 12V IN jack on the side... of the Monitor. Plug the cigarette lighter adapter into a 120 VAC power receptacle. This can be done with the Monitor inside or outside the pouch. 3 5 3 Plug the AC/DC adapter into the cigarette lighter socket. Option 2 Vehicle...
... the supplied DIN cable, there is no need for a power source to be connected to Figure 4) Figure 4 c Using the AC/DC adapter supplied with the Monitor inside or outside the pouch. This can be done with the VBPEX5, plug the connector end into the DC 12V IN jack on the side... of the Monitor. Plug the cigarette lighter adapter into a 120 VAC power receptacle. This can be done with the Monitor inside or outside the pouch. 3 5 3 Plug the AC/DC adapter into the cigarette lighter socket. Option 2 Vehicle...
Owners Manual
Page 7
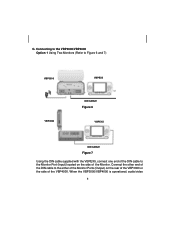
Connecting to the VBP3000/VBP4000 Option 1 Using Two Monitors (Refer to Figure 6 and 7) VBP3000 VBP4000 VBPEX5 DIN CABLE Figure 6 VBVPBEPXE5X5 DIN CABLE Figure 7 Using the DIN cable supplied with the VBPEX5, connect one end of the DIN cable to the either of the Monitor Ports (Output) on the side of the VBP4000. G. Connect the other end of the DIN cable to the Monitor Port (Input) located on the rear of the VBP3000 or the side of the Monitor. When the VBP3000/VBP4000 is operational, audio/video 6 6
Connecting to the VBP3000/VBP4000 Option 1 Using Two Monitors (Refer to Figure 6 and 7) VBP3000 VBP4000 VBPEX5 DIN CABLE Figure 6 VBVPBEPXE5X5 DIN CABLE Figure 7 Using the DIN cable supplied with the VBPEX5, connect one end of the DIN cable to the either of the Monitor Ports (Output) on the side of the VBP4000. G. Connect the other end of the DIN cable to the Monitor Port (Input) located on the rear of the VBP3000 or the side of the Monitor. When the VBP3000/VBP4000 is operational, audio/video 6 6
Owners Manual
Page 8
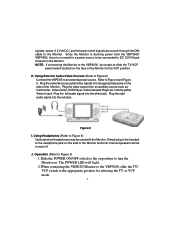
... the appropriate position for a power source to be connected to DC 12V IN jack located on the side of the Monitor and both internal speakers will light. 2.When connecting the VBPEX5 Monitor to the VBP3000, slide the TV/ VCP switch to Figure 4 and Figure 5. J. signals, power (12 Volt DC ) and Infrared ...control signals are routed through the DIN cable to the VCP position. NOTE: If connecting the Monitor to the VBP4000 be turned off. Plug the external source audio/video signals into the appropriate jacks on the face of the...
... the appropriate position for a power source to be connected to DC 12V IN jack located on the side of the Monitor and both internal speakers will light. 2.When connecting the VBPEX5 Monitor to the VBP3000, slide the TV/ VCP switch to Figure 4 and Figure 5. J. signals, power (12 Volt DC ) and Infrared ...control signals are routed through the DIN cable to the VCP position. NOTE: If connecting the Monitor to the VBP4000 be turned off. Plug the external source audio/video signals into the appropriate jacks on the face of the...
Owners Manual
Page 9
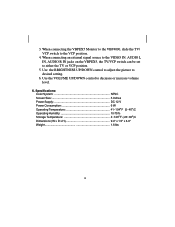
... VIDEO IN, AUDIO L IN, AUDIO R IN jacks on the VBPEX5, the TV/VCP switch can be set to the VCP position. 4. When connecting the VBPEX5 Monitor to the VBP4000, slide the TV/ VCP switch to either the TV or VCP position. 5. K. 3.
... VIDEO IN, AUDIO L IN, AUDIO R IN jacks on the VBPEX5, the TV/VCP switch can be set to the VCP position. 4. When connecting the VBPEX5 Monitor to the VBP4000, slide the TV/ VCP switch to either the TV or VCP position. 5. K. 3.

