
Owners Manual
Page 1
VBDV56 5.6" LCD MONITOR Owner's Manual
VBDV56 5.6" LCD MONITOR Owner's Manual
Owners Manual
Page 2
Contents 3 D.Positioning the Monitor 3 E. Using External Audio/Video Sources (Refer to Figure 3 6 K. Introduction 2 B. Cautions 2 C. Operation (Refer to Figure 7)....... .. 6 I. Do not use liquid cleaners or aerosol cleaners. Use a cloth lightly dampened..., make sure the system is unplugged from the power source. Specifications 7 Warranty 8 1 Using Headphones (Refer to Figure 7 6 J. In the interest of safety, the VBDV56 should never be installed where it may become dirty or damaged. Important Notice It is unlawful in the motor vehicle at any point forward of...
Contents 3 D.Positioning the Monitor 3 E. Using External Audio/Video Sources (Refer to Figure 3 6 K. Introduction 2 B. Cautions 2 C. Operation (Refer to Figure 7)....... .. 6 I. Do not use liquid cleaners or aerosol cleaners. Use a cloth lightly dampened..., make sure the system is unplugged from the power source. Specifications 7 Warranty 8 1 Using Headphones (Refer to Figure 7 6 J. In the interest of safety, the VBDV56 should never be installed where it may become dirty or damaged. Important Notice It is unlawful in the motor vehicle at any point forward of...
Owners Manual
Page 3
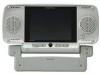
... DIN cable) supplied with a cloth or other material. 5. When the system is designed to operation. This Monitor is left unattended and unused for selecting the VBDV56, 5.6 inch Liquid Crystal Display (LCD) Monitor. It will assist you for long periods of the unit. Contact qualified service personnel if your system is plug... sunlight. To prevent fire or electric shock, do not remove the back cover of time, unplug it from sources of the Monitor is in a fire or electric shock). 4. A. The VBDV56 utilizes state of the art electronics and is unplugged from the system. 2.
... DIN cable) supplied with a cloth or other material. 5. When the system is designed to operation. This Monitor is left unattended and unused for selecting the VBDV56, 5.6 inch Liquid Crystal Display (LCD) Monitor. It will assist you for long periods of the unit. Contact qualified service personnel if your system is plug... sunlight. To prevent fire or electric shock, do not remove the back cover of time, unplug it from sources of the Monitor is in a fire or electric shock). 4. A. The VBDV56 utilizes state of the art electronics and is unplugged from the system. 2.
Owners Manual
Page 4
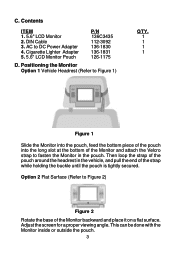
...-1830 136-1831 126-1175 D. Adjust the screen for a proper viewing angle. AC to fasten the Monitor in the vehicle, and pull the end of the Monitor backward and place it on a flat surface. C. Contents ITEM 1. 5.6" LCD Monitor 2. DIN Cable 3. Option 2 Flat Surface (Refer to Figure 2) Figure 2 Rotate the base of the strap while...
...-1830 136-1831 126-1175 D. Adjust the screen for a proper viewing angle. AC to fasten the Monitor in the vehicle, and pull the end of the Monitor backward and place it on a flat surface. C. Contents ITEM 1. 5.6" LCD Monitor 2. DIN Cable 3. Option 2 Flat Surface (Refer to Figure 2) Figure 2 Rotate the base of the strap while...
Owners Manual
Page 5
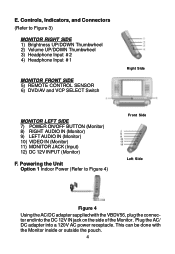
... 5) REMOTE CONTROL SENSOR 6) DVD/AV and VCP SELECT Switch Right Side MONITOR LEFT SIDE 7) POWER ON/OFF BUTTON (Monitor) 8) RIGHT AUDIO IN (Monitor) 9) LEFT AUDIO IN (Monitor) 10) VIDEO IN (Monitor) 11) MONITOR JACK (Input) 12) DC 12V INPUT (Monitor) F. Plug the AC/ DC adapter into the DC 12V IN jack ...on the side of the Monitor. E. Controls, Indicators, and Connectors (Refer to Figure 4) Front Side Left Side Figure 4 Using the AC/DC adapter supplied with the Monitor inside or outside the pouch. 4 This can be done with the VBDV56, plug the connector end into a 120V ...
... 5) REMOTE CONTROL SENSOR 6) DVD/AV and VCP SELECT Switch Right Side MONITOR LEFT SIDE 7) POWER ON/OFF BUTTON (Monitor) 8) RIGHT AUDIO IN (Monitor) 9) LEFT AUDIO IN (Monitor) 10) VIDEO IN (Monitor) 11) MONITOR JACK (Input) 12) DC 12V INPUT (Monitor) F. Plug the AC/ DC adapter into the DC 12V IN jack ...on the side of the Monitor. E. Controls, Indicators, and Connectors (Refer to Figure 4) Front Side Left Side Figure 4 Using the AC/DC adapter supplied with the Monitor inside or outside the pouch. 4 This can be done with the VBDV56, plug the connector end into a 120V ...
Owners Manual
Page 6
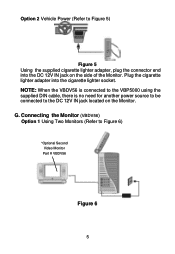
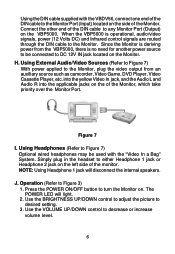
Plug the cigarette lighter adapter into the DC 12V IN jack on the Monitor. NOTE: When the VBDV56 is connected to the VBP5000 using the supplied DIN cable, there is no need for another power source to be connected to the DC 12V IN jack located on the side of the Monitor. G. Connecting the Monitor (VBDV56) Option 1 Using Two Monitors (Refer to Figure 6) *Optional Second Video Monitor Part # VBDV56 Figure 6 5 Option 2 Vehicle Power (Refer to Figure 5) Figure 5 Using the supplied cigarette lighter adapter, plug the connector end into the cigarette lighter socket.
Plug the cigarette lighter adapter into the DC 12V IN jack on the Monitor. NOTE: When the VBDV56 is connected to the VBP5000 using the supplied DIN cable, there is no need for another power source to be connected to the DC 12V IN jack located on the side of the Monitor. G. Connecting the Monitor (VBDV56) Option 1 Using Two Monitors (Refer to Figure 6) *Optional Second Video Monitor Part # VBDV56 Figure 6 5 Option 2 Vehicle Power (Refer to Figure 5) Figure 5 Using the supplied cigarette lighter adapter, plug the connector end into the cigarette lighter socket.
Owners Manual
Page 7
...to be used with the VBDV56, connect one end of the DIN cable to DC 12V IN jack located on the side of the Monitor. Using Headphones (Refer to Figure 7) Optional wired headphones may be connected to the Monitor Port (Input) located on the Monitor. Press the POWER ON/... Volts DC) and Infrared control signals are routed through the DIN cable to any Monitor Port (Output) on the of the Monitor, which take priority over the Monitor Port. NOTE: Using Headphone 1 jack will light. 2. Using External Audio/Video Sources (Refer to Figure 7) With power applied to decrease or increase...
...to be used with the VBDV56, connect one end of the DIN cable to DC 12V IN jack located on the side of the Monitor. Using Headphones (Refer to Figure 7) Optional wired headphones may be connected to the Monitor Port (Input) located on the Monitor. Press the POWER ON/... Volts DC) and Infrared control signals are routed through the DIN cable to any Monitor Port (Output) on the of the Monitor, which take priority over the Monitor Port. NOTE: Using Headphone 1 jack will light. 2. Using External Audio/Video Sources (Refer to Figure 7) With power applied to decrease or increase...

