User Guide
Page 8
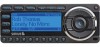
SIRIUS Satellite Radio is not responsible for issues arising from functioning properly in the event of safety devices such as described in this unit. • Do not install the FM Extender Antenna where it will hinder or block your view. • Do not install the radio where it may obstruct your view through the windshield, or of your vehicle's indicator displays. • Do not...
SIRIUS Satellite Radio is not responsible for issues arising from functioning properly in the event of safety devices such as described in this unit. • Do not install the FM Extender Antenna where it will hinder or block your view. • Do not install the radio where it may obstruct your view through the windshield, or of your vehicle's indicator displays. • Do not...
User Guide
Page 10
... the eCos source code be made available to change. Hardware, subscription and activation fee required. Prices and programming are licensed under the eCos license. Portions of the eCos operating system. For full Terms & Conditions, visit http://sirius.com. The eCos License and eCos source code are available to all portions of SIRIUS Satellite Radio. Installation required with some equipment. 10 Copyrights & Trademarks SIRIUS Satellite Radio reserves...
... the eCos source code be made available to change. Hardware, subscription and activation fee required. Prices and programming are licensed under the eCos license. Portions of the eCos operating system. For full Terms & Conditions, visit http://sirius.com. The eCos License and eCos source code are available to all portions of SIRIUS Satellite Radio. Installation required with some equipment. 10 Copyrights & Trademarks SIRIUS Satellite Radio reserves...
User Guide
Page 14
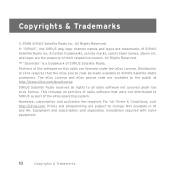
... the necessary accessories to install an optional FM Direct Adapter or an audio cable to connect the audio output of the SIRIUS radio mounted in your vehicle where it will be in your vehicle. Professional installation provides an experienced technician to install the Vehicle Dock in a vehicle are provided. The location should be easily accessible and provide good visibility of the display, and should not...
... the necessary accessories to install an optional FM Direct Adapter or an audio cable to connect the audio output of the SIRIUS radio mounted in your vehicle where it will be in your vehicle. Professional installation provides an experienced technician to install the Vehicle Dock in a vehicle are provided. The location should be easily accessible and provide good visibility of the display, and should not...

User Guide
Page 40
... operation of the front console (see Figure 21). 40 Installation Power Cable Hide Excess Cable Figure 20 D. Antenna Cable FEA Cable Power Cable Figure 19 Step 4 Follow the instructions in this manual to vehicle dock or SIRIUS radio C. The bundled cables should be as far away from the CLA power cable as possible (see Figure 20). Coil Excess Cable Under Carpet or Mat B. If possible, tuck the coiled part...
... operation of the front console (see Figure 21). 40 Installation Power Cable Hide Excess Cable Figure 20 D. Antenna Cable FEA Cable Power Cable Figure 19 Step 4 Follow the instructions in this manual to vehicle dock or SIRIUS radio C. The bundled cables should be as far away from the CLA power cable as possible (see Figure 20). Coil Excess Cable Under Carpet or Mat B. If possible, tuck the coiled part...

User Guide
Page 41
Direct Wired Audio Connection If your vehicle's audio system has an "AUX IN" or "LINE IN" jack it is the best-quality audio connection you can use for your SIRIUS radio. (And if the AUX IN or LINE IN connector is located somewhere on your vehicle's audio system (see Figure 22). Plug the cable's male 1/8" stereo connector into the AUX IN/LINE IN connector on the front of your vehicle's audio system and...
Direct Wired Audio Connection If your vehicle's audio system has an "AUX IN" or "LINE IN" jack it is the best-quality audio connection you can use for your SIRIUS radio. (And if the AUX IN or LINE IN connector is located somewhere on your vehicle's audio system (see Figure 22). Plug the cable's male 1/8" stereo connector into the AUX IN/LINE IN connector on the front of your vehicle's audio system and...

User Guide
Page 45
... PRESETS Button Channel UP/DOWN Buttons Figure 26 SELECT Button Figure 27 5. The FM1 frequency screen will appear, with FM1 highlighted. Installation 45 FM1 is factory-set in Step 2, then press the Select button to select it (see Figure 28, left). Press the Select button. Press and hold the FM PRESETS button (see Figure 27). Use the Channel UP/DOWN buttons to 88.1MHz. To listen to your SIRIUS radio, turn your SIRIUS radio ON, then turn...
... PRESETS Button Channel UP/DOWN Buttons Figure 26 SELECT Button Figure 27 5. The FM1 frequency screen will appear, with FM1 highlighted. Installation 45 FM1 is factory-set in Step 2, then press the Select button to select it (see Figure 28, left). Press the Select button. Press and hold the FM PRESETS button (see Figure 27). Use the Channel UP/DOWN buttons to 88.1MHz. To listen to your SIRIUS radio, turn your SIRIUS radio ON, then turn...

User Guide
Page 49
... Vehicle Code Section 26708(a); Minnesota Statutes 2005, Section 169.71) A Note About The Installation Procedure Before you permanently mount the FM Extender Antenna (FEA), you will first mount it using the included suction cup mounts to drivers In California and Minnesota State law prohibits drivers in California and Minnesota from using its adhesive mounts. WARNING Notice to test the installation. SIRIUS does...
... Vehicle Code Section 26708(a); Minnesota Statutes 2005, Section 169.71) A Note About The Installation Procedure Before you permanently mount the FM Extender Antenna (FEA), you will first mount it using the included suction cup mounts to drivers In California and Minnesota State law prohibits drivers in California and Minnesota from using its adhesive mounts. WARNING Notice to test the installation. SIRIUS does...

User Guide
Page 50
.... D. G. H. In-glass, in the rear windshield: Several lengths of wire in SUVs, mini-vans and station wagons. 50 Installation Whip/aerial mounted on rear part of roof: A whip or aerial antenna mounted on the front part of the roof (often just above the rear windshield glass). Whip/aerial mounted on front part of roof: A whip or aerial antenna mounted on the rear part of the roof (often...
.... D. G. H. In-glass, in the rear windshield: Several lengths of wire in SUVs, mini-vans and station wagons. 50 Installation Whip/aerial mounted on rear part of roof: A whip or aerial antenna mounted on the front part of the roof (often just above the rear windshield glass). Whip/aerial mounted on front part of roof: A whip or aerial antenna mounted on the rear part of the roof (often...

User Guide
Page 58
... your SIRIUS preset. The FM PRESETS screen will become your Starmate ST5 and turn its power ON. FM1 is factory-set to the same FM channel a. Step 4: Temporarily plug the FEA into the Vehicle Dock's FM OUT connector See Figure 37. This may not be the best frequency for a suggested FM channel based on your zip code. • Once you have located an FM channel that...
... your SIRIUS preset. The FM PRESETS screen will become your Starmate ST5 and turn its power ON. FM1 is factory-set to the same FM channel a. Step 4: Temporarily plug the FEA into the Vehicle Dock's FM OUT connector See Figure 37. This may not be the best frequency for a suggested FM channel based on your zip code. • Once you have located an FM channel that...
User Guide
Page 65
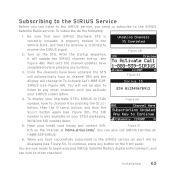
... SIR- Wait until you need to subscribe to the SIRIUS Satellite Radio service. To display your Starmate ST5's SIRIUS ID (SID) Figure 50 number, tune to receive the SIRIUS signal. 2. Have your SIRIUS Starmate ST5 is correctly installed, is properly docked in the Vehicle Dock, and that the antenna is also available on the ST5. Figure 51 IUS on the front panel. To continue, press...
... SIR- Wait until you need to subscribe to the SIRIUS Satellite Radio service. To display your Starmate ST5's SIRIUS ID (SID) Figure 50 number, tune to receive the SIRIUS signal. 2. Have your SIRIUS Starmate ST5 is correctly installed, is properly docked in the Vehicle Dock, and that the antenna is also available on the ST5. Figure 51 IUS on the front panel. To continue, press...

User Guide
Page 67
...Jump Button: Quickly switches between different preset frequencies used to enter a channel number. Category < / > Buttons: Navigate through a broadcast saved in SIRIUS Replay. 6. FM Presets Button: Selects between the current channel and a favorite (or frequently-accessed) channel. 14. Pressing and holding will display a prompt to directly tune channels by the built-in SIRIUS Replay. 7. 4. Play/Pause Button: Pauses and replays live or time-shifted content from the currently tuned channel. Preset Number Buttons (0 - 9): Set and select preset channels. Fast-Forward Button...
...Jump Button: Quickly switches between different preset frequencies used to enter a channel number. Category < / > Buttons: Navigate through a broadcast saved in SIRIUS Replay. 6. FM Presets Button: Selects between the current channel and a favorite (or frequently-accessed) channel. 14. Pressing and holding will display a prompt to directly tune channels by the built-in SIRIUS Replay. 7. 4. Play/Pause Button: Pauses and replays live or time-shifted content from the currently tuned channel. Preset Number Buttons (0 - 9): Set and select preset channels. Fast-Forward Button...

User Guide
Page 69
... holding this button displays the list of the Select button will return to enter a channel number. Volume +/- Also used for the ST5's built-in SIRIUS Replay. 7. Fast-Forward Button: Fast-forwards through channels and display screens, and highlight items on the display screen. Pressing and holding switches the display to directly tune channels by entering the channel number. 10. Buttons: Adjusts the audio volume up to make setup and feature changes. 15. Select Button: Selects items highlighted on the display. 5. Memory (MEMO) Button (S-Seek Function): Saves...
... holding this button displays the list of the Select button will return to enter a channel number. Volume +/- Also used for the ST5's built-in SIRIUS Replay. 7. Fast-Forward Button: Fast-forwards through channels and display screens, and highlight items on the display screen. Pressing and holding switches the display to directly tune channels by entering the channel number. 10. Buttons: Adjusts the audio volume up to make setup and feature changes. 15. Select Button: Selects items highlighted on the display. 5. Memory (MEMO) Button (S-Seek Function): Saves...

User Guide
Page 70
Remove Cover Insert Battery "+" Side Up Figure 54 70 Controls See Figure 54. Remote Control Battery Installation To install the remote control battery, turn the remote control over and locate the battery cover near the bottom edge. Open the battery compartment and place the battery in the compartment with the + side of the battery facing up. Replace the battery cover on the remote control.
Remove Cover Insert Battery "+" Side Up Figure 54 70 Controls See Figure 54. Remote Control Battery Installation To install the remote control battery, turn the remote control over and locate the battery cover near the bottom edge. Open the battery compartment and place the battery in the compartment with the + side of the battery facing up. Replace the battery cover on the remote control.

User Guide
Page 75
... new channel will begin playing and the display will sequence the display between the team/driver names and the current score of any of your subscribed channel numbers and names. To exit the MY CHANNELS screen without changing to the highlighted channel. Press the Select button to tune to a different channel, press and hold the DISP button for 1½ seconds, until the Default screen is active, the ST5 displays...
... new channel will begin playing and the display will sequence the display between the team/driver names and the current score of any of your subscribed channel numbers and names. To exit the MY CHANNELS screen without changing to the highlighted channel. Press the Select button to tune to a different channel, press and hold the DISP button for 1½ seconds, until the Default screen is active, the ST5 displays...
User Guide
Page 87
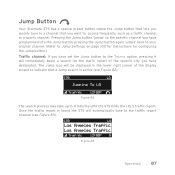
... programmed into the Jump button; Once the traffic report is active (see Figure 83). Jump Button Your Starmate ST5 has a special preset button called the Jump button that lets you quickly tune to a channel that a Jump search is found the ST5 will immediately begin a search for configuring the Jump button.) Traffic channel: If you have set the Jump button...
... programmed into the Jump button; Once the traffic report is active (see Figure 83). Jump Button Your Starmate ST5 has a special preset button called the Jump button that lets you quickly tune to a channel that a Jump search is found the ST5 will immediately begin a search for configuring the Jump button.) Traffic channel: If you have set the Jump button...

User Guide
Page 94
... the FM preset frequencies, FM1 is set to select for the preset and press the Select button. It also makes it easy for you to select new FM transmitter preset frequencies without having to turn the transmitter ON. The FM frequency screen will then be displayed (see Figure 91). Select YES to go through the Menu Options (see page 96). FM2 - FM Presets Button If you are using a wireless connection between...
... the FM preset frequencies, FM1 is set to select for the preset and press the Select button. It also makes it easy for you to select new FM transmitter preset frequencies without having to turn the transmitter ON. The FM frequency screen will then be displayed (see Figure 91). Select YES to go through the Menu Options (see page 96). FM2 - FM Presets Button If you are using a wireless connection between...
User Guide
Page 106
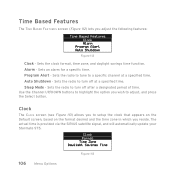
... SIRIUS satellite signal, and will automatically update your Starmate ST5. 106 Menu Options Figure 113 Sets the radio to turn off at a specified time. Clock The CLOCK screen (see Figure 113) allows you reside. Sets the radio to adjust, and press the Select button. Sets an alarm for a specific time. Use the Channel UP/DOWN buttons to highlight the option you adjust the following features: Figure 112 Clock - Sleep Mode - Sets the clock...
... SIRIUS satellite signal, and will automatically update your Starmate ST5. 106 Menu Options Figure 113 Sets the radio to turn off at a specified time. Clock The CLOCK screen (see Figure 113) allows you reside. Sets the radio to adjust, and press the Select button. Sets an alarm for a specific time. Use the Channel UP/DOWN buttons to highlight the option you adjust the following features: Figure 112 Clock - Sleep Mode - Sets the clock...

User Guide
Page 108
Use the Category < and > buttons to set the hours and use the Channel UP/DOWN buttons to set the alarm time (see Figure 117) lets you want the ST5 to power on. (The default time is 12:00.) Figure 118 108 Menu Options Figure 117 SET ALARM: This turns the alarm ON and OFF. ALARM TIME: This lets you set the minutes when you to set your Starmate ST5 to turn ON at a specific time. Alarm The ALARM screen (see Figure 118). The last selected channel prior to shutdown will play when the ST5 powers ON.
Use the Category < and > buttons to set the hours and use the Channel UP/DOWN buttons to set the alarm time (see Figure 117) lets you want the ST5 to power on. (The default time is 12:00.) Figure 118 108 Menu Options Figure 117 SET ALARM: This turns the alarm ON and OFF. ALARM TIME: This lets you set the minutes when you to set your Starmate ST5 to turn ON at a specific time. Alarm The ALARM screen (see Figure 118). The last selected channel prior to shutdown will play when the ST5 powers ON.
User Guide
Page 115
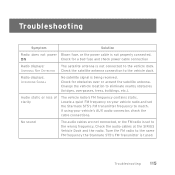
... using your vehicle radio and set to the vehicle dock. ON Check for obstacles over or around the satellite antenna. Locate a quiet FM frequency on your vehicle's AUX audio connector, check the cable connections. Check the audio cables at the SIRIUS Vehicle Dock and the radio. Check for a bad fuse and check power cable connection Radio displays: The satellite antenna is being received. Troubleshooting Symptom Solution Radio does not power Blown fuse, or the power cable is tuned. No sound The audio cables are not connected...
... using your vehicle radio and set to the vehicle dock. ON Check for obstacles over or around the satellite antenna. Locate a quiet FM frequency on your vehicle's AUX audio connector, check the cable connections. Check the audio cables at the SIRIUS Vehicle Dock and the radio. Check for a bad fuse and check power cable connection Radio displays: The satellite antenna is being received. Troubleshooting Symptom Solution Radio does not power Blown fuse, or the power cable is tuned. No sound The audio cables are not connected...

User Guide
Page 120
sirius.com Sirius Satellite Radio Inc. 1221 Avenue of the Americas New York, NY 10020 800.869.5590 Starmate 5 User Guide (030508a)
sirius.com Sirius Satellite Radio Inc. 1221 Avenue of the Americas New York, NY 10020 800.869.5590 Starmate 5 User Guide (030508a)


