
Installation Guide
Page 4
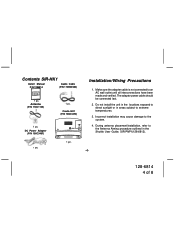
...refer to extreme temperatures. 3. Do not install the unit in the locations exposed to direct sunlight or in areas subject to the Antenna Aiming procedure outlined in the Shuttle User Guide, SIR-PNP1(128-6812). -4- 128-6814 4 of 8 Installation/Wiring Precautions 1. Incorrect... installation may cause damage to an AC wall outlet until all interconnections have been made and verified. Antenna (P/N 118C1125) 1 pc. The adapter power cable should be connected last. 2. Make sure the adapter cable is not connected to the system. ...
...refer to extreme temperatures. 3. Do not install the unit in the locations exposed to direct sunlight or in areas subject to the Antenna Aiming procedure outlined in the Shuttle User Guide, SIR-PNP1(128-6812). -4- 128-6814 4 of 8 Installation/Wiring Precautions 1. Incorrect... installation may cause damage to an AC wall outlet until all interconnections have been made and verified. Antenna (P/N 118C1125) 1 pc. The adapter power cable should be connected last. 2. Make sure the adapter cable is not connected to the system. ...

Installation Guide
Page 5
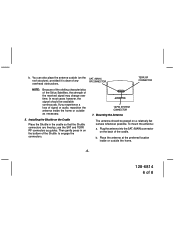
... best reception, the supplied antenna should be required to enjoy Sirius® Satellite Radio as soon as high terrain, trees, overhangs, etc. 1. The following installation instructions, or enlist the help of 8 RF CONNECTOR TO AC WALL OUTLET SHUTTLE ANTENNA DC POWER ADAPTER -5- 128-6814 5 of a professional installer. 2. Set up your Audiovox Shuttle using the following...
... best reception, the supplied antenna should be required to enjoy Sirius® Satellite Radio as soon as high terrain, trees, overhangs, etc. 1. The following installation instructions, or enlist the help of 8 RF CONNECTOR TO AC WALL OUTLET SHUTTLE ANTENNA DC POWER ADAPTER -5- 128-6814 5 of a professional installer. 2. Set up your Audiovox Shuttle using the following...
Installation Guide
Page 6
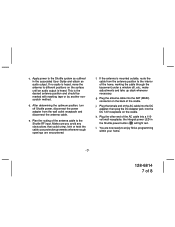
... Shuttle on the Cradle Place the Shuttle in on the back of the received signal may change over time. Place the antenna at the preferred location inside the home or outside as guides. Plug the antenna into the SAT. (MAIN) connector on the bottom of the Shuttle to...-6- 128-6814 6 of any RF CONNECTOR overhead obstructions. RF CONNECTOR NOTE: Because of the orbiting characteristics of the Sirius Satellites, the strength of the cradle. b. Mounting the Antenna The antenna should be placed on the SAT. (MAIN) roof structure), provided it is clear of 8 In most cases however,...
... Shuttle on the Cradle Place the Shuttle in on the back of the received signal may change over time. Place the antenna at the preferred location inside the home or outside as guides. Plug the antenna into the SAT. (MAIN) connector on the bottom of the Shuttle to...-6- 128-6814 6 of any RF CONNECTOR overhead obstructions. RF CONNECTOR NOTE: Because of the orbiting characteristics of the Sirius Satellites, the strength of the cradle. b. Mounting the Antenna The antenna should be placed on the SAT. (MAIN) roof structure), provided it is clear of 8 In most cases however,...
Installation Guide
Page 7
... routing of the cradle. k. You are encountered. After determining the optimum position, turn off Shuttle power, disconnect the power adapter from the antenna position to the interior of the AC cable into a 110volt wall receptacle; Plug the female end of the home, working the cable through the... the Shuttle power button ( ) will light red. Plug the antenna cable into the DC 12V receptacle on the back of the antenna cable to different positions on the surface until an audio output is the desired antenna position and should be marked with masking tape or by another nonscratch...
... routing of the cradle. k. You are encountered. After determining the optimum position, turn off Shuttle power, disconnect the power adapter from the antenna position to the interior of the AC cable into a 110volt wall receptacle; Plug the female end of the home, working the cable through the... the Shuttle power button ( ) will light red. Plug the antenna cable into the DC 12V receptacle on the back of the antenna cable to different positions on the surface until an audio output is the desired antenna position and should be marked with masking tape or by another nonscratch...
Installation Guide
Page 8
... DURATION OF THIS WRITTEN WARRANTY. This Warranty does not extend to the elimination of externally generated static or noise, to correction of antenna problems, to costs incurred for installation, removal or reinstallation of the product, or to damage to tapes, compact discs, speakers, ...11788 ! 1-800-645-4994 CANADA : CALL 1-800-645-4994 FOR LOCATION OF WARRANTY STATION SERVING YOUR AREA 128-6464 © 2003 Audiovox Electronics Corporation -8- 128-6814 128-6814 8 of incidental or consequential damage so the above limitations or exclusions may also have other express warranties...
... DURATION OF THIS WRITTEN WARRANTY. This Warranty does not extend to the elimination of externally generated static or noise, to correction of antenna problems, to costs incurred for installation, removal or reinstallation of the product, or to damage to tapes, compact discs, speakers, ...11788 ! 1-800-645-4994 CANADA : CALL 1-800-645-4994 FOR LOCATION OF WARRANTY STATION SERVING YOUR AREA 128-6464 © 2003 Audiovox Electronics Corporation -8- 128-6814 128-6814 8 of incidental or consequential damage so the above limitations or exclusions may also have other express warranties...
