User Guide
Page 2
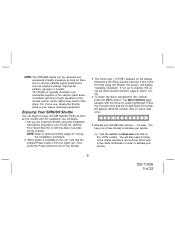
... Audiovox Shuttle receiver must be used with : • Over 120 channels of original programming, including - 65 channels of world-class sports, news, talk and information. Sirius will revolutionize your specific installation needs. guaranteed, Over 50 channels of 100% commercial-free music - Audiovox Home Kit: Audiovox Vehicle Kit: Audiovox Boom Box: Part Number SIR-HK3 Part Number SIR-CK3 Part Number SIR-BB3 -2- 128-7193A 2 of 32 These kits are available at retailers where Audiovox main units are...
... Audiovox Shuttle receiver must be used with : • Over 120 channels of original programming, including - 65 channels of world-class sports, news, talk and information. Sirius will revolutionize your specific installation needs. guaranteed, Over 50 channels of 100% commercial-free music - Audiovox Home Kit: Audiovox Vehicle Kit: Audiovox Boom Box: Part Number SIR-HK3 Part Number SIR-CK3 Part Number SIR-BB3 -2- 128-7193A 2 of 32 These kits are available at retailers where Audiovox main units are...
User Guide
Page 3
... Your Sirius Shuttle 5 Sirius Shuttle Controls 6 Basic Operation 8 Tuning by Category 8 Content Listing Options (Look Ahead 8 Direct Tuning 9 Setting/Using Channel Preset Buttons 9 Preset List Mode 10 Display Button 10 Memory Button (S-Seek Function 11 Menu Display Options 14 Sirius ID 14 Jump Settings 14 Display Settings 18 FM Transmitter Options 19 Add or Skip 20 Lock Options 20 Lock/Unlock Default Code Function 20 Edit Code 21 Audio Level Options 21 Antenna Aiming (Home Installation 21 Memory Options 22 Time Based Features 22 Clock...
... Your Sirius Shuttle 5 Sirius Shuttle Controls 6 Basic Operation 8 Tuning by Category 8 Content Listing Options (Look Ahead 8 Direct Tuning 9 Setting/Using Channel Preset Buttons 9 Preset List Mode 10 Display Button 10 Memory Button (S-Seek Function 11 Menu Display Options 14 Sirius ID 14 Jump Settings 14 Display Settings 18 FM Transmitter Options 19 Add or Skip 20 Lock Options 20 Lock/Unlock Default Code Function 20 Edit Code 21 Audio Level Options 21 Antenna Aiming (Home Installation 21 Memory Options 22 Time Based Features 22 Clock...
User Guide
Page 4
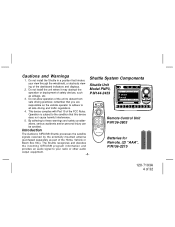
... personal injury can Remote Control Unit P/N136-3803 be avoided. Do not install the Shuttle in a position that hinders your radio or other audio P/N156-2215 output equipment. -4- 128-7193A 4 of the dashboard indicators and displays. 2. JUMP 4. Introduction The Audiovox SIRIUS® Shuttle processes the satellite signals received by the externally mounted antenna (purchased separately as part of safety devices, such as the vehicle operator to adhere...
... personal injury can Remote Control Unit P/N136-3803 be avoided. Do not install the Shuttle in a position that hinders your radio or other audio P/N156-2215 output equipment. -4- 128-7193A 4 of the dashboard indicators and displays. 2. JUMP 4. Introduction The Audiovox SIRIUS® Shuttle processes the satellite signals received by the externally mounted antenna (purchased separately as part of safety devices, such as the vehicle operator to adhere...
User Guide
Page 5
... activate your Audiovox Shuttle using the Shuttle, the screen will display "Updating Channels". Set up your service: (a) Visit the website at sirius.com and click on the display followed by the Sirius preview channel. NOTE: Refer to channel 184 us- If this is available to the unit, note that the integral Power button LED icon lights red. ing. 4. The Menu Options page appears with line-of-sight operation of the remote control...
... activate your Audiovox Shuttle using the Shuttle, the screen will display "Updating Channels". Set up your service: (a) Visit the website at sirius.com and click on the display followed by the Sirius preview channel. NOTE: Refer to channel 184 us- If this is available to the unit, note that the integral Power button LED icon lights red. ing. 4. The Menu Options page appears with line-of-sight operation of the remote control...
User Guide
Page 6
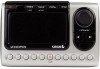
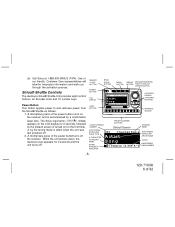
... removes power from the Sirius® Shuttle as follows: 1. The Sirius logo/name ( ) initially appears on the LCD display for 3 seconds, followed by the Default screen (if turned on the receiver, and is accompanied by the tuning mode in effect when the unit was last powered off. 2. A momentary press of the power buttonturns off . MEMORY (s-seek) BUTTON POWER BUTTON LCD DISPLAY JUMP BUTTON BAND (p.tune) BUTTON MENU BUTTON DISPLAY ENCODER KNOB AND BUTTON PUSH-TO-SELECT...
... removes power from the Sirius® Shuttle as follows: 1. The Sirius logo/name ( ) initially appears on the LCD display for 3 seconds, followed by the Default screen (if turned on the receiver, and is accompanied by the tuning mode in effect when the unit was last powered off. 2. A momentary press of the power buttonturns off . MEMORY (s-seek) BUTTON POWER BUTTON LCD DISPLAY JUMP BUTTON BAND (p.tune) BUTTON MENU BUTTON DISPLAY ENCODER KNOB AND BUTTON PUSH-TO-SELECT...

User Guide
Page 7
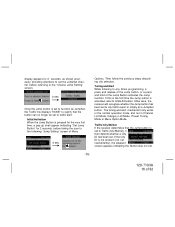
... on the LCD screen. Category Buttons: The Up or Down category buttons allows the user to access "Menu Options" which displays the user setup menu, plus other feature/function adjustments. Once a choice has been made, it matches the Artist/Song title stored in Shuttle memory. Display (DISP) Button: This button allows the user to 24 Artist/Song Title combinations. When in the list or menu mode, turning the Encoder...
... on the LCD screen. Category Buttons: The Up or Down category buttons allows the user to access "Menu Options" which displays the user setup menu, plus other feature/function adjustments. Once a choice has been made, it matches the Artist/Song title stored in Shuttle memory. Display (DISP) Button: This button allows the user to 24 Artist/Song Title combinations. When in the list or menu mode, turning the Encoder...

User Guide
Page 8
... having to change the current channel you are used when entering and recalling preset channel numbers into memory. set tuning continues until the user decides to select that channel. 3. Basic Operation With the unit properly installed, activated and connected to tune and select a desired channel based on other channel), and then tune back to the music/talk/sports programming you to easily tune to . Rotate the Encoder knob to select and play the desired channel, or use the Category...
... having to change the current channel you are used when entering and recalling preset channel numbers into memory. set tuning continues until the user decides to select that channel. 3. Basic Operation With the unit properly installed, activated and connected to tune and select a desired channel based on other channel), and then tune back to the music/talk/sports programming you to easily tune to . Rotate the Encoder knob to select and play the desired channel, or use the Category...

User Guide
Page 9
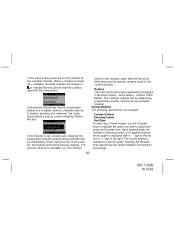
... Encoder knob, the direct tuning method or the The DISP button is heard, confirming that the preset has been stored. button changes Channel List to save into memory by pressing the and channel names. Consecutively pressing the DISP button while tuning by the Artist Name. category tuning method. Category Artist Name Display Category Song Title Display Setting/Using Channel Preset Buttons The unit contains 10 preset buttons. With the desired channel playing, press and...
... Encoder knob, the direct tuning method or the The DISP button is heard, confirming that the preset has been stored. button changes Channel List to save into memory by pressing the and channel names. Consecutively pressing the DISP button while tuning by the Artist Name. category tuning method. Category Artist Name Display Category Song Title Display Setting/Using Channel Preset Buttons The unit contains 10 preset buttons. With the desired channel playing, press and...

User Guide
Page 14
... display. This pop-up screen is followed by a display offering 2 options for the user's selection. Menu Descriptions Sirius ID Displays your 12 digit Sirius ID number. Using the Encoder knob, highlight the option you wish to select either of the jump setting options, but not both. -14- 128-7193A 14 of a city where traffic/weather reports are available: Sirius ID Sirius ID Audio Level Options Jump Settings Antenna Aiming Display Settings Memory...
... display. This pop-up screen is followed by a display offering 2 options for the user's selection. Menu Descriptions Sirius ID Displays your 12 digit Sirius ID number. Using the Encoder knob, highlight the option you wish to select either of the jump setting options, but not both. -14- 128-7193A 14 of a city where traffic/weather reports are available: Sirius ID Sirius ID Audio Level Options Jump Settings Antenna Aiming Display Settings Memory...
User Guide
Page 16
... time, a pop-up shall appear indicating "Set Jump Button" for 2 seconds, as JumpSet, the Traffic line displays "NONE" to signify that the Jump button is set to function as shown previously, providing directions to set the JumpSet channel, before taking the user to the following "Jump Setting" screen of Menu 2 sec. Options. The tuning and alert mechanism only works in the normal operation mode, and not in Channel List Mode...
... time, a pop-up shall appear indicating "Set Jump Button" for 2 seconds, as JumpSet, the Traffic line displays "NONE" to signify that the Jump button is set to function as shown previously, providing directions to set the JumpSet channel, before taking the user to the following "Jump Setting" screen of Menu 2 sec. Options. The tuning and alert mechanism only works in the normal operation mode, and not in Channel List Mode...
User Guide
Page 18
... channel tuned to after a power cycle, there will change to to the JumpSet channel immediately. Replace The traffic city ID can be replaced by programming another channel as the JumpSet channel. The JumpSet channel can only be replaced by changing it in the Menu Option - Upon entering either the contrast or dimming control, a 10 segment horizon tal bar graph is saved as the JumpSet channel. Jump Setting...
... channel tuned to after a power cycle, there will change to to the JumpSet channel immediately. Replace The traffic city ID can be replaced by programming another channel as the JumpSet channel. The JumpSet channel can only be replaced by changing it in the Menu Option - Upon entering either the contrast or dimming control, a 10 segment horizon tal bar graph is saved as the JumpSet channel. Jump Setting...

User Guide
Page 19
... right. Dimming control offers two choices; Press the select button to enter the new frequency setting, or press the MENU button to return to the menu options page with a "-" sign to the left, and a "+" sign to toggle between the FM ON or FM OFF function/display selection. Frequency Setting: Upon entering this mode, any FM transmitter frequency can be chosen using the low level audio outputs in 200kHz steps...
... right. Dimming control offers two choices; Press the select button to enter the new frequency setting, or press the MENU button to return to the menu options page with a "-" sign to the left, and a "+" sign to toggle between the FM ON or FM OFF function/display selection. Frequency Setting: Upon entering this mode, any FM transmitter frequency can be chosen using the low level audio outputs in 200kHz steps...

User Guide
Page 20
... digit numerical code that is used to navigate the list and highlight the channel to the channel and prevents the channel from being accessible during any of the tuning modes. Once a channel has been highlighted, pressing the Select Button displays the text "Skip" next to lock/unlock channel access. The Encoder knob is turned off (or by direct channel number entry, at which time the user will be adjusted.
... digit numerical code that is used to navigate the list and highlight the channel to the channel and prevents the channel from being accessible during any of the tuning modes. Once a channel has been highlighted, pressing the Select Button displays the text "Skip" next to lock/unlock channel access. The Encoder knob is turned off (or by direct channel number entry, at which time the user will be adjusted.

User Guide
Page 21
... sight satellite signal. Antenna Aiming (Home Installation) Upon entering this mode, the user is displayed with a "-" sign to the left and a "+" sign to the right. Position the antenna to access the User Audio Level Options Menu. Moving the antenna Edit Code location adjusts the bar graphs signal strength, represented Upon entering this mode, two 10 segment horizontal bar graphs are typically used reception. Once the correct code NOTE...
... sight satellite signal. Antenna Aiming (Home Installation) Upon entering this mode, the user is displayed with a "-" sign to the left and a "+" sign to the right. Position the antenna to access the User Audio Level Options Menu. Moving the antenna Edit Code location adjusts the bar graphs signal strength, represented Upon entering this mode, two 10 segment horizontal bar graphs are typically used reception. Once the correct code NOTE...

User Guide
Page 22
... Savings Time, if used. a prompt display screen appears confirming - The clock data is provided via the Sirius channel, and will also exit the desired (highlighted) function. Are You Sure? Select "Yes" or" No" and press the Encoder knob. Upon entering this mode, the user can be cleared. Clear all 24 Memory Locations can turn the Memory Search Function (S-Seek) ON or OFF. Memory Options In this mode, rotate...
... Savings Time, if used. a prompt display screen appears confirming - The clock data is provided via the Sirius channel, and will also exit the desired (highlighted) function. Are You Sure? Select "Yes" or" No" and press the Encoder knob. Upon entering this mode, the user can be cleared. Clear all 24 Memory Locations can turn the Memory Search Function (S-Seek) ON or OFF. Memory Options In this mode, rotate...

User Guide
Page 23
... when the Alarm feature is activated. NOTE: When the shuttle has not been turned on at the set the unit to receive the satellite signal so the time can be heard. Alarm Clock: When this function if your area is on the time will be triggered until the shuttle updates the time information using the satellite signal. The last selected channel prior to DST; rotate the...
... when the Alarm feature is activated. NOTE: When the shuttle has not been turned on at the set the unit to receive the satellite signal so the time can be heard. Alarm Clock: When this function if your area is on the time will be triggered until the shuttle updates the time information using the satellite signal. The last selected channel prior to DST; rotate the...
User Guide
Page 26
...:00PM • Program Alert Time 12:00PM • Program Alert Day Monday • Program Alert Channel Number (current channel) • Auto Shutdown Off • Sleep Mode Off R estore A ll S ettings? Each button on the remote control functions in the same way as the button on the Shuttle unit. The unit will now turn off after the selected time has expired Factory Default The Factory Default screen displays the text Restore Default Settings with the...
...:00PM • Program Alert Time 12:00PM • Program Alert Day Monday • Program Alert Channel Number (current channel) • Auto Shutdown Off • Sleep Mode Off R estore A ll S ettings? Each button on the remote control functions in the same way as the button on the Shuttle unit. The unit will now turn off after the selected time has expired Factory Default The Factory Default screen displays the text Restore Default Settings with the...

User Guide
Page 27
... channel number. MENU- SELECT/ DIRECT- For op- 1. Used to choose one of three ways of speaker audio output when used for adjustments in the various menus. 13. CAT- Provide means of increasing and decreasing level 3 of 4 presenting the Artist and Song title information on the front panel of 32 allows the user to switch between the 3 preset bands (A, B, C) it toward the Remote Sensor on the LCD 10 screen. 8. Used...
... channel number. MENU- SELECT/ DIRECT- For op- 1. Used to choose one of three ways of speaker audio output when used for adjustments in the various menus. 13. CAT- Provide means of increasing and decreasing level 3 of 4 presenting the Artist and Song title information on the front panel of 32 allows the user to switch between the 3 preset bands (A, B, C) it toward the Remote Sensor on the LCD 10 screen. 8. Used...
User Guide
Page 28
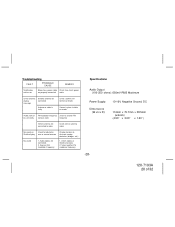
Check cables at Shuttle and radio. 2. No signal on Blown fuse, power cable Check fuse check power not properly connected cable Check antenna display message Satellite antenna not connected Antenna or cable is faulty Check satellite connection to Shuttle Contact system installer or vendor Audio static or FM modulator frequency switch to another FM modulator frequency. Specifications Audio Output (100-250 ohms): 650mV RMS Maximum Power Supply: Dimensions (W x H x D): 10-16V, Negative Ground, DC 114mm x 75.7mm x 38.5mm...
Check cables at Shuttle and radio. 2. No signal on Blown fuse, power cable Check fuse check power not properly connected cable Check antenna display message Satellite antenna not connected Antenna or cable is faulty Check satellite connection to Shuttle Contact system installer or vendor Audio static or FM modulator frequency switch to another FM modulator frequency. Specifications Audio Output (100-250 ohms): 650mV RMS Maximum Power Supply: Dimensions (W x H x D): 10-16V, Negative Ground, DC 114mm x 75.7mm x 38.5mm...
User Guide
Page 31
... representative is authorized to assume for installation, removal or reinstallation of the product, or to damage to tapes, compact discs, speakers, accessories, or vehicle electrical systems. This Warranty does not apply to any product or part thereof which vary from the date of original purchase, such defect(s) will be repaired or replaced with the sale of this Warranty...
... representative is authorized to assume for installation, removal or reinstallation of the product, or to damage to tapes, compact discs, speakers, accessories, or vehicle electrical systems. This Warranty does not apply to any product or part thereof which vary from the date of original purchase, such defect(s) will be repaired or replaced with the sale of this Warranty...


