Owners Manual
Page 2
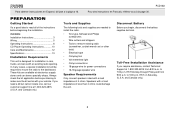
..., référez-vous à la page 30. PCD163 PREPARATION Getting Started It's a good idea to read all ...installation. EST Monday through Friday and from 8:30 a.m. Contents Installation Instructions 3 Wiring 5 Operating Instructions 6 CD Player Operating Instructions 10 Care and Maintenance 12 Specifications 13 Installation Requirements This unit is designed for power ...need a kit but cannot locate one, call our customer support line at electronics supply stores and car stereo specialty shops. These kits are needed to install the radio. • Torx type, flathead and Philips ...
..., référez-vous à la page 30. PCD163 PREPARATION Getting Started It's a good idea to read all ...installation. EST Monday through Friday and from 8:30 a.m. Contents Installation Instructions 3 Wiring 5 Operating Instructions 6 CD Player Operating Instructions 10 Care and Maintenance 12 Specifications 13 Installation Requirements This unit is designed for power ...need a kit but cannot locate one, call our customer support line at electronics supply stores and car stereo specialty shops. These kits are needed to install the radio. • Torx type, flathead and Philips ...
Owners Manual
Page 4
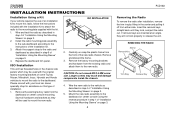
... assembly to the dashboard or center console using the reverse procedure in step 1 of "Installation Using the Mounting Sleeve" on page 3. 4 PCD163 Removing the Radio To remove the radio after installation, remove the trim ring by lifting in step 4 of installation. 1. Install the radio ... straight back until they will not lock properly to release the unit. INSTALLATION INSTRUCTIONS Installation Using a Kit If your local car stereo specialty shop for assistance on this radio, follow the instructions included with the installation kit to attach the radio to the mounting plate...
... assembly to the dashboard or center console using the reverse procedure in step 1 of "Installation Using the Mounting Sleeve" on page 3. 4 PCD163 Removing the Radio To remove the radio after installation, remove the trim ring by lifting in step 4 of installation. 1. Install the radio ... straight back until they will not lock properly to release the unit. INSTALLATION INSTRUCTIONS Installation Using a Kit If your local car stereo specialty shop for assistance on this radio, follow the instructions included with the installation kit to attach the radio to the mounting plate...
Owners Manual
Page 13
...to 20kHz, -3dB Reference Supply Voltage: 14.4VDC CD Player Signal to Noise Ratio: >85dBA Frequency Response: 20Hz to 20kHz, -3dB Channel Separation: > 55dB @ 1kHz D/A converter: 1Bit/Ch FM Tuner Mono Sensitivity: 18dBf 50dB Stereo Quieting Sensitivity: 20dBf Stereo Separation @ 1kHz: >30dB Frequency Response: 30Hz ...make sure the CDDA format is the standard format of an "original store-bought" CD. PCD163 SPECIFICATIONS CD-R and CD-RW Capability Depending on media type and method of "recording/burning", some CD-R/RWs may be closed. After "recording/ burning" the session must be incompatible ...
...to 20kHz, -3dB Reference Supply Voltage: 14.4VDC CD Player Signal to Noise Ratio: >85dBA Frequency Response: 20Hz to 20kHz, -3dB Channel Separation: > 55dB @ 1kHz D/A converter: 1Bit/Ch FM Tuner Mono Sensitivity: 18dBf 50dB Stereo Quieting Sensitivity: 20dBf Stereo Separation @ 1kHz: >30dB Frequency Response: 30Hz ...make sure the CDDA format is the standard format of an "original store-bought" CD. PCD163 SPECIFICATIONS CD-R and CD-RW Capability Depending on media type and method of "recording/burning", some CD-R/RWs may be closed. After "recording/ burning" the session must be incompatible ...


