Owners Manual
Page 2
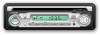
...EST Monday through Friday and from 8:30 a.m. and Canada only.) 2 to make sure the kit works with an existing radio opening. PCD163 PREPARATION Getting Started It's a good idea to remove existing radio (screwdriver, socket wrench set or other tools) • Electrical tape...and supplies are available at 1-800-323-4815. (U.S.A. EST on Saturday. (U.S.A. Contents Installation Instructions 3 Wiring 5 Operating Instructions 6 CD Player Operating Instructions 10 Care and Maintenance 12 Specifications 13 Installation Requirements This unit is designed for power connections • 16-18...
...EST Monday through Friday and from 8:30 a.m. and Canada only.) 2 to make sure the kit works with an existing radio opening. PCD163 PREPARATION Getting Started It's a good idea to remove existing radio (screwdriver, socket wrench set or other tools) • Electrical tape...and supplies are available at 1-800-323-4815. (U.S.A. EST on Saturday. (U.S.A. Contents Installation Instructions 3 Wiring 5 Operating Instructions 6 CD Player Operating Instructions 10 Care and Maintenance 12 Specifications 13 Installation Requirements This unit is designed for power connections • 16-18...

Owners Manual
Page 3
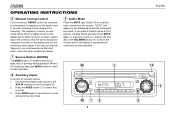
... does not operate, re-check all connections are secure and insulated with wire nuts or electrical tape. SEL/MENU BAND LOUD MODE MUTE TRACK PCD163 DISP TU RPT SCN AUX IN NING 3 BEND TABS Check the dashboard opening size by sliding the mounting sleeve into it into place. 6....4. CAUTION: The support strap must be "on the rear of the chassis using the hex nut provided. Place the radio in front of the CD player, the chassis must be brought through the mounting sleeve. INSTALLATION CAUTION: For proper operation of the dashboard opening . Do not force the sleeve...
... does not operate, re-check all connections are secure and insulated with wire nuts or electrical tape. SEL/MENU BAND LOUD MODE MUTE TRACK PCD163 DISP TU RPT SCN AUX IN NING 3 BEND TABS Check the dashboard opening size by sliding the mounting sleeve into it into place. 6....4. CAUTION: The support strap must be "on the rear of the chassis using the hex nut provided. Place the radio in front of the CD player, the chassis must be brought through the mounting sleeve. INSTALLATION CAUTION: For proper operation of the dashboard opening . Do not force the sleeve...
Owners Manual
Page 8
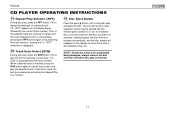
...shown on the display panel and the volume will be muted. (If you press this button while a CD is tuned offfrequency, you are receiving a clear signal. SEL/MENU BAND LOUD MODE MUTE 3b 7 9 TRACK PCD163 DISP TUN ING 6 AUX IN RPT SCN 8 8 Connect the portable audio player to the AUX ... Aux In mode and go to mute the radio volume from the system. If the radio is playing, CD play will be paused.) Press MUTE again, or press the volume +/- PCD163 OPERATING INSTRUCTIONS 6 Manual Tuning Control Turn the manual TUNING control (6) clockwise to tune upward in frequency on ...
...shown on the display panel and the volume will be muted. (If you press this button while a CD is tuned offfrequency, you are receiving a clear signal. SEL/MENU BAND LOUD MODE MUTE 3b 7 9 TRACK PCD163 DISP TUN ING 6 AUX IN RPT SCN 8 8 Connect the portable audio player to the AUX ... Aux In mode and go to mute the radio volume from the system. If the radio is playing, CD play will be paused.) Press MUTE again, or press the volume +/- PCD163 OPERATING INSTRUCTIONS 6 Manual Tuning Control Turn the manual TUNING control (6) clockwise to tune upward in frequency on ...
Owners Manual
Page 9
... the DISP button (10) to adjust the hour. 4. button (3b) to adjust the minutes. Turn the vehicle ignition and radio on page 7), the radio frequency, CD player track indication or clock may be displayed. Setting the Clock To set and normal operation will set the clock, perform the following steps: 1. Press... (10) until the time display flashes. 3. Five seconds after the last hour or minute adjustment has been made, the time will resume. 9 Press the volume - PCD163 OPERATING INSTRUCTIONS 10 Display Selector (DISP) This unit can display either the clock time or radio frequency...
... the DISP button (10) to adjust the hour. 4. button (3b) to adjust the minutes. Turn the vehicle ignition and radio on page 7), the radio frequency, CD player track indication or clock may be displayed. Setting the Clock To set and normal operation will set the clock, perform the following steps: 1. Press... (10) until the time display flashes. 3. Five seconds after the last hour or minute adjustment has been made, the time will resume. 9 Press the volume - PCD163 OPERATING INSTRUCTIONS 10 Display Selector (DISP) This unit can display either the clock time or radio frequency...
Owners Manual
Page 10
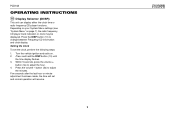
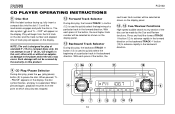
... to pause the disc. SEL/MENU BAND LOUD MODE MUTE TRACK PCD163 DISP TUN ING 6 AUX IN RPT SCN 3b 7 10 9 13 12 14 15 Play will appear on the display. Do not attempt to use 3" (8 cm.) CD singles in this product. 12 Forward Track Selector During disc play,...disc symbol flashes, and play is used to quickly select the beginning of a particular track in the backward direction. PAUSE" appears on the display. PCD163 CD PLAYER OPERATING INSTRUCTIONS 11 Disc Slot With the label surface facing up, fully insert a compact disc into the slot (11) until the mechanism engages ...
... to pause the disc. SEL/MENU BAND LOUD MODE MUTE TRACK PCD163 DISP TUN ING 6 AUX IN RPT SCN 3b 7 10 9 13 12 14 15 Play will appear on the display. Do not attempt to use 3" (8 cm.) CD singles in this product. 12 Forward Track Selector During disc play,...disc symbol flashes, and play is used to quickly select the beginning of a particular track in the backward direction. PAUSE" appears on the display. PCD163 CD PLAYER OPERATING INSTRUCTIONS 11 Disc Slot With the label surface facing up, fully insert a compact disc into the slot (11) until the mechanism engages ...
Owners Manual
Page 11
... (14) to play the selected track. If an ejected disc is not removed from the unit when disc play is still installed in the unit. PCD163 CD PLAYER OPERATING INSTRUCTIONS 14 Repeat Play Selector (RPT) During disc play and eject the disc. RPT" indication to disappear. 15 Track Scan Select (SCN) During...
... (14) to play the selected track. If an ejected disc is not removed from the unit when disc play is still installed in the unit. PCD163 CD PLAYER OPERATING INSTRUCTIONS 14 Repeat Play Selector (RPT) During disc play and eject the disc. RPT" indication to disappear. 15 Track Scan Select (SCN) During...
Owners Manual
Page 12
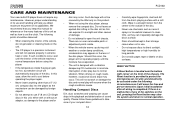
...operating the player again. • Never insert anything other causes of any maintenance. When driving on the lens of your compact discs: 12 PCD163 • Carefully wipe fingerprints, dust and dirt from the center to the outside of disc play of its capabilities. Should this product. •...points should only be covered by foreign objects. • Do not attempt to use chemicals such as record sprays or household cleaners to clean CDs, as they can irreparably damage the disc's surface. • Discs should be observed: • When cleaning the interior of the vehicle,...
...operating the player again. • Never insert anything other causes of any maintenance. When driving on the lens of your compact discs: 12 PCD163 • Carefully wipe fingerprints, dust and dirt from the center to the outside of disc play of its capabilities. Should this product. •...points should only be covered by foreign objects. • Do not attempt to use chemicals such as record sprays or household cleaners to clean CDs, as they can irreparably damage the disc's surface. • Discs should be observed: • When cleaning the interior of the vehicle,...
Owners Manual
Page 13
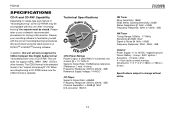
...Frequency Response: 20Hz to 20kHz, -3dB Reference Supply Voltage: 14.4VDC CD Player Signal to Noise Ratio: >85dBA Frequency Response: 20Hz to 20kHz, -3dB Channel Separation: > 55dB @ 1kHz D/A converter: 1Bit/Ch FM Tuner Mono Sensitivity: 18dBf 50dB Stereo Quieting Sensitivity: 20dBf Stereo Separation ..." CD. After "recording/ burning" the session must be incompatible with the correct "recording/burning" procedures. In addition, this unit. Review your software's recommended procedures for closing a disc/session. The CDDA format is selected. PCD163 SPECIFICATIONS CD-R and CD-RW...
...Frequency Response: 20Hz to 20kHz, -3dB Reference Supply Voltage: 14.4VDC CD Player Signal to Noise Ratio: >85dBA Frequency Response: 20Hz to 20kHz, -3dB Channel Separation: > 55dB @ 1kHz D/A converter: 1Bit/Ch FM Tuner Mono Sensitivity: 18dBf 50dB Stereo Quieting Sensitivity: 20dBf Stereo Separation ..." CD. After "recording/ burning" the session must be incompatible with the correct "recording/burning" procedures. In addition, this unit. Review your software's recommended procedures for closing a disc/session. The CDDA format is selected. PCD163 SPECIFICATIONS CD-R and CD-RW...
Owners Manual
Page 43
... connection with the sale of this product. Proof of purchase is required in the form of products purchased through an authorized Audiovox retailer in the U.S.A., Puerto Rico or Canada. No person or representative is authorized to assume for the Company any questions....4815 with a new or reconditioned product (at the Company's option) without charge for parts and repair labor. Limited Warranty CD or Multimedia Radios/Headunits Audiovox Electronics Corporation ("the Company") is committed to quality and customer service, and are not covered by improper installation, mishandling, ...
... connection with the sale of this product. Proof of purchase is required in the form of products purchased through an authorized Audiovox retailer in the U.S.A., Puerto Rico or Canada. No person or representative is authorized to assume for the Company any questions....4815 with a new or reconditioned product (at the Company's option) without charge for parts and repair labor. Limited Warranty CD or Multimedia Radios/Headunits Audiovox Electronics Corporation ("the Company") is committed to quality and customer service, and are not covered by improper installation, mishandling, ...
