
User Manual
Page 1
Before using the unit, please read this manual carefully to obtain the best performance from your unit and retain it for purchasing our products. User's Manual MP3/WMA DIGITAL AUDIO PLAYER Thank you for future reference.
Before using the unit, please read this manual carefully to obtain the best performance from your unit and retain it for purchasing our products. User's Manual MP3/WMA DIGITAL AUDIO PLAYER Thank you for future reference.

User Manual
Page 2
... limits for help. CC THIS DEVICE COMPLIES WITH PART 15 OF THE FCC RULES. I - However, there is no guarantee that is on , the user is connected. -Consult the dealer or an experienced radio/TV technician for a Class B digital device, pursuant to this equipment does cause harmful interference to radio communications. THIS CLASS B DIGITAL APPARATUS COMPLIES WITH CANADIAN ICES-003. - OPERATION IS...
... limits for help. CC THIS DEVICE COMPLIES WITH PART 15 OF THE FCC RULES. I - However, there is no guarantee that is on , the user is connected. -Consult the dealer or an experienced radio/TV technician for a Class B digital device, pursuant to this equipment does cause harmful interference to radio communications. THIS CLASS B DIGITAL APPARATUS COMPLIES WITH CANADIAN ICES-003. - OPERATION IS...
User Manual
Page 3
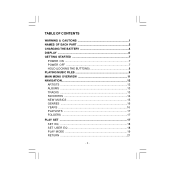
II - TABLE OF CONTENTS WARNING & CAUTIONS 1 NAMES OF EACH PART 2 CHARGING THE BATTERY 4 DISPLAY 6 GETTING STARTED 7 POWER ON 7 POWER OFF 7 HOLD (LOCKING THE BUTTONS 8 PLAYING MUSIC FILES 9 MAIN MENU OVERVIEW 11 NAVIGATION 12 ARTISTS 12 ALBUMS 13 TRACKS 13 FAVORITES 14 NEW MUSICS 15 GENRES 16 YEARS 16 PLAYLISTS 17 FOLDERS 17 PLAY SET 17 SET EQ 18 SET USER EQ 18 PLAY MODE 19 RETURN 21 -
II - TABLE OF CONTENTS WARNING & CAUTIONS 1 NAMES OF EACH PART 2 CHARGING THE BATTERY 4 DISPLAY 6 GETTING STARTED 7 POWER ON 7 POWER OFF 7 HOLD (LOCKING THE BUTTONS 8 PLAYING MUSIC FILES 9 MAIN MENU OVERVIEW 11 NAVIGATION 12 ARTISTS 12 ALBUMS 13 TRACKS 13 FAVORITES 14 NEW MUSICS 15 GENRES 16 YEARS 16 PLAYLISTS 17 FOLDERS 17 PLAY SET 17 SET EQ 18 SET USER EQ 18 PLAY MODE 19 RETURN 21 -

User Manual
Page 4
... SLEEP TIME 22 RETURN 22 GENERAL SET 23 LCD CONTRAST 23 USB MODE SET 23 FREE MEMORY 24 FACTORY RESET 24 BACK LIGHT 25 LANGUAGE 25 DELETE ONE 26 QUICK FORMAT 26 ABOUT 27 RETURN 27 EXIT 27 USB DRIVER INSTALLATION (forWindows 98 only 28 USING IN PC 31 Using Your MP3 Player without Windows Media Player 10 31 Using Your MP3 Player with Windows Media Player 10 32 Synchronize Tracks to the MP3 Player 33 Creating a Playlist 35 Deleting...
... SLEEP TIME 22 RETURN 22 GENERAL SET 23 LCD CONTRAST 23 USB MODE SET 23 FREE MEMORY 24 FACTORY RESET 24 BACK LIGHT 25 LANGUAGE 25 DELETE ONE 26 QUICK FORMAT 26 ABOUT 27 RETURN 27 EXIT 27 USB DRIVER INSTALLATION (forWindows 98 only 28 USING IN PC 31 Using Your MP3 Player without Windows Media Player 10 31 Using Your MP3 Player with Windows Media Player 10 32 Synchronize Tracks to the MP3 Player 33 Creating a Playlist 35 Deleting...
User Manual
Page 7
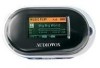
.... Button To decrease the volume. 11 PHONES Jack For connecting the headphones/earphones. 12 VOLUME + Button To increase the volume. -3- Press the " / " button to stop during playback. 7 Strip Mount For buckling the supplied strip. 8 HOLD Knob To lock the buttons. 9 RESET Hole For resetting the player. 10 VOLUME - Press it again to begin playing. Keep the " " depressed: To go back at high speed. 2 REW Button Press the " " lightly/repeatedly...
.... Button To decrease the volume. 11 PHONES Jack For connecting the headphones/earphones. 12 VOLUME + Button To increase the volume. -3- Press the " / " button to stop during playback. 7 Strip Mount For buckling the supplied strip. 8 HOLD Knob To lock the buttons. 9 RESET Hole For resetting the player. 10 VOLUME - Press it again to begin playing. Keep the " " depressed: To go back at high speed. 2 REW Button Press the " " lightly/repeatedly...

User Manual
Page 8
... supplied USB cord. • Connect the small connector of the USB cord to the MINI USB port of the unit. • Connect the large connector of the USB cord to USB mode automatically. -4- CHARGING THE BATTERY The MP3 player has a built-in, non-user-replaceable, rechargeable battery. Turn on the unit screen as below: • If you press other buttons (except the "M" button), the unit will turn to USB mode. • If no button is...
... supplied USB cord. • Connect the small connector of the USB cord to the MINI USB port of the unit. • Connect the large connector of the USB cord to USB mode automatically. -4- CHARGING THE BATTERY The MP3 player has a built-in, non-user-replaceable, rechargeable battery. Turn on the unit screen as below: • If you press other buttons (except the "M" button), the unit will turn to USB mode. • If no button is...
User Manual
Page 9
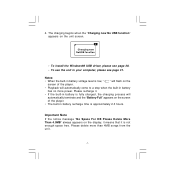
The charging begins when the "Charging now No USB function" appears on the unit screen. • To install the Windows98 USB driver, please see page 28. • To use the unit in battery recharge time is not enough space free. Please recharge it is approximately 2-3 hours. 4. Important Note If the notice message "No Space For DB Please Delete More Than 4.0MB" always appears...
The charging begins when the "Charging now No USB function" appears on the unit screen. • To install the Windows98 USB driver, please see page 28. • To use the unit in battery recharge time is not enough space free. Please recharge it is approximately 2-3 hours. 4. Important Note If the notice message "No Space For DB Please Delete More Than 4.0MB" always appears...

User Manual
Page 16
... play songs in the Music Library. • Nine searching methods are available to you: Artists, Albums, Tracks, Favorites, New Musics, Genres, Years, Playlists or Folders. • After transferring the musics to the player, the system will sort them automatically according to the previous menu. Press the " " or " " button to enter the Music Library. NAVIGATION In main menu, press the " " or " " button to select the NAVIGATION item...
... play songs in the Music Library. • Nine searching methods are available to you: Artists, Albums, Tracks, Favorites, New Musics, Genres, Years, Playlists or Folders. • After transferring the musics to the player, the system will sort them automatically according to the previous menu. Press the " " or " " button to enter the Music Library. NAVIGATION In main menu, press the " " or " " button to select the NAVIGATION item...

User Manual
Page 18
... confirm. • This track is deleted from Favorites 1. Press the " " or " " button to Favorites 1. Select "DELETE" and press the " " button to confirm. • This track is stored into Favorites. 5. Go into the Music Library menu to search your favorite songs. • User can select favorite musics and add them to Favorites or delete them from it. Delete Tracks from Favorites. 5. Press the...
... confirm. • This track is deleted from Favorites 1. Press the " " or " " button to Favorites 1. Select "DELETE" and press the " " button to confirm. • This track is stored into Favorites. 5. Go into the Music Library menu to search your favorite songs. • User can select favorite musics and add them to Favorites or delete them from it. Delete Tracks from Favorites. 5. Press the...

User Manual
Page 19
... New Musics item and then press the " " button. 2. Note:In the 1Day, 1Week & 1Month folder, it will display 20 latest tracks. -15- Or, 4. Select the Play All option to start playing. 3. New Musics • To search a track via the new musics. 1. Press the " " or " " button to select a track and press the " " button to play all tracks of the folder. Play your Favorite Music 1. In the Music Library menu, press the " " or " " button...
... New Musics item and then press the " " button. 2. Note:In the 1Day, 1Week & 1Month folder, it will display 20 latest tracks. -15- Or, 4. Select the Play All option to start playing. 3. New Musics • To search a track via the new musics. 1. Press the " " or " " button to select a track and press the " " button to play all tracks of the folder. Play your Favorite Music 1. In the Music Library menu, press the " " or " " button...

User Manual
Page 21
... into the Music Library menu and press the " " or " " button to start playing. Playlists • To search a track via the folders. 1. Press the " " or " " button to select a track, then press the " " button to select the Folders item, then press the " " button. 2. Press the " " or " " button to select a folder or a track and press the " " button to select the Playlists item, then press the " " button. 2. Press the " " or " " button to confirm...
... into the Music Library menu and press the " " or " " button to start playing. Playlists • To search a track via the folders. 1. Press the " " or " " button to select a track, then press the " " button to select the Folders item, then press the " " button. 2. Press the " " or " " button to select a folder or a track and press the " " button to select the Playlists item, then press the " " button. 2. Press the " " or " " button to confirm...
User Manual
Page 32
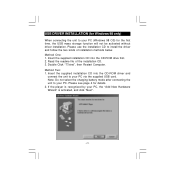
Double Click "77xinst", then Restart Computer. Read the readme file of installation methods below. Note: Do not select the charging battery mode after connecting the unit to your PC (Windows 98 OS) for the first time, the USB mass storage function will not be activated without driver installation. Please see page 4 for details. 2. If the player is activated, and click "Next". -28- Insert...
Double Click "77xinst", then Restart Computer. Read the readme file of installation methods below. Note: Do not select the charging battery mode after connecting the unit to your PC (Windows 98 OS) for the first time, the USB mass storage function will not be activated without driver installation. Please see page 4 for details. 2. If the player is activated, and click "Next". -28- Insert...
User Manual
Page 35
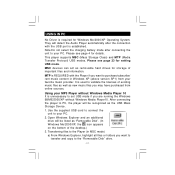
... connecting the player to PC, the player will be recognized as removable hard drives for Windows Me/2000/XP Operating System. Open Windows Explorer and an additional drive will be listed as new music files you want to transfer and copy to the "Removable Disk" drive. -31- USING IN PC No Driver is REQUIRED with the USB port is established. Use the supplied USB cord to connect the unit to the Player (in Windows XP (above version SP1) from online sources. Transferring files...
... connecting the player to PC, the player will be recognized as removable hard drives for Windows Me/2000/XP Operating System. Open Windows Explorer and an additional drive will be listed as new music files you want to transfer and copy to the "Removable Disk" drive. -31- USING IN PC No Driver is REQUIRED with the USB port is established. Use the supplied USB cord to connect the unit to the Player (in Windows XP (above version SP1) from online sources. Transferring files...
User Manual
Page 36
.... 3. Open Windows Explorer and an additional drive will not be listed as "MTP/JANUS Player". 4. Set the USB mode to MTP (Media Transfer Protocol). • If you set the USB mode to MSC, it to connect to your computer.) Note: The device is capable of transferring files at hi-speed mode of USB 2.0. Use the supplied USB cord to connect the device to your MP3 Player with the older USB 1.1 ports. If USB 2.0 port is still compatible with Windows Media Player 10 This player supports Digital Rights Management...
.... 3. Open Windows Explorer and an additional drive will not be listed as "MTP/JANUS Player". 4. Set the USB mode to MTP (Media Transfer Protocol). • If you set the USB mode to MSC, it to connect to your computer.) Note: The device is capable of transferring files at hi-speed mode of USB 2.0. Use the supplied USB cord to connect the device to your MP3 Player with the older USB 1.1 ports. If USB 2.0 port is still compatible with Windows Media Player 10 This player supports Digital Rights Management...
User Manual
Page 37
... songs purchased from an online service (such as, Napster, MusicNow). You may visit http://www.microsoft.com/windows/windowsmedia/mp10/ onlinestrores.aspx for details. Do You Want to Buy Musics from the menu bar on the online service. 3. a) Click the Library tab from an Online Service? Login to the MP3 Player 1. Open Windows Media Player10. It is an example for music on the top of the Windows Media Player screen...
... songs purchased from an online service (such as, Napster, MusicNow). You may visit http://www.microsoft.com/windows/windowsmedia/mp10/ onlinestrores.aspx for details. Do You Want to Buy Musics from the menu bar on the online service. 3. a) Click the Library tab from an Online Service? Login to the MP3 Player 1. Open Windows Media Player10. It is an example for music on the top of the Windows Media Player screen...

User Manual
Page 38
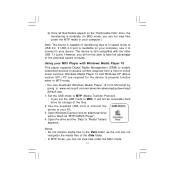
In Windows Media Player, click Sync and the "Sync List" pane appears. Then select the "MTP/JANUS Player" from the dropdown list on it. Repeat and add other songs. 3. 2. Select "Add to -> Sync List", then the song will be added to "Sync List". Locate a music in the Library and right-click on the right side of this screen. -34-
In Windows Media Player, click Sync and the "Sync List" pane appears. Then select the "MTP/JANUS Player" from the dropdown list on it. Repeat and add other songs. 3. 2. Select "Add to -> Sync List", then the song will be added to "Sync List". Locate a music in the Library and right-click on the right side of this screen. -34-

User Manual
Page 39
... listen to create a playlist. Below is an example for details about how to on your reference: -35- After transferring, the "Synchronized to transfer the musics. Click "Start Sync" to Device (4 items)" message appears. Microsoft Windows Media Player 10 makes it easier than ever to the MP3 player. Total 4 songs are a great way to control what you want, and then enjoy them. A progress indicator will show each file transferring.
... listen to create a playlist. Below is an example for details about how to on your reference: -35- After transferring, the "Synchronized to transfer the musics. Click "Start Sync" to Device (4 items)" message appears. Microsoft Windows Media Player 10 makes it easier than ever to the MP3 player. Total 4 songs are a great way to control what you want, and then enjoy them. A progress indicator will show each file transferring.
User Manual
Page 41
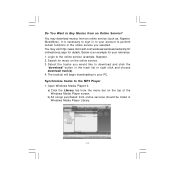
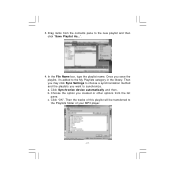
... the tracks of your MP3 player. -37- Then you may click Sync Settings to choose a synchronization method and the playlists you save the playlist, it's added to the new playlist and then click "Save Playlist As...". 4. c. 3. Once you want to the Playlists folder of this playlist will be transferred to synchronize. a. Click "OK". Click Synchronize device automatically and then, b. Drag items from the list pane.
... the tracks of your MP3 player. -37- Then you may click Sync Settings to choose a synchronization method and the playlists you save the playlist, it's added to the new playlist and then click "Save Playlist As...". 4. c. 3. Once you want to the Playlists folder of this playlist will be transferred to synchronize. a. Click "OK". Click Synchronize device automatically and then, b. Drag items from the list pane.

User Manual
Page 42
... computer. Even if the musics are removed, the license will take some space of the Playlist from your MP3 Player 1. Wait for the track to be formatted periodically. -38- In Windows Media Player, click the Library tab and the "MTP/ JANUS Player" in the folder tree. 2. Select a folder (like folder) from the device tree or select a track from Sync list. 3. Note: After download musics online, the license of the...
... computer. Even if the musics are removed, the license will take some space of the Playlist from your MP3 Player 1. Wait for the track to be formatted periodically. -38- In Windows Media Player, click the Library tab and the "MTP/ JANUS Player" in the folder tree. 2. Select a folder (like folder) from the device tree or select a track from Sync list. 3. Note: After download musics online, the license of the...
User Manual
Page 44
... a drive. • Check if the USB cable is correctly connected. • Check the USB control in the off position. • Reset the Player via the RESET hole. • Low level format (All files will be played normally. • Check if there are MP3 or WMA files on . • Check if the built-in battery. Slide the HOLD knob to confirm. b. Adjust the " VOLUME " control. If the file data is...
... a drive. • Check if the USB cable is correctly connected. • Check the USB control in the off position. • Reset the Player via the RESET hole. • Low level format (All files will be played normally. • Check if there are MP3 or WMA files on . • Check if the built-in battery. Slide the HOLD knob to confirm. b. Adjust the " VOLUME " control. If the file data is...
