

User Manual
Page 2
... manual in VGA/YbPr mode 35 10 TV troubleshooting 37 12 Notices 41 Basic operations 20 Maintenance/repair 42 Main on-screen-display (OSD) introduction 21 Specifications 43 2 Contents Index Overview 3 Operations 22 Important safety information 4 Picture adjustment 22 System setting 23 Important safety cautions 5 Audio setting 28 Accessories 7 Channel setting 30 Identification of this unit. Congratulations on your purchase of controls 8 Selecting channel 32 Control buttons Back Remote control Installation 8 OSD setting 33 9 Timer setting...
... manual in VGA/YbPr mode 35 10 TV troubleshooting 37 12 Notices 41 Basic operations 20 Maintenance/repair 42 Main on-screen-display (OSD) introduction 21 Specifications 43 2 Contents Index Overview 3 Operations 22 Important safety information 4 Picture adjustment 22 System setting 23 Important safety cautions 5 Audio setting 28 Accessories 7 Channel setting 30 Identification of this unit. Congratulations on your purchase of controls 8 Selecting channel 32 Control buttons Back Remote control Installation 8 OSD setting 33 9 Timer setting...
User Manual
Page 7
... and Contrast settings to environmental considerations. Batteries 6.. This type of irreversible LCD panel deterioration can cause permanent "Shadow Image" on normal programs in your local authorities, or the Electronics Industries Alliance Environment at: http://www.eiae.org/ Accessories 1.. Remote Control (Model Specific) 5.. FPE2000 TV unit 2.. Important Safety Cautions Important Information Regarding use of Video Games, Computer, captions or other fixed images displays The extended use Recycling...
... and Contrast settings to environmental considerations. Batteries 6.. This type of irreversible LCD panel deterioration can cause permanent "Shadow Image" on normal programs in your local authorities, or the Electronics Industries Alliance Environment at: http://www.eiae.org/ Accessories 1.. Remote Control (Model Specific) 5.. FPE2000 TV unit 2.. Important Safety Cautions Important Information Regarding use of Video Games, Computer, captions or other fixed images displays The extended use Recycling...

User Manual
Page 8
... the standby mode. VOL +/- This operation manual provides a description based on the remote control. Increase or decrease the sound volume level. SOURCE To access the SOURCE select menu 2. Change the TV channel. POWER ( ) Press this button to access the MENU main page. 3. MENU Press this button to adjust the value or setting of controls Control buttons Control Panel SOURCE MENU CH CH VOL VOL Menu Channel Down/Up Select Input Signal Volume Down/Up Power On/ Standby Speaker Speaker Remote Sensor 1. In OSD Menu, press these buttons to turn the set is...
... the standby mode. VOL +/- This operation manual provides a description based on the remote control. Increase or decrease the sound volume level. SOURCE To access the SOURCE select menu 2. Change the TV channel. POWER ( ) Press this button to access the MENU main page. 3. MENU Press this button to adjust the value or setting of controls Control buttons Control Panel SOURCE MENU CH CH VOL VOL Menu Channel Down/Up Select Input Signal Volume Down/Up Power On/ Standby Speaker Speaker Remote Sensor 1. In OSD Menu, press these buttons to turn the set is...
User Manual
Page 9
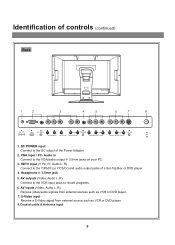
HDTV input (Y, Pb, Pr, Audio L, R) Connect to the VGA/audio output 3.5mm jacks on your PC. 3. S-Video input Receive a S-Video signal from external sources such as VCR or DVD player. 8.Coaxial cable & Antenna input 9 AV inputs (Video, Audio L, R) Receive video/audio signals from external source such as VCR or DVD player. 7. Audio in Connect to the Y/Pb/Pr (or Y/Cb/Cr) and audio output jacks of a Set-Top Box or DVD player. 4. AV outputs (Video, Audio L, R) Connect to the VCR input jacks to the DC output of controls (continued) Back 1 2 3 4 5 6 7 8 DC 12V VGA PC...
HDTV input (Y, Pb, Pr, Audio L, R) Connect to the VGA/audio output 3.5mm jacks on your PC. 3. S-Video input Receive a S-Video signal from external sources such as VCR or DVD player. 8.Coaxial cable & Antenna input 9 AV inputs (Video, Audio L, R) Receive video/audio signals from external source such as VCR or DVD player. 7. Audio in Connect to the Y/Pb/Pr (or Y/Cb/Cr) and audio output jacks of a Set-Top Box or DVD player. 4. AV outputs (Video, Audio L, R) Connect to the VCR input jacks to the DC output of controls (continued) Back 1 2 3 4 5 6 7 8 DC 12V VGA PC...

User Manual
Page 10
In the menu operation, adjust the selected item Access the menu Select OSD menu position Change audio to select item. In menu operations, used to mono, stereo or SAP Auto correct picture Select picture mode between Bright, Nature, Soft & User Select the input signal source Adjust the bass Mute Channel up /down selector. Exit the menu S.M Sound preset mode selector Setting sleep timer Previous channel Display the current state Direct channel selector Adjust the treble Flip the cover open in the arrow direction. 10 Remote Control Power on/standby Volume up /down selector;
In the menu operation, adjust the selected item Access the menu Select OSD menu position Change audio to select item. In menu operations, used to mono, stereo or SAP Auto correct picture Select picture mode between Bright, Nature, Soft & User Select the input signal source Adjust the bass Mute Channel up /down selector. Exit the menu S.M Sound preset mode selector Setting sleep timer Previous channel Display the current state Direct channel selector Adjust the treble Flip the cover open in the arrow direction. 10 Remote Control Power on/standby Volume up /down selector;

User Manual
Page 11
Preparing the Remote Control Please install the batteries before using the remote control. Batteries for the Remote Control If the remote control fails to operate the LCD TV functions, replace the batteries in the remote control. 1 Open the battery cover. 2 Insert two size-AAA batteries. 3 Replace the cover and slide in reverse until the lock snaps.
Preparing the Remote Control Please install the batteries before using the remote control. Batteries for the Remote Control If the remote control fails to operate the LCD TV functions, replace the batteries in the remote control. 1 Open the battery cover. 2 Insert two size-AAA batteries. 3 Replace the cover and slide in reverse until the lock snaps.

User Manual
Page 13
..., you can tune most cable channels without using a Cable TV converter box. Descrambling these signals for normal viewing requires the use of the converter/descrambler box (usually channel 3 or 4) and use of the TV. Follow the connections shown below . Set the TV/VCR to the output channel of the converter/descrambler or satellite box to tune scrambled channels. FOR SUBSCRIBERS TO SCRAMBLED CABLE TV SERVICE OR SATELLITE If you...
..., you can tune most cable channels without using a Cable TV converter box. Descrambling these signals for normal viewing requires the use of the converter/descrambler box (usually channel 3 or 4) and use of the TV. Follow the connections shown below . Set the TV/VCR to the output channel of the converter/descrambler or satellite box to tune scrambled channels. FOR SUBSCRIBERS TO SCRAMBLED CABLE TV SERVICE OR SATELLITE If you...
User Manual
Page 14
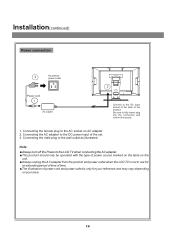
Installation(continued) Power connection Household 3 power outlet Power cord 1 AC adapter 2 Connect to the DC input socket of the back of the set. 3. Connecting the male plug to the AC socket on AC adapter. 2. Connecting the female plug to the wall outlet as illustrated. Connecting the AC adapter to fully insert plug into the connection and confirm it is secure. 1. Be sure to the DC power input of the product. Note:
Installation(continued) Power connection Household 3 power outlet Power cord 1 AC adapter 2 Connect to the DC input socket of the back of the set. 3. Connecting the male plug to the AC socket on AC adapter. 2. Connecting the female plug to the wall outlet as illustrated. Connecting the AC adapter to fully insert plug into the connection and confirm it is secure. 1. Be sure to the DC power input of the product. Note:

User Manual
Page 16
... through composite cable. Installation(continued) Notes about connection 1. When connecting an external device, turn off the power of LCD TV to the output of the picture with high quality picture and sound. Composite Video signal connection Connect the composite video signal terminal on the TV to AV mode. If you select S-video signal, please set the input signal source of the main unit first to SVIDEO mode. Carefully check the terminals for position and type before making...
... through composite cable. Installation(continued) Notes about connection 1. When connecting an external device, turn off the power of LCD TV to the output of the picture with high quality picture and sound. Composite Video signal connection Connect the composite video signal terminal on the TV to AV mode. If you select S-video signal, please set the input signal source of the main unit first to SVIDEO mode. Carefully check the terminals for position and type before making...

User Manual
Page 17
We strongly recommend that you select PC signal, please set the input signal source of PC equipment through Min D-sub 15 pin cable as illustrated.For the audio connection,use an audio cord that matches the audio output terminal on the PC to 60Hz. If you set it may not display correctly. (Control Panel/Display Settings) 3. If the signal resolution exceeds this resolution, it above 60Hz, the unit may not be possible to...
We strongly recommend that you select PC signal, please set the input signal source of PC equipment through Min D-sub 15 pin cable as illustrated.For the audio connection,use an audio cord that matches the audio output terminal on the PC to 60Hz. If you set it may not display correctly. (Control Panel/Display Settings) 3. If the signal resolution exceeds this resolution, it above 60Hz, the unit may not be possible to...
User Manual
Page 18
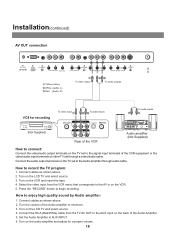
... "RECORD" button to AUX INPUT. 6. How to record the TV program: 1. Connect cables as shown above . 2. Connect the audio output terminals on the VCR. 5. Turn on the audio amplifier and adjust for recording To video input Y To audio inputs WR ANT OUT AV OUT S-VIDEO ANT IN VIDEO L AUDIO R To audio inputs W R (Not Supplied) AV IN VIDEO L AUDIO R Rear of the VCR Audio amplifier (Not Supplied) How to connect: Connect the video/audio output terminals on the TV set to the signal input terminals...
... "RECORD" button to AUX INPUT. 6. How to record the TV program: 1. Connect cables as shown above . 2. Connect the audio output terminals on the VCR. 5. Turn on the audio amplifier and adjust for recording To video input Y To audio inputs WR ANT OUT AV OUT S-VIDEO ANT IN VIDEO L AUDIO R To audio inputs W R (Not Supplied) AV IN VIDEO L AUDIO R Rear of the VCR Audio amplifier (Not Supplied) How to connect: Connect the video/audio output terminals on the TV set to the signal input terminals...

User Manual
Page 19
... outputs on your DVD player are sometimes labeled Y, Cb, Cr. Installation(continued) YPbPr input connection Please connect the YPbPr input terminals on the TV set. DC 12V VGA PC-AUDIO Y Pb Pr R AUDIO L PHONE VIDEO L AUDIO R VIDEO L AUDIO R S-VIDEO RF DT V IN AV OUT AV IN G Y Yellow (video) W white (audio L) R red (audio R, Pr) G Green (Y) B Blue (Pb) BR R W Video cable Audio cable G B RR W HDTV OUT ANT Y Pb Pr AV OUT R AUDIO L AUDIO R AUDIO L VIDEO S-VIDEO Rear of the LCD TV to like colors. 19 If so, connect...
... outputs on your DVD player are sometimes labeled Y, Cb, Cr. Installation(continued) YPbPr input connection Please connect the YPbPr input terminals on the TV set. DC 12V VGA PC-AUDIO Y Pb Pr R AUDIO L PHONE VIDEO L AUDIO R VIDEO L AUDIO R S-VIDEO RF DT V IN AV OUT AV IN G Y Yellow (video) W white (audio L) R red (audio R, Pr) G Green (Y) B Blue (Pb) BR R W Video cable Audio cable G B RR W HDTV OUT ANT Y Pb Pr AV OUT R AUDIO L AUDIO R AUDIO L VIDEO S-VIDEO Rear of the LCD TV to like colors. 19 If so, connect...

User Manual
Page 20
... power completely, unplug the power cord from the wall outlet. SOURCE TV AV SVIDEO YPbPr/YCbCr VGA TV Note: All buttons shown in the manual are located on the remote control. Press VOL+/- S.M 2 If you want to highlight your desired input signal source. Basic Operations Turning on 1 Connect the power correctly, then the red indicator lights up and the unit is in STANDBY mode. (See Page 14.) 2 Press the POWER ( )button on the remote control...
... power completely, unplug the power cord from the wall outlet. SOURCE TV AV SVIDEO YPbPr/YCbCr VGA TV Note: All buttons shown in the manual are located on the remote control. Press VOL+/- S.M 2 If you want to highlight your desired input signal source. Basic Operations Turning on 1 Connect the power correctly, then the red indicator lights up and the unit is in STANDBY mode. (See Page 14.) 2 Press the POWER ( )button on the remote control...
User Manual
Page 21
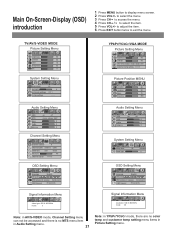
... translucent OSD timeout 30 seconds Signal Information Menu video type: 650 X 462/60Hz mode: 3 Signal Information Menu resolution: 640 X 480/60Hz mode: 40 Note: in AV/S-VIDEO mode, Channel Setting menu can not be accessed and there is no MTS menu item in Audio Setting menu. 21 Note: in YPbPr/YCbCr mode, there are no color temp and customer temp setting menu items in Picture Setting menu. Main On-Screen-Display (OSD) introduction 1 Press MENU button to select the item...
... translucent OSD timeout 30 seconds Signal Information Menu video type: 650 X 462/60Hz mode: 3 Signal Information Menu resolution: 640 X 480/60Hz mode: 40 Note: in AV/S-VIDEO mode, Channel Setting menu can not be accessed and there is no MTS menu item in Audio Setting menu. 21 Note: in YPbPr/YCbCr mode, there are no color temp and customer temp setting menu items in Picture Setting menu. Main On-Screen-Display (OSD) introduction 1 Press MENU button to select the item...

User Manual
Page 22
... To adjust picture's brightness 0-100 contrast To adjust picture's contrast 0-100 color To adjust picture's color sharpness To adjust picture's sharpness 0-36 0-63 tint To adjust picture's tint -32-+31 You can select picture mode by pressing MENU. 2 Press CH5/6to select the item brightness 50 that you want to adjust selected item. soft bright user nature Bright: Select for a standard picture. Nature: Select for a bright picture. Operations Picture adjustment 1 Access Picture Setting menu by P.M button. to adjust...
... To adjust picture's brightness 0-100 contrast To adjust picture's contrast 0-100 color To adjust picture's color sharpness To adjust picture's sharpness 0-36 0-63 tint To adjust picture's tint -32-+31 You can select picture mode by pressing MENU. 2 Press CH5/6to select the item brightness 50 that you want to adjust selected item. soft bright user nature Bright: Select for a standard picture. Nature: Select for a bright picture. Operations Picture adjustment 1 Access Picture Setting menu by P.M button. to adjust...

User Manual
Page 24
... access the sub-menu.) 4 Press CH5/6to select Vchip global setting item. Some TV programs only provide one channel caption, one channel text, or only caption without text. Use VOL+/- S.M Note: 1. Parental Control with closed caption signals, and therefore the TV will not be broadcast with V-Chip 1 Access the System Setting menu. 2 Press CH5/6to select V-Chip settings item. blue screen on backlight 6 ccd mode settings CC 1 V-chip settings - - - - 3 Press VOL+/- menu.(The default password...
... access the sub-menu.) 4 Press CH5/6to select Vchip global setting item. Some TV programs only provide one channel caption, one channel text, or only caption without text. Use VOL+/- S.M Note: 1. Parental Control with closed caption signals, and therefore the TV will not be broadcast with V-Chip 1 Access the System Setting menu. 2 Press CH5/6to select V-Chip settings item. blue screen on backlight 6 ccd mode settings CC 1 V-chip settings - - - - 3 Press VOL+/- menu.(The default password...

User Manual
Page 28
...: Select for a music program. Custom settings mode in the Audio Setting OSD are saved under USER mode. 28 to restore. volume 75 (Range:0-100) Muting the sound You can press S.M button on the remote control to switch the sound mode between user, movie, music, and news. to select MTS item. 3 Press VOL+/- News: Select for a speech or talk program. Operations (continued) Audio Setting Selecting the MTS 1 Access the Audio Setting menu. 2 Press CH5/6 to...
...: Select for a music program. Custom settings mode in the Audio Setting OSD are saved under USER mode. 28 to restore. volume 75 (Range:0-100) Muting the sound You can press S.M button on the remote control to switch the sound mode between user, movie, music, and news. to select MTS item. 3 Press VOL+/- News: Select for a speech or talk program. Operations (continued) Audio Setting Selecting the MTS 1 Access the Audio Setting menu. 2 Press CH5/6 to...
User Manual
Page 30
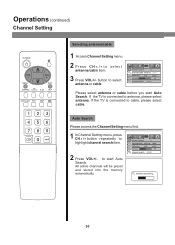
... start Auto Search. Auto Search Please access the Channel Setting menu first. 1 In Channel Setting menu, press CH5/6button repeatedly to antenna, please select antenna. If the TV is connected to highlight channel search item. 2 Press VOL+/- All active channels will be preset and stored into the memory automatically. to cable, please select cable. channel number 9 antenna/cable antenna cable add/erase add erase fine tune 48 channel search antenna searching 30 Operations (continued) Channel Setting Selecting antenna/cable 1 Access Channel Setting menu...
... start Auto Search. Auto Search Please access the Channel Setting menu first. 1 In Channel Setting menu, press CH5/6button repeatedly to antenna, please select antenna. If the TV is connected to highlight channel search item. 2 Press VOL+/- All active channels will be preset and stored into the memory automatically. to cable, please select cable. channel number 9 antenna/cable antenna cable add/erase add erase fine tune 48 channel search antenna searching 30 Operations (continued) Channel Setting Selecting antenna/cable 1 Access Channel Setting menu...
User Manual
Page 35
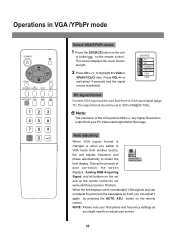
.../YPbPr mode 1 Press the SOURCE button on the unit or button on the remote control. Press VOL+/- S.M PC signal format Connect VGA input and be set and on the set to: 800 x 600@60-70Hz. The screen displays the menu shown as you can not adjust the picture to the best status by itself, you might need to re-adjust your PC Video card might distort the image Auto adjusting When VGA signal format is changed...
.../YPbPr mode 1 Press the SOURCE button on the unit or button on the remote control. Press VOL+/- S.M PC signal format Connect VGA input and be set and on the set to: 800 x 600@60-70Hz. The screen displays the menu shown as you can not adjust the picture to the best status by itself, you might need to re-adjust your PC Video card might distort the image Auto adjusting When VGA signal format is changed...
User Manual
Page 43
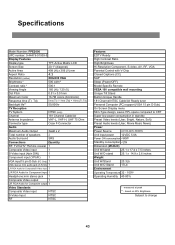
... jack 1 Composite Video output 1 L/R RCA Audio for Composite output 1 Video Standards Composite Video input NTSC S-Video Input NTSC RF NTSC Features EDTV Ready High Contrast Ratio High Brightness Hi-Resolution Component, S-video, AV, RF, VGA Parental Control with V-Chip Closed Captions (CC) SAP Sleep (Power/OFF) Model Specific Remote VESA 100 compatible wall mounting Unique Tilt Stand Built-in Unique Handle 181 Channel NTSC Cable/Air Ready tuner Personal Computer (PC) support (VGA 15 pin D-Sub) On Screen Display menu Slim-Type design, saves...
... jack 1 Composite Video output 1 L/R RCA Audio for Composite output 1 Video Standards Composite Video input NTSC S-Video Input NTSC RF NTSC Features EDTV Ready High Contrast Ratio High Brightness Hi-Resolution Component, S-video, AV, RF, VGA Parental Control with V-Chip Closed Captions (CC) SAP Sleep (Power/OFF) Model Specific Remote VESA 100 compatible wall mounting Unique Tilt Stand Built-in Unique Handle 181 Channel NTSC Cable/Air Ready tuner Personal Computer (PC) support (VGA 15 pin D-Sub) On Screen Display menu Slim-Type design, saves...


