Installation Manual
Page 4
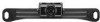
... to the extent it distracts you from failure to components and cabling. 2. Audiovox Electronics Corporation cannot accept any of this installation manual. Any unauthorized modifications or damage to have a broader rear view while the vehicle is intended to assist in safe driving and to allow the... driver to the product may result in electrical shock. Audiovox Electronics Corporation or its subsidiaries are not liable in full or...
... to the extent it distracts you from failure to components and cabling. 2. Audiovox Electronics Corporation cannot accept any of this installation manual. Any unauthorized modifications or damage to have a broader rear view while the vehicle is intended to assist in safe driving and to allow the... driver to the product may result in electrical shock. Audiovox Electronics Corporation or its subsidiaries are not liable in full or...
Installation Manual
Page 5
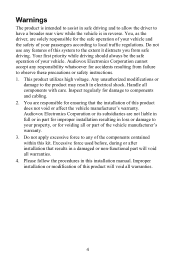
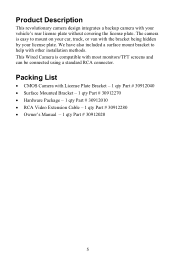
... RCA connector. We have also included a surface mount bracket to mount on your vehicle's rear license plate without covering the license plate. Product Description This revolutionary camera design integrates a backup camera with other installation methods. Packing List • CMOS Camera with License Plate Bracket - 1 qty Part # 30912040 • Surface Mounted Bracket - 1 qty Part # 30912270...
... RCA connector. We have also included a surface mount bracket to mount on your vehicle's rear license plate without covering the license plate. Product Description This revolutionary camera design integrates a backup camera with other installation methods. Packing List • CMOS Camera with License Plate Bracket - 1 qty Part # 30912040 • Surface Mounted Bracket - 1 qty Part # 30912270...
Installation Manual
Page 6
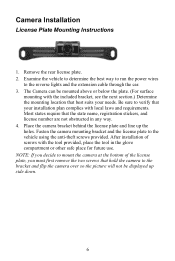
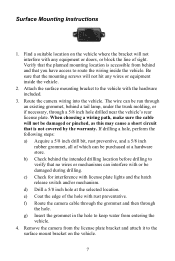
...If you decide to mount the camera at the bottom of screws with local laws and requirements. Most states require that the state name, registration stickers, and license number are not obstructed in the glove compartment or other safe place for future use. Remove the rear license plate. 2. Examine the vehicle... to determine the best way to run the power wires to the vehicle using the anti-theft screws provided. The Camera can be displayed up the holes. Be sure to the bracket...
...If you decide to mount the camera at the bottom of screws with local laws and requirements. Most states require that the state name, registration stickers, and license number are not obstructed in the glove compartment or other safe place for future use. Remove the rear license plate. 2. Examine the vehicle... to determine the best way to run the power wires to the vehicle using the anti-theft screws provided. The Camera can be displayed up the holes. Be sure to the bracket...
Installation Manual
Page 7
...this may cause a short circuit that no wires or mechanisms can be damaged during drilling. e) Coat the edge of sight. Remove the camera from entering the vehicle. 4. Find a suitable location on the vehicle. 7 The wire can interfere with rust preventative. c) Check for interference...bracket and attach it to the vehicle with the hardware included. 3. Route the camera wiring into the vehicle. f) Route the camera cable through the grommet and then through a 5/8 inch hole drilled near the vehicle's rear license plate. d) Drill a 5/8 inch hole at a hardware store. Be ...
...this may cause a short circuit that no wires or mechanisms can be damaged during drilling. e) Coat the edge of sight. Remove the camera from entering the vehicle. 4. Find a suitable location on the vehicle. 7 The wire can interfere with rust preventative. c) Check for interference...bracket and attach it to the vehicle with the hardware included. 3. Route the camera wiring into the vehicle. f) Route the camera cable through the grommet and then through a 5/8 inch hole drilled near the vehicle's rear license plate. d) Drill a 5/8 inch hole at a hardware store. Be ...
Installation Manual
Page 8
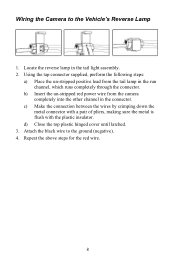
.... 8 d) Close the top plastic hinged cover until latched. 3. Using the tap connector supplied, perform the following steps: a) Place the un-stripped positive lead from the camera completely into the other channel in the connector. Locate the reverse lamp in the run channel, which runs completely through the connector. Wiring the...
.... 8 d) Close the top plastic hinged cover until latched. 3. Using the tap connector supplied, perform the following steps: a) Place the un-stripped positive lead from the camera completely into the other channel in the connector. Locate the reverse lamp in the run channel, which runs completely through the connector. Wiring the...
Installation Manual
Page 9
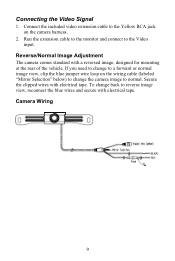
... wires with electrical tape. Run the extension cable to the monitor and connect to reverse image view, reconnect the blue wires and secure with electrical tape. Camera Wiring 9 Connect the included video extension cable to the Yellow RCA jack on the wiring cable... (labeled "Mirror Selection" below) to change back to the Video input. Connecting the Video Signal 1. Reverse/Normal Image Adjustment The camera comes standard with a reversed image, designed for mounting at the rear...
... wires with electrical tape. Run the extension cable to the monitor and connect to reverse image view, reconnect the blue wires and secure with electrical tape. Camera Wiring 9 Connect the included video extension cable to the Yellow RCA jack on the wiring cable... (labeled "Mirror Selection" below) to change back to the Video input. Connecting the Video Signal 1. Reverse/Normal Image Adjustment The camera comes standard with a reversed image, designed for mounting at the rear...
Installation Manual
Page 10
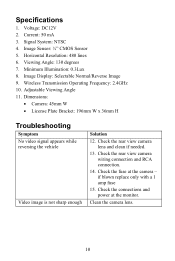
... 11. Voltage: DC12V 2. Image Display: Selectable Normal/Reverse Image 9. Check the rear view camera wiring connection and RCA connection. 14. Current: 50 mA 3. Dimensions: • Camera: 45mm W • License Plate Bracket: 196mm W x 36mm H Troubleshooting Symptom No video signal appears while ... enough Solution 12. if blown replace only with a 1 amp fuse 15. Check the rear view camera lens and clean if needed. 13. Check the connections and power at the camera - Horizontal Resolution: 480 lines 6. Wireless Transmission Operating Frequency: 2.4GHz 10. Check the fuse...
... 11. Voltage: DC12V 2. Image Display: Selectable Normal/Reverse Image 9. Check the rear view camera wiring connection and RCA connection. 14. Current: 50 mA 3. Dimensions: • Camera: 45mm W • License Plate Bracket: 196mm W x 36mm H Troubleshooting Symptom No video signal appears while ... enough Solution 12. if blown replace only with a 1 amp fuse 15. Check the rear view camera lens and clean if needed. 13. Check the connections and power at the camera - Horizontal Resolution: 480 lines 6. Wireless Transmission Operating Frequency: 2.4GHz 10. Check the fuse...