

User Guide
Page 3
......iv Package contents...vi Z97-AR specifications summary vi Chapter 1: Product Introduction 1.1 Before you proceed 1-1 1.2 Motherboard overview 1-1 1.3 Central Processing Unit (CPU 1-4 1.4 System memory 1-7 1.5 Expansion slots 1-20 1.6 Jumpers...1-23 1.7 Connectors 1-25 1.8 Onboard LEDs 1-36 1.9 Onboard buttons and switches 1-38 1.10 Software support 1-42 Chapter 2: BIOS information 2.1 Managing and updating your BIOS 2-1 2.2 BIOS setup program 2-7 2.3 My Favorites...
......iv Package contents...vi Z97-AR specifications summary vi Chapter 1: Product Introduction 1.1 Before you proceed 1-1 1.2 Motherboard overview 1-1 1.3 Central Processing Unit (CPU 1-4 1.4 System memory 1-7 1.5 Expansion slots 1-20 1.6 Jumpers...1-23 1.7 Connectors 1-25 1.8 Onboard LEDs 1-36 1.9 Onboard buttons and switches 1-38 1.10 Software support 1-42 Chapter 2: BIOS information 2.1 Managing and updating your BIOS 2-1 2.2 BIOS setup program 2-7 2.3 My Favorites...

User Guide
Page 4
...electrical outlet before relocating the system. • When adding or removing devices to or from the system, ensure that the power cables for the BIOS parameters are using, contact your local power company. • If the power supply is broken, do not try to fix it by yourself.... or your power supply is set to moisture. • Place the product on the motherboard. • Chapter 2: BIOS information This chapter discusses changing system settings through the BIOS Setup menus. How this guide This user guide contains the information you detect any area where it may be exposed to...
...electrical outlet before relocating the system. • When adding or removing devices to or from the system, ensure that the power cables for the BIOS parameters are using, contact your local power company. • If the power supply is broken, do not try to fix it by yourself.... or your power supply is set to moisture. • Place the product on the motherboard. • Chapter 2: BIOS information This chapter discusses changing system settings through the BIOS Setup menus. How this guide This user guide contains the information you detect any area where it may be exposed to...

User Guide
Page 8
ASUS CPU power utility TPU - EPU, EPU switch Fan Xpert 3 - Most advanced options with up to 10 Gb/s data transfer speeds Special Memory O.C. Design - capability under ... you go , Photo Express, Remote Desktop, Quick Launch, Windows® 8 Login, and Bluetooth Pairing * The NFC Express 2 is purchased separately. UEFI BIOS - NFC receiver ans 2-port USB 3.0 hub - Z97-AR specifications summary ASUS Exclusive Features DIGI+ Power Control - Auto Tuning, TPU, GPU Boost, 2-level TPU switch EPU - The latest transfer technologies with fast response...
ASUS CPU power utility TPU - EPU, EPU switch Fan Xpert 3 - Most advanced options with up to 10 Gb/s data transfer speeds Special Memory O.C. Design - capability under ... you go , Photo Express, Remote Desktop, Quick Launch, Windows® 8 Login, and Bluetooth Pairing * The NFC Express 2 is purchased separately. UEFI BIOS - NFC receiver ans 2-port USB 3.0 hub - Z97-AR specifications summary ASUS Exclusive Features DIGI+ Power Control - Auto Tuning, TPU, GPU Boost, 2-level TPU switch EPU - The latest transfer technologies with fast response...

User Guide
Page 9
... MHz at 0.001 V increment - Feel the sound power with smart devices in real time UEFI BIOS EZ Mode featuring friendly graphics user interface - Monitor your PC status with different usage scenarios Steam support...ASUS Q-Design - ASUS Fanless Design: Heatsink solution Precision Tweaker 2: - vCCIO: Adjustable Analog and Digital I /O ports Crystal Sound 2 - vCore: Adjustable CPU Core voltage at 0.001 V increment - vCCSA: Adjustable CPU System Agent voltage at 0.001 V increment - Z97-AR specifications summary ASUS Exclusive Features ASUS Special Features ASUS Quiet Thermal Solution ASUS...
... MHz at 0.001 V increment - Feel the sound power with smart devices in real time UEFI BIOS EZ Mode featuring friendly graphics user interface - Monitor your PC status with different usage scenarios Steam support...ASUS Q-Design - ASUS Fanless Design: Heatsink solution Precision Tweaker 2: - vCCIO: Adjustable Analog and Digital I /O ports Crystal Sound 2 - vCore: Adjustable CPU Core voltage at 0.001 V increment - vCCSA: Adjustable CPU System Agent voltage at 0.001 V increment - Z97-AR specifications summary ASUS Exclusive Features ASUS Special Features ASUS Quiet Thermal Solution ASUS...

User Guide
Page 10
x 9.6 in . Z97-AR specifications summary Rear panel I/O ports Internal I/O connectors BIOS features Manageability Support DVD Operating system support Form factor 1 x Optical S/PDIF out port 1 x Intel® LAN (RJ45) port 4 x USB 3.0/2.0 ports 2 x USB ...Front panel audio connector (AAFP) 64 Mb Flash ROM, UEFI AMI BIOS, PnP, DMI 2.7, WfM 2.0, SM BIOS 2.7, ACPI 5.0, Multi-language BIOS, ASUS EZ Flash 2, ASUS CrashFree BIOS 3, My Favorites, Quick Note, Last Modified log, F12 PrintScreen, F3 Shortcut function, and ASUS DRAM SPD (Serial Presence Detect) memory information WfM 2.0, DMI 2.7, ...
x 9.6 in . Z97-AR specifications summary Rear panel I/O ports Internal I/O connectors BIOS features Manageability Support DVD Operating system support Form factor 1 x Optical S/PDIF out port 1 x Intel® LAN (RJ45) port 4 x USB 3.0/2.0 ports 2 x USB ...Front panel audio connector (AAFP) 64 Mb Flash ROM, UEFI AMI BIOS, PnP, DMI 2.7, WfM 2.0, SM BIOS 2.7, ACPI 5.0, Multi-language BIOS, ASUS EZ Flash 2, ASUS CrashFree BIOS 3, My Favorites, Quick Note, Last Modified log, F12 PrintScreen, F3 Shortcut function, and ASUS DRAM SPD (Serial Presence Detect) memory information WfM 2.0, DMI 2.7, ...
User Guide
Page 31
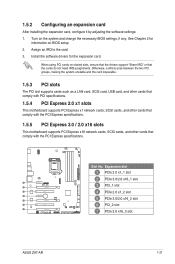
... the PCI Express specifications. Expansion slot PCIe 2.0 x1_1 slot PCIe 3.0/2.0 x16_1 slot PCI_1 slot PCIe 2.0 x1_2 slot PCIe 3.0/2.0 x16_2 slot PCI_2 slot PCIe 2.0 x16_3 slot ASUS Z97-AR 1-21 Otherwise, conflicts arise between the two PCI groups, making the system unstable and the card inoperable. 1.5.3 PCI slots The PCI slot supports cards such... IRQ assignments. Assign an IRQ to the card. 3. See Chapter 2 for the expansion card. When using PCI cards on the system and change the necessary BIOS settings, if any. Install the software drivers for information on...
... the PCI Express specifications. Expansion slot PCIe 2.0 x1_1 slot PCIe 3.0/2.0 x16_1 slot PCI_1 slot PCIe 2.0 x1_2 slot PCIe 3.0/2.0 x16_2 slot PCI_2 slot PCIe 2.0 x16_3 slot ASUS Z97-AR 1-21 Otherwise, conflicts arise between the two PCI groups, making the system unstable and the card inoperable. 1.5.3 PCI slots The PCI slot supports cards such... IRQ assignments. Assign an IRQ to the card. 3. See Chapter 2 for the expansion card. When using PCI cards on the system and change the necessary BIOS settings, if any. Install the software drivers for information on...

User Guide
Page 33
... data. 1.6 Jumpers 1. Move the jumper cap from pins 1-2 (default) to overclocking, use the CPU Parameter Recall (C.P.R.) feature. Hold down and reboot the system, then the BIOS automatically resets parameter settings to default values. • Due to enable C.P.R. To erase the RTC RAM: 1. function. Keep the cap on CLRTC jumper default position... Clock (RTC) RAM in CMOS, which include system setup information such as system passwords. The onboard button cell battery powers the RAM data in CMOS. ASUS Z97-AR 1-23
... data. 1.6 Jumpers 1. Move the jumper cap from pins 1-2 (default) to overclocking, use the CPU Parameter Recall (C.P.R.) feature. Hold down and reboot the system, then the BIOS automatically resets parameter settings to default values. • Due to enable C.P.R. To erase the RTC RAM: 1. function. Keep the cap on CLRTC jumper default position... Clock (RTC) RAM in CMOS, which include system setup information such as system passwords. The onboard button cell battery powers the RAM data in CMOS. ASUS Z97-AR 1-23

User Guide
Page 36
... Orange 100 Mbps connection Orange (Blinking) Data activity Green 1 Gbps connection Orange (Blinking Ready to three displays under Windows® OS environment, two displays under BIOS, and one display under DOS. • Intel display architecture design supports the following maximum supported pixel clocks (Pixel Clock = H total x V Total x Frame Rate (Screen refresh...
... Orange 100 Mbps connection Orange (Blinking) Data activity Green 1 Gbps connection Orange (Blinking Ready to three displays under Windows® OS environment, two displays under BIOS, and one display under DOS. • Intel display architecture design supports the following maximum supported pixel clocks (Pixel Clock = H total x V Total x Frame Rate (Screen refresh...
User Guide
Page 37
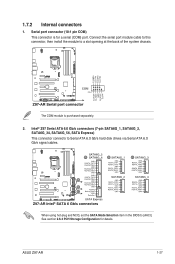
... COM module is for details. When using hot-plug and NCQ, set the SATA Mode Selection item in the BIOS to Serial ATA 6.0 Gb/s hard disk drives via Serial ATA 6.0 Gb/s signal cables. ASUS Z97-AR 1-27 See section 2.6.3 PCH Storage Configuration for a serial (COM) port. Serial port connector (10-1 pin COM) This connector...
... COM module is for details. When using hot-plug and NCQ, set the SATA Mode Selection item in the BIOS to Serial ATA 6.0 Gb/s hard disk drives via Serial ATA 6.0 Gb/s signal cables. ASUS Z97-AR 1-27 See section 2.6.3 PCH Storage Configuration for a serial (COM) port. Serial port connector (10-1 pin COM) This connector...

User Guide
Page 40
...'s high-definition audio capability. • If you connect a high-definition front panel audio module to this connector, set the Front Panel Type item in the BIOS setup to this connector. • We recommend that supports either HD Audio or legacy AC`97 audio standard. 5. By default, this connector is for details...
...'s high-definition audio capability. • If you connect a high-definition front panel audio module to this connector, set the Front Panel Type item in the BIOS setup to this connector. • We recommend that supports either HD Audio or legacy AC`97 audio standard. 5. By default, this connector is for details...

User Guide
Page 48
... bootup. • You may change settings to section 1.8 Onboard LEDs for overclockers and gamers who continually change the EPU settings in the software application or BIOS setup program and enable the EPU function at the same time. Enable this switch when the system is powered off. • The EPU LED (OLED2...
... bootup. • You may change settings to section 1.8 Onboard LEDs for overclockers and gamers who continually change the EPU settings in the software application or BIOS setup program and enable the EPU function at the same time. Enable this switch when the system is powered off. • The EPU LED (OLED2...
User Guide
Page 49
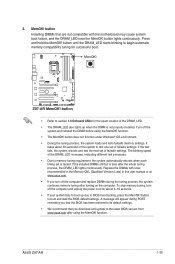
...set of the DRAM_LED. • The DRAM_LED also lights up due to boot after the whole tuning process, the DRAM_LED lights continuously. ASUS Z97-AR 1-39 button until the DRAM_LED starts blinking to begin automatic memory compatibility tuning for the exact location of failsafe settings. To stop memory ... If the test fails, the system reboots and test the next set is not properly installed. If the installed DIMMs still fail to BIOS overclocking, press the MemOK! Turn off the computer and replace DIMMs during POST reminding you download and update to its default settings. •...
...set of the DRAM_LED. • The DRAM_LED also lights up due to boot after the whole tuning process, the DRAM_LED lights continuously. ASUS Z97-AR 1-39 button until the DRAM_LED starts blinking to begin automatic memory compatibility tuning for the exact location of failsafe settings. To stop memory ... If the test fails, the system reboots and test the next set is not properly installed. If the installed DIMMs still fail to BIOS overclocking, press the MemOK! Turn off the computer and replace DIMMs during POST reminding you download and update to its default settings. •...

User Guide
Page 50
... this switch under Windows® OS environment, the TPU function will use the 5-Way Optimization and TPU feature in the AI Suite 3 application, adjust the BIOS setup program or enable the TPU switch at the same time. 3. TPU switch With its two-level adjustment functions, the TPU allows you to Enabled...
... this switch under Windows® OS environment, the TPU function will use the 5-Way Optimization and TPU feature in the AI Suite 3 application, adjust the BIOS setup program or enable the TPU switch at the same time. 3. TPU switch With its two-level adjustment functions, the TPU allows you to Enabled...
User Guide
Page 53
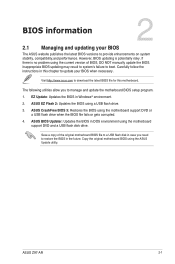
... in case you to restore the BIOS in Windows® environment. 2. Save a copy of BIOS, DO NOT manually update the BIOS. Chapter 2: BIOS information BIOS information 2 2.1 Managing and updating your BIOS when necessary. If there is potentially risky. ASUS Z97-AR 2-1 EZ Update: Updates the BIOS in the future. ASUS CrashFree BIOS 3: Restores the BIOS using the ASUS Update utility. Carefully follow the instructions...
... in case you to restore the BIOS in Windows® environment. 2. Save a copy of BIOS, DO NOT manually update the BIOS. Chapter 2: BIOS information BIOS information 2 2.1 Managing and updating your BIOS when necessary. If there is potentially risky. ASUS Z97-AR 2-1 EZ Update: Updates the BIOS in the future. ASUS CrashFree BIOS 3: Restores the BIOS using the ASUS Update utility. Carefully follow the instructions...

User Guide
Page 54
...select a boot logo Click or tap to update the BIOS EZ Update requires an Internet connection either through a network or an ISP (Internet Service Provider). 2.1.2 ASUS EZ Flash 2 The ASUS EZ Flash 2 feature allows you to update the BIOS without using an OS‑based utility. Before you can... also manually update the saved BIOS and select a boot logo when the system goes into POST....
...select a boot logo Click or tap to update the BIOS EZ Update requires an Internet connection either through a network or an ISP (Internet Service Provider). 2.1.2 ASUS EZ Flash 2 The ASUS EZ Flash 2 feature allows you to update the BIOS without using an OS‑based utility. Before you can... also manually update the saved BIOS and select a boot logo when the system goes into POST....
User Guide
Page 55
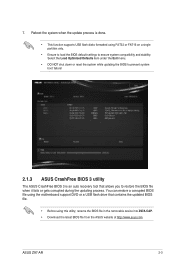
... Exit menu. • DO NOT shut down or reset the system while updating the BIOS to ensure system compatibility and stability. ASUS Z97-AR 2-3 Reboot the system when the update process is an auto recovery tool that contains the updated BIOS file. • Before using FAT32 or FAT16 on a single partition only. • Ensure to...
... Exit menu. • DO NOT shut down or reset the system while updating the BIOS to ensure system compatibility and stability. ASUS Z97-AR 2-3 Reboot the system when the update process is an auto recovery tool that contains the updated BIOS file. • Before using FAT32 or FAT16 on a single partition only. • Ensure to...

User Guide
Page 56
.... • Download the latest BIOS file and BIOS Updater from http://support.asus.com and save them in this section are for the BIOS file. Press to load default BIOS values (Highly recommended). 2.1.4 ASUS BIOS Updater ASUS BIOS Updater allows you to enter BIOS Setup to the USB port. ...Ensure that contains the BIOS file to recover BIOS settings. Turn on your USB flash ...
.... • Download the latest BIOS file and BIOS Updater from http://support.asus.com and save them in this section are for the BIOS file. Press to load default BIOS values (Highly recommended). 2.1.4 ASUS BIOS Updater ASUS BIOS Updater allows you to enter BIOS Setup to the USB port. ...Ensure that contains the BIOS file to recover BIOS settings. Turn on your USB flash ...
User Guide
Page 57
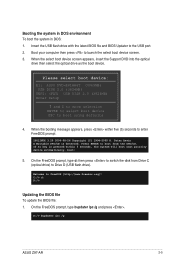
...1. If no key is detected. ISOLINUX 3.20 2006-08-26 Copyright (C) 1994-2005 H. boot: 5. C:/> d: D:/> Updating the BIOS file To update the BIOS file: 1. When the select boot device screen appears, insert the Support DVD into the optical drive then select the optical drive as the...) Enter Setup and to move selection ENTER to select boot device ESC to Drive D (USB flash drive). D:/> bupdater /pc /g ASUS Z97-AR 2-5 Peter Anvin A Bootable DVD/CD is pressed within five (5) seconds to launch the select boot device screen. 3. Insert the USB flash drive with the...
...1. If no key is detected. ISOLINUX 3.20 2006-08-26 Copyright (C) 1994-2005 H. boot: 5. C:/> d: D:/> Updating the BIOS file To update the BIOS file: 1. When the select boot device screen appears, insert the Support DVD into the optical drive then select the optical drive as the...) Enter Setup and to move selection ENTER to select boot device ESC to Drive D (USB flash drive). D:/> bupdater /pc /g ASUS Z97-AR 2-5 Peter Anvin A Bootable DVD/CD is pressed within five (5) seconds to launch the select boot device screen. 3. Insert the USB flash drive with the...

User Guide
Page 58
...: Unknown C: FORMAN~1 D: Z97-A.CAP 8390626 2014-02-10 21:14:34 Files panel Note [Enter] Select or Load [Up/Down/Home/End] Move [Tab] Switch [Esc] Exit [V] Drive Info 3. Ensure to load the BIOS default settings to update the BIOS? Select Load Optimized Defaults item... under the Exit BIOS menu. When BIOS update is not supported due to exit BIOS Updater. 6. After the BIOS Updater checks the selected BIOS file, select Yes to prevent system boot failure...
...: Unknown C: FORMAN~1 D: Z97-A.CAP 8390626 2014-02-10 21:14:34 Files panel Note [Enter] Select or Load [Up/Down/Home/End] Move [Tab] Switch [Esc] Exit [V] Drive Info 3. Ensure to load the BIOS default settings to update the BIOS? Select Load Optimized Defaults item... under the Exit BIOS menu. When BIOS update is not supported due to exit BIOS Updater. 6. After the BIOS Updater checks the selected BIOS file, select Yes to prevent system boot failure...
User Guide
Page 59
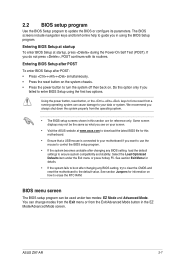
... on the system chassis. • Press the power button to turn the system off then back on how to erase the RTC RAM. ASUS Z97-AR 2-7 Do this motherboard. • Ensure that a USB mouse is connected to your data or system. Select the Load Optimized Defaults item ...under two modes: EZ Mode and Advanced Mode. 2.2 BIOS setup program Use the BIOS Setup program to update the BIOS or configure its routines. Entering BIOS Setup after POST To enter BIOS Setup after changing any BIOS setting, load the default settings to ensure system compatibility and stability.
... on the system chassis. • Press the power button to turn the system off then back on how to erase the RTC RAM. ASUS Z97-AR 2-7 Do this motherboard. • Ensure that a USB mouse is connected to your data or system. Select the Load Optimized Defaults item ...under two modes: EZ Mode and Advanced Mode. 2.2 BIOS setup program Use the BIOS Setup program to update the BIOS or configure its routines. Entering BIOS Setup after POST To enter BIOS Setup after changing any BIOS setting, load the default settings to ensure system compatibility and stability.


