
-Manual
Page 7
... can be determined by turning the equipment off and on a circuit different from digital apparatus set out in our products at ASUS REACH website at http://green.asus.com/english/REACH.htm. However, there is encouraged to try to correct the interference by the party responsible for a Class ...B digital device, pursuant to this equipment. Changes or modifications to Part 15 of the monitor to the graphics card is required to assure ...
... can be determined by turning the equipment off and on a circuit different from digital apparatus set out in our products at ASUS REACH website at http://green.asus.com/english/REACH.htm. However, there is encouraged to try to correct the interference by the party responsible for a Class ...B digital device, pursuant to this equipment. Changes or modifications to Part 15 of the monitor to the graphics card is required to assure ...

-Manual
Page 12
... to provide sufficient air flow to keep the system stable. USE THE PROPRIETARY POWER SUPPLY ONLY; Z8NH-D12 Series specifications summary Networking Graphic Onboard I/O Connectors Rear I/O Connectors Management Solution Monitoring Environment LAN 2 * Intel 82574L + 1 * Management LAN ...1 * Single Port 1 * Single Port DDR Infiniband QDR Infiniband 20Gbps with 40Gbps CX4 interface with QSFP interface VGA Aspeed...
... to provide sufficient air flow to keep the system stable. USE THE PROPRIETARY POWER SUPPLY ONLY; Z8NH-D12 Series specifications summary Networking Graphic Onboard I/O Connectors Rear I/O Connectors Management Solution Monitoring Environment LAN 2 * Intel 82574L + 1 * Management LAN ...1 * Single Port 1 * Single Port DDR Infiniband QDR Infiniband 20Gbps with 40Gbps CX4 interface with QSFP interface VGA Aspeed...

-Manual
Page 27
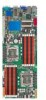
... RAID_SEL1) 6. USB 2.0 ports 1 and 2 3. LAN 2 (RJ-45) port 5. Location LED Page 2-25 2-25 2-25 2-25 2-25 2-25 2-25 ASUS Z8NH-D12 Series 2-9 Clear RTC RAM (CLRTC1) 2. LAN 1 (RJ-45) port 4. DDR3 sockets 3. Video Graphics Adapter port 7. LVDDR3_SEL2) 4. LAN controller setting (3-pin LAN_SW1, LAN_SW2) 5. Serial (COM1) port 6. Force BIOS recovery setting (3-pin RECOVERY1) Page...
... RAID_SEL1) 6. USB 2.0 ports 1 and 2 3. LAN 2 (RJ-45) port 5. Location LED Page 2-25 2-25 2-25 2-25 2-25 2-25 2-25 ASUS Z8NH-D12 Series 2-9 Clear RTC RAM (CLRTC1) 2. LAN 1 (RJ-45) port 4. DDR3 sockets 3. Video Graphics Adapter port 7. LVDDR3_SEL2) 4. LAN controller setting (3-pin LAN_SW1, LAN_SW2) 5. Serial (COM1) port 6. Force BIOS recovery setting (3-pin RECOVERY1) Page...

-Manual
Page 47
This port is for a VGA monitor or other serial devices. 6. Data transmitting ACT LED LINK LED ASUS Z8NH-D12 Series 2-29 Serial (COM1) port. Video Graphics Adapter port. Location LED. InfiniBand (MQSFP1) indicators. (Z8PH-D12 SE/QDR only) These indicators show the status of InfiniBand (MQSFP1). Ready Device plugged in ; This LED lights up for you to an...
This port is for a VGA monitor or other serial devices. 6. Data transmitting ACT LED LINK LED ASUS Z8NH-D12 Series 2-29 Serial (COM1) port. Video Graphics Adapter port. Location LED. InfiniBand (MQSFP1) indicators. (Z8PH-D12 SE/QDR only) These indicators show the status of InfiniBand (MQSFP1). Ready Device plugged in ; This LED lights up for you to an...

-Manual
Page 143
...Insert your driver disk into /dev/sda and press "OK" to continue. Pr�e�s��s��. - To install or upgrade in graphical mode, press the key. - At the boot:, type linux dd no�s�t�o�r�a�g�e. 3. Use the function keys listed below... Linux OS 4.7/4.8 To install the RAID controller driver when installing�R��e�d�H��a�t® Enterprise OS: 1. OK Cancel ASUS Z8NH-D12 Series 6-9 Boot the system from the Red Hat® OS installation CD. 2.
...Insert your driver disk into /dev/sda and press "OK" to continue. Pr�e�s��s��. - To install or upgrade in graphical mode, press the key. - At the boot:, type linux dd no�s�t�o�r�a�g�e. 3. Use the function keys listed below... Linux OS 4.7/4.8 To install the RAID controller driver when installing�R��e�d�H��a�t® Enterprise OS: 1. OK Cancel ASUS Z8NH-D12 Series 6-9 Boot the system from the Red Hat® OS installation CD. 2.

-Manual
Page 148
... 6 hard disk drives, type command line: linux dd noprobe=ata1 noprobe=ata2 noprobe=ata3 noprobe=ata4 noprobe=ata5 noprobe=ata6. 3. To install or upgrade in graphical mode, press the key. - Main Menu Do you want to select the driver disk source. Pr�e�s��s��. - Yes No 5. Boot...
... 6 hard disk drives, type command line: linux dd noprobe=ata1 noprobe=ata2 noprobe=ata3 noprobe=ata4 noprobe=ata5 noprobe=ata6. 3. To install or upgrade in graphical mode, press the key. - Main Menu Do you want to select the driver disk source. Pr�e�s��s��. - Yes No 5. Boot...

-Manual
Page 149
... switch to the floppy disk drive, select OK, then press . 6. Insert the Red Hat® Enterprise RAID driver disk to the command-line interface from graphic user interface. 10. mkdir /mnt/driver mount /dev/fd0 /mnt/driver cd /mnt/driver sh replace_ahci.sh reboot...
... switch to the floppy disk drive, select OK, then press . 6. Insert the Red Hat® Enterprise RAID driver disk to the command-line interface from graphic user interface. 10. mkdir /mnt/driver mount /dev/fd0 /mnt/driver cd /mnt/driver sh replace_ahci.sh reboot...