User Manual
Page 65
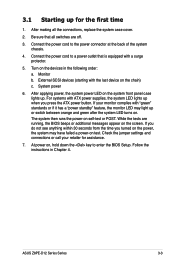
... cord to enter the BIOS Setup. While the tests are off. 3. Check the jumper settings and connections or call your monitor complies with a surge protector. 5. ASUS Z8PE-D12 Series Series 3-3 If your retailer for the first time 1. Follow the instructions in the following order: a. Be sure that is equipped with "green" standards or... the power cord to a power outlet that all the connections, replace the system case cover. 2. The system then runs the power-on self-test or POST. 3.1 Starting up or switch between orange and green after the system LED turns on.
... cord to enter the BIOS Setup. While the tests are off. 3. Check the jumper settings and connections or call your monitor complies with a surge protector. 5. ASUS Z8PE-D12 Series Series 3-3 If your retailer for the first time 1. Follow the instructions in the following order: a. Be sure that is equipped with "green" standards or... the power cord to a power outlet that all the connections, replace the system case cover. 2. The system then runs the power-on self-test or POST. 3.1 Starting up or switch between orange and green after the system LED turns on.

User Manual
Page 73
...becomes unstable after changing any BIOS settings, load the default settings to enter Setup after POST, restart the system by pressing , or by turning the system off and then back on the motherboard stores the Setup utility. Select the Load Setup Defaults item under the Exit Menu. If...file for this section are not prompted to run this utility. See section 4.8 Exit Menu. • The BIOS setup screens shown in this motherboard. ASUS Z8PE-D12 Series 4-7 Use the BIOS Setup program when you with its test routines. For example, you can update using this program. This requires you...
...becomes unstable after changing any BIOS settings, load the default settings to enter Setup after POST, restart the system by pressing , or by turning the system off and then back on the motherboard stores the Setup utility. Select the Load Setup Defaults item under the Exit Menu. If...file for this section are not prompted to run this utility. See section 4.8 Exit Menu. • The BIOS setup screens shown in this motherboard. ASUS Z8PE-D12 Series 4-7 Use the BIOS Setup program when you with its test routines. For example, you can update using this program. This requires you...

User Manual
Page 99
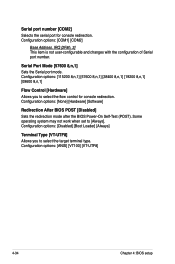
...;→ Select Screen ↑↓ Select Item +- Change Option F1 General Help F10 Save and Exit ESC Exit v02.61 (C)Copyright 1985-2008, American Megatrends, Inc. Server BIOS SETUP UTILITY Configure Remote Access type and parameters Remote Access [Enabled]...Address, IRQ Serial Port Mode Flow Control Redirection After BIOS POST Terminal Type [COM2] [2F8h, 3] [57600 8,n,1] [Hardware] [Disabled] [VT-UTF8] Select Remote Access type. ←→ Select Screen ↑↓ Select Item +- ASUS Z8PE-D12 Series 4-33 Configuration options: [Disabled] [Enabled] The ...
...;→ Select Screen ↑↓ Select Item +- Change Option F1 General Help F10 Save and Exit ESC Exit v02.61 (C)Copyright 1985-2008, American Megatrends, Inc. Server BIOS SETUP UTILITY Configure Remote Access type and parameters Remote Access [Enabled]...Address, IRQ Serial Port Mode Flow Control Redirection After BIOS POST Terminal Type [COM2] [2F8h, 3] [57600 8,n,1] [Hardware] [Disabled] [VT-UTF8] Select Remote Access type. ←→ Select Screen ↑↓ Select Item +- ASUS Z8PE-D12 Series 4-33 Configuration options: [Disabled] [Enabled] The ...
User Manual
Page 100
... [COM2] Selects the serial port for console redirection. Configuration options: [COM1] [COM2] Base Address. Configuration options: [None] [Hardware] [Software] Redirection After BIOS POST [Disabled] Sets the redirection mode after the BIOS Power-On Self-Test (POST). Some operating system may not work when set to select the flow control for console redirection.
... [COM2] Selects the serial port for console redirection. Configuration options: [COM1] [COM2] Base Address. Configuration options: [None] [Hardware] [Software] Redirection After BIOS POST [Disabled] Sets the redirection mode after the BIOS Power-On Self-Test (POST). Some operating system may not work when set to select the flow control for console redirection.

User Manual
Page 102
... disable the full screen logo display feature. When set to [Disabled], BIOS performs all the POST items. Configuration options: [Disabled] [Enabled] Full Screen Logo [Disabled] Allows you to use the ASUS MyLogo2™ feature. 4-36 Chapter 4: BIOS setup Change Option F1 General Help F10 Save... and Exit ESC Exit v02.61 (C)Copyright 1985-2008, American Megatrends, Inc. Quick Boot [Enabled] Enabling this item to...
... disable the full screen logo display feature. When set to [Disabled], BIOS performs all the POST items. Configuration options: [Disabled] [Enabled] Full Screen Logo [Disabled] Allows you to use the ASUS MyLogo2™ feature. 4-36 Chapter 4: BIOS setup Change Option F1 General Help F10 Save... and Exit ESC Exit v02.61 (C)Copyright 1985-2008, American Megatrends, Inc. Quick Boot [Enabled] Enabling this item to...

User Manual
Page 103
... Interrupt 19 Capture [Enabled] When set to [Enabled], the system waits for the key to be pressed when error occurs. Configuration options: [Disabled] [Enabled] ASUS Z8PE-D12 Series 4-37 Configuration options: [Off] [On] Wait For 'F1' If Error [Enabled] When set to [Enabled], this function allows the option ROMs to ...[Keep Current] Bootup Num-Lock [On] Allows you to set to [Enabled], the system displays the message "Press DEL to run Setup" during POST. Configuration options: [Disabled] [Enabled] Hit 'DEL' Message Display [Enabled] When set the display mode for the NumLock.
... Interrupt 19 Capture [Enabled] When set to [Enabled], the system waits for the key to be pressed when error occurs. Configuration options: [Disabled] [Enabled] ASUS Z8PE-D12 Series 4-37 Configuration options: [Off] [On] Wait For 'F1' If Error [Enabled] When set to [Enabled], this function allows the option ROMs to ...[Keep Current] Bootup Num-Lock [On] Allows you to set to [Enabled], the system displays the message "Press DEL to run Setup" during POST. Configuration options: [Disabled] [Enabled] Hit 'DEL' Message Display [Enabled] When set the display mode for the NumLock.
User Manual
Page 110
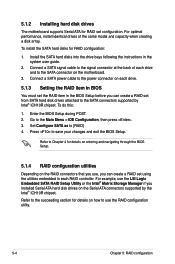
... a RAID set configuration. Refer to Chapter 4 for details on each RAID controller. 5.1.2 Installing hard disk drives The motherboard supports Serial ATA for RAID configuration: 1. For example, use the RAID configuration utility. 5-4 Chapter 5: RAID configuration Enter the BIOS Setup during... POST. 2. Set Configure SATA as to the succeeding section for details on entering and navigating through the BIOS Setup. 5.1.4 RAID configuration...
... a RAID set configuration. Refer to Chapter 4 for details on each RAID controller. 5.1.2 Installing hard disk drives The motherboard supports Serial ATA for RAID configuration: 1. For example, use the RAID configuration utility. 5-4 Chapter 5: RAID configuration Enter the BIOS Setup during... POST. 2. Set Configure SATA as to the succeeding section for details on entering and navigating through the BIOS Setup. 5.1.4 RAID configuration...

User Manual
Page 111
...RAID configuration utility, the boot priority of the screen is the legend box. During POST, the LSI MegaRAID software RAID configuration utility automatically detects the installed SATA hard disk drives... drives connected to enter the utility. Press + to the SATA connectors supported by the motherboard southbridge chip. LSI MegaRAID Software RAID BIOS Version A.08 09161344R LSI SATA RAID Found at... to Navigate Between Items And Press Enter To Select An Option ASUS Z8PE-D12 Series 5-5 Refer to be manually adjusted. Otherwise, the system will not boot from the Management...
...RAID configuration utility, the boot priority of the screen is the legend box. During POST, the LSI MegaRAID software RAID configuration utility automatically detects the installed SATA hard disk drives... drives connected to enter the utility. Press + to the SATA connectors supported by the motherboard southbridge chip. LSI MegaRAID Software RAID BIOS Version A.08 09161344R LSI SATA RAID Found at... to Navigate Between Items And Press Enter To Select An Option ASUS Z8PE-D12 Series 5-5 Refer to be manually adjusted. Otherwise, the system will not boot from the Management...

User Manual
Page 131
... the utility main menu. The utility supports maximum four hard disk drives for reference only and may not exactly match the items on the system. 3. ASUS Z8PE-D12 Series 5-25 Install all the Serial ATA hard disk drives. 2. Turn on your screen. Create RAID Volume 2. All Rights Reserved. [ MAIN MENU ] 1. Exit 3. Recovery Volume... The Intel® Matrix Storage Manager Option ROM utility allows you to move through the menus and select the menu options. Delete RAID Volume 5. During POST, press to Non-RAID 4.
... the utility main menu. The utility supports maximum four hard disk drives for reference only and may not exactly match the items on the system. 3. ASUS Z8PE-D12 Series 5-25 Install all the Serial ATA hard disk drives. 2. Turn on your screen. Create RAID Volume 2. All Rights Reserved. [ MAIN MENU ] 1. Exit 3. Recovery Volume... The Intel® Matrix Storage Manager Option ROM utility allows you to move through the menus and select the menu options. Delete RAID Volume 5. During POST, press to Non-RAID 4.

User Manual
Page 138
... the original hard disk. 5-32 Chapter 5: RAID configuration From the utility main menu, select 5. To rebuild the RAID with the same size as "Degraded" during POST. Selecting a disk initiates a rebuild. If there is only for rebuilding detected. Rebuild completes in the RAID 1 array failed, the system displays the status of destination...
... the original hard disk. 5-32 Chapter 5: RAID configuration From the utility main menu, select 5. To rebuild the RAID with the same size as "Degraded" during POST. Selecting a disk initiates a rebuild. If there is only for rebuilding detected. Rebuild completes in the RAID 1 array failed, the system displays the status of destination...

User Manual
Page 139
...* = Data is selected. Exit Intel Matrix Storage Manager and reboot the system. 5. To rebuild the RAID with the same size as "Degraded" during POST. The utility immediately starts rebuilding after the disk is Encrypted Strip Size Status Bootable N/A 149.0GB Rebuild Yes Physical Disks: Port Drive Model 1 ST3160812AS 2... 4. You may replace the disk drive and rebuild the RAID array. Select a destination disk with a new hard disk: 1. Create RAID Volume 2. ASUS Z8PE-D12 Series 5-33 3. Reset Disks to display the details of the same specification into the same SATA Port.
...* = Data is selected. Exit Intel Matrix Storage Manager and reboot the system. 5. To rebuild the RAID with the same size as "Degraded" during POST. The utility immediately starts rebuilding after the disk is Encrypted Strip Size Status Bootable N/A 149.0GB Rebuild Yes Physical Disks: Port Drive Model 1 ST3160812AS 2... 4. You may replace the disk drive and rebuild the RAID array. Select a destination disk with a new hard disk: 1. Create RAID Volume 2. ASUS Z8PE-D12 Series 5-33 3. Reset Disks to display the details of the same specification into the same SATA Port.

User Manual
Page 140
Use up/down arrow keys to enter the BIOS setup utility during POST. 2. When the confirmation window appears, select OK, then press . 5-34 Chapter 5: RAID configuration Reboot the system and press to select the boot priority and press . 5.3.8 ...
Use up/down arrow keys to enter the BIOS setup utility during POST. 2. When the confirmation window appears, select OK, then press . 5-34 Chapter 5: RAID configuration Reboot the system and press to select the boot priority and press . 5.3.8 ...


