
User Guide
Page 3
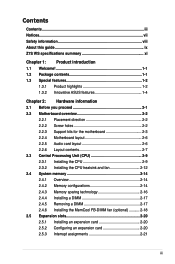
... guide ix Z7S WS specifications summary xi Chapter 1: Product introduction 1.1 Welcome 1-1 1.2 Package contents 1-1 1.3 Special features 1-2 1.3.1 Product highlights 1-2 1.3.2 Innovative ASUS features 1-4 Chapter 2: Hardware information 2.1 Before you proceed 2-1 2.2 Motherboard overview 2-2 2.2.1 Placement direction 2-2 2.2.2 Screw holes 2-2 2.2.3 Support kits for the motherboard 2-3 2.2.4 Motherboard layout 2-6 2.2.5 Audio card layout 2-6 2.2.6 Layout contents 2-7 2.3 Central Processing Unit (CPU 2-9 2.3.1 Installing the CPU 2-9 2.3.2 Installing the CPU heatsink and fan...
... guide ix Z7S WS specifications summary xi Chapter 1: Product introduction 1.1 Welcome 1-1 1.2 Package contents 1-1 1.3 Special features 1-2 1.3.1 Product highlights 1-2 1.3.2 Innovative ASUS features 1-4 Chapter 2: Hardware information 2.1 Before you proceed 2-1 2.2 Motherboard overview 2-2 2.2.1 Placement direction 2-2 2.2.2 Screw holes 2-2 2.2.3 Support kits for the motherboard 2-3 2.2.4 Motherboard layout 2-6 2.2.5 Audio card layout 2-6 2.2.6 Layout contents 2-7 2.3 Central Processing Unit (CPU 2-9 2.3.1 Installing the CPU 2-9 2.3.2 Installing the CPU heatsink and fan...

User Guide
Page 25
... CEK spring has four hooks to the CPU0 heatsink holes. Socket for CPU1 Socket for the motherboard For additional protection from motherboard breakage due to the weight of the CPU heatsinks, your chassis is SSI CEB 1.1 compliant, we recommend that you use the... CEK springs; Position the CEK spring underneath the motherboard, then match the CEK spring hooks to match the designated holes around the CPU area. otherwise, use as weight support. 2.2.3 Support kits for CPU0 Heatsink hole 2. ASUS Z7S WS...
... CEK spring has four hooks to the CPU0 heatsink holes. Socket for CPU1 Socket for the motherboard For additional protection from motherboard breakage due to the weight of the CPU heatsinks, your chassis is SSI CEB 1.1 compliant, we recommend that you use the... CEK springs; Position the CEK spring underneath the motherboard, then match the CEK spring hooks to match the designated holes around the CPU area. otherwise, use as weight support. 2.2.3 Support kits for CPU0 Heatsink hole 2. ASUS Z7S WS...

User Guide
Page 26
Press the upper spring hooks inward, then insert to the upper CPU heatsink holes until they snap in place. 5. The CEK springs appear as shown when installed. If you installed a second CPU, repeat steps 2 to 4 to install the CEK spring to the lower CPU heatsink holes until they snap in place. 4. Press the lower spring clips inward, then insert to the CPU1 heatsink holes. 3. CEK spring screw hole 2-4 Chapter 2: Hardware information
Press the upper spring hooks inward, then insert to the upper CPU heatsink holes until they snap in place. 5. The CEK springs appear as shown when installed. If you installed a second CPU, repeat steps 2 to 4 to install the CEK spring to the lower CPU heatsink holes until they snap in place. 4. Press the lower spring clips inward, then insert to the CPU1 heatsink holes. 3. CEK spring screw hole 2-4 Chapter 2: Hardware information

User Guide
Page 27
ASUS Z7S WS 2-5 Standoffs for CPU0 Standoffs for illustration. Socket for CPU1 Socket for CPU0 Make sure that should be right on top of their respective standoffs. Refer to section 2.2.2 Screw holes for CPU1 7. Before installing the motherboard into the chassis, locate the standoffs...perfectly match the CEK spring screw holes; otherwise, you can not install the CPU heatsinks properly. 8. Secure the motherboard with the external I/O ports toward the chassis rear panel. 6. Install the motherboard with eight (8) screws. The CPU sockets should match the eight (8) CEK spring ...
ASUS Z7S WS 2-5 Standoffs for CPU0 Standoffs for illustration. Socket for CPU1 Socket for CPU0 Make sure that should be right on top of their respective standoffs. Refer to section 2.2.2 Screw holes for CPU1 7. Before installing the motherboard into the chassis, locate the standoffs...perfectly match the CEK spring screw holes; otherwise, you can not install the CPU heatsinks properly. 8. Secure the motherboard with the external I/O ports toward the chassis rear panel. 6. Install the motherboard with eight (8) screws. The CPU sockets should match the eight (8) CEK spring ...

User Guide
Page 31
... cost of repair only if the damage is shipment/transit-related. • Keep the cap after installing the motherboard. ASUS Z7S WS 2-9 CPU0 CPU1 Z7S WS ® Z7S WS CPU LGA771 Before installing the CPU, make sure that the PnP cap is on your retailer immediately if the...on the socket and the socket contacts are not bent. ASUS will process Return Merchandise Authorization (RMA) requests only if the motherboard comes with installation instructions for the CPU and heatsink. 2.3 Central Processing Unit (CPU) The motherboard comes with a surface mount LGA771 socket designed for the ...
... cost of repair only if the damage is shipment/transit-related. • Keep the cap after installing the motherboard. ASUS Z7S WS 2-9 CPU0 CPU1 Z7S WS ® Z7S WS CPU LGA771 Before installing the CPU, make sure that the PnP cap is on your retailer immediately if the...on the socket and the socket contacts are not bent. ASUS will process Return Merchandise Authorization (RMA) requests only if the motherboard comes with installation instructions for the CPU and heatsink. 2.3 Central Processing Unit (CPU) The motherboard comes with a surface mount LGA771 socket designed for the ...

User Guide
Page 34
... fan. • Refer to ensure optimum thermal condition and performance. CPU heatsink (top view) CPU heatsink (bottom view) To install the CPU heatsink and fan: 1. 2.3.2 Installing the CPU heatsink and fan The Intel® Xeon™ processors require an Intel certified heatsink and fan assembly to the installation manual that came with the nuts on...
... fan. • Refer to ensure optimum thermal condition and performance. CPU heatsink (top view) CPU heatsink (bottom view) To install the CPU heatsink and fan: 1. 2.3.2 Installing the CPU heatsink and fan The Intel® Xeon™ processors require an Intel certified heatsink and fan assembly to the installation manual that came with the nuts on...

User Guide
Page 35
... to the 4‑pin connector labeled CPU0_FAN. Repeat steps 1 to 3 to install the other heatsink if you fail to plug this connector. 4. Connect the fan cable to tighten the four heatsink screws in a diagonal sequence. 3. Z7S WS ® CPU0_FAN CPU1_FAN Z7S WS CPU fan connectors CPU0_FAN PWM Control FAN Speed FAN Power GND CPU1_FAN PWM Control... connector labeled CPU1_FAN. Hardware monitoring errors may occur if you have installed a second CPU, then connect the fan cable to connect the CPU fan cable! 2. ASUS Z7S WS 2-13
... to the 4‑pin connector labeled CPU0_FAN. Repeat steps 1 to 3 to install the other heatsink if you fail to plug this connector. 4. Connect the fan cable to tighten the four heatsink screws in a diagonal sequence. 3. Z7S WS ® CPU0_FAN CPU1_FAN Z7S WS CPU fan connectors CPU0_FAN PWM Control FAN Speed FAN Power GND CPU1_FAN PWM Control... connector labeled CPU1_FAN. Hardware monitoring errors may occur if you have installed a second CPU, then connect the fan cable to connect the CPU fan cable! 2. ASUS Z7S WS 2-13
User Guide
Page 3
... guide ix Z7S WS specifications summary xi Chapter 1: Product introduction 1.1 Welcome 1-1 1.2 Package contents 1-1 1.3 Special features 1-2 1.3.1 Product highlights 1-2 1.3.2 Innovative ASUS features 1-4 Chapter 2: Hardware information 2.1 Before you proceed 2-1 2.2 Motherboard overview 2-2 2.2.1 Placement direction 2-2 2.2.2 Screw holes 2-2 2.2.3 Support kits for the motherboard 2-3 2.2.4 Motherboard layout 2-6 2.2.5 Audio card layout 2-6 2.2.6 Layout contents 2-7 2.3 Central Processing Unit (CPU 2-9 2.3.1 Installing the CPU 2-9 2.3.2 Installing the CPU heatsink and fan...
... guide ix Z7S WS specifications summary xi Chapter 1: Product introduction 1.1 Welcome 1-1 1.2 Package contents 1-1 1.3 Special features 1-2 1.3.1 Product highlights 1-2 1.3.2 Innovative ASUS features 1-4 Chapter 2: Hardware information 2.1 Before you proceed 2-1 2.2 Motherboard overview 2-2 2.2.1 Placement direction 2-2 2.2.2 Screw holes 2-2 2.2.3 Support kits for the motherboard 2-3 2.2.4 Motherboard layout 2-6 2.2.5 Audio card layout 2-6 2.2.6 Layout contents 2-7 2.3 Central Processing Unit (CPU 2-9 2.3.1 Installing the CPU 2-9 2.3.2 Installing the CPU heatsink and fan...

User Guide
Page 25
... CPU area. Install the CEK springs before installing the motherboard. Locate the CPU heatsink holes on the motherboard. ASUS Z7S WS 2-3 Hook To install the CEK spring: 1. Socket for CPU1 Socket for the motherboard For additional protection from motherboard breakage due to the weight of the CPU heatsinks, your chassis is SSI CEB 1.1 compliant, we recommend that you use the support...
... CPU area. Install the CEK springs before installing the motherboard. Locate the CPU heatsink holes on the motherboard. ASUS Z7S WS 2-3 Hook To install the CEK spring: 1. Socket for CPU1 Socket for the motherboard For additional protection from motherboard breakage due to the weight of the CPU heatsinks, your chassis is SSI CEB 1.1 compliant, we recommend that you use the support...

User Guide
Page 26
The CEK springs appear as shown when installed. CEK spring screw hole 2-4 Chapter 2: Hardware information Press the lower spring clips inward, then insert to the lower CPU heatsink holes until they snap in place. 4. 3. Press the upper spring hooks inward, then insert to the CPU1 heatsink holes. If you installed a second CPU, repeat steps 2 to 4 to install the CEK spring to the upper CPU heatsink holes until they snap in place. 5.
The CEK springs appear as shown when installed. CEK spring screw hole 2-4 Chapter 2: Hardware information Press the lower spring clips inward, then insert to the lower CPU heatsink holes until they snap in place. 4. 3. Press the upper spring hooks inward, then insert to the CPU1 heatsink holes. If you installed a second CPU, repeat steps 2 to 4 to install the CEK spring to the upper CPU heatsink holes until they snap in place. 5.

User Guide
Page 27
.... Install the motherboard with eight (8) screws. Refer to section 2.2.2 Screw holes for CPU1 7. 6. Before installing the motherboard into the chassis, locate the standoffs that the standoffs perfectly match the CEK spring screw holes; otherwise, you can not install the CPU heatsinks properly. 8. Secure the motherboard with the external I/O ports toward the chassis rear panel. ASUS Z7S WS 2-5
.... Install the motherboard with eight (8) screws. Refer to section 2.2.2 Screw holes for CPU1 7. 6. Before installing the motherboard into the chassis, locate the standoffs that the standoffs perfectly match the CEK spring screw holes; otherwise, you can not install the CPU heatsinks properly. 8. Secure the motherboard with the external I/O ports toward the chassis rear panel. ASUS Z7S WS 2-5

User Guide
Page 31
... the CPU, make sure that the socket box is on the socket and the socket contacts are not bent. ASUS Z7S WS 2-9 2.3 Central Processing Unit (CPU) The motherboard comes with a surface mount LGA771 socket designed for the Intel® Xeon® Quad/Dual Core processor. ... to the PnP cap/socket contacts/motherboard components. ASUS will shoulder the cost of repair only if the damage is on the motherboard. ASUS will process Return Merchandise Authorization (RMA) requests only if the motherboard comes with installation instructions for the CPU and heatsink. Contact your left.
... the CPU, make sure that the socket box is on the socket and the socket contacts are not bent. ASUS Z7S WS 2-9 2.3 Central Processing Unit (CPU) The motherboard comes with a surface mount LGA771 socket designed for the Intel® Xeon® Quad/Dual Core processor. ... to the PnP cap/socket contacts/motherboard components. ASUS will shoulder the cost of repair only if the damage is on the motherboard. ASUS will process Return Merchandise Authorization (RMA) requests only if the motherboard comes with installation instructions for the CPU and heatsink. Contact your left.

User Guide
Page 34
...that came with the nuts on the support plate. Place the heatsink on top of the installed CPU, making sure that you have applied the thermal grease to the top of the CPU before installing the heatsink and fan. • Refer to ensure optimum thermal condition ...and performance. Heatsink screw 2-12 Chapter 2: Hardware information When you buy a boxed Intel CPU, the package includes the heatsink, fan, retention brackets, screws, thermal grease, installation manual...
...that came with the nuts on the support plate. Place the heatsink on top of the installed CPU, making sure that you have applied the thermal grease to the top of the CPU before installing the heatsink and fan. • Refer to ensure optimum thermal condition ...and performance. Heatsink screw 2-12 Chapter 2: Hardware information When you buy a boxed Intel CPU, the package includes the heatsink, fan, retention brackets, screws, thermal grease, installation manual...

User Guide
Page 35
...;pin connector labeled CPU1_FAN. Repeat steps 1 to 3 to install the other heatsink if you fail to connect the CPU fan cable! Z7S WS ® CPU0_FAN CPU1_FAN Z7S WS CPU fan connectors CPU0_FAN PWM Control FAN Speed FAN Power GND CPU1_FAN PWM Control FAN Speed FAN Power GND DO NOT forget to plug this connector. 4. 2. ASUS Z7S WS 2-13
...;pin connector labeled CPU1_FAN. Repeat steps 1 to 3 to install the other heatsink if you fail to connect the CPU fan cable! Z7S WS ® CPU0_FAN CPU1_FAN Z7S WS CPU fan connectors CPU0_FAN PWM Control FAN Speed FAN Power GND CPU1_FAN PWM Control FAN Speed FAN Power GND DO NOT forget to plug this connector. 4. 2. ASUS Z7S WS 2-13

