
User Guide
Page 2
... entitles you to the source code of this manual, including the products and software described in it from http://support.asus.com/download or (2) for backup purposes, without intent to : ASUSTeK Computer Inc. ASUS ASSUMES NO RESPONSIBILITY OR LIABILITY FOR ANY ERRORS OR INACCURACIES THAT MAY APPEAR IN THIS MANUAL, INCLUDING THE PRODUCTS AND SOFTWARE DESCRIBED IN IT. Products and...
... entitles you to the source code of this manual, including the products and software described in it from http://support.asus.com/download or (2) for backup purposes, without intent to : ASUSTeK Computer Inc. ASUS ASSUMES NO RESPONSIBILITY OR LIABILITY FOR ANY ERRORS OR INACCURACIES THAT MAY APPEAR IN THIS MANUAL, INCLUDING THE PRODUCTS AND SOFTWARE DESCRIBED IN IT. Products and...
User Guide
Page 7
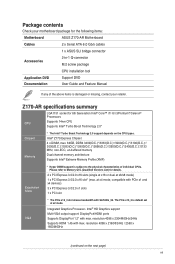
..., non-ECC, un-buffered memory Dual channel memory architecture Supports Intel® Extreme Memory Profile (XMP) Expansion Slots * Hyper DIMM support is default set at x8/x8 mode) 1 x PCI Express 3.0/2.0 x16 slot* (max. Integrated Graphics Processor- Package contents Check your motherboard package for the following items: Motherboard ASUS Z170-AR Motherboard Cables 2 x Serial ATA 6.0 Gb/s cables 1 x ASUS SLI bridge connector Accessories 2-in-1 Q-connector M.2 screw package CPU installation tool Application DVD Support DVD Documentation User Guide and Feature Manual If any of...
..., non-ECC, un-buffered memory Dual channel memory architecture Supports Intel® Extreme Memory Profile (XMP) Expansion Slots * Hyper DIMM support is default set at x8/x8 mode) 1 x PCI Express 3.0/2.0 x16 slot* (max. Integrated Graphics Processor- Package contents Check your motherboard package for the following items: Motherboard ASUS Z170-AR Motherboard Cables 2 x Serial ATA 6.0 Gb/s cables 1 x ASUS SLI bridge connector Accessories 2-in-1 Q-connector M.2 screw package CPU installation tool Application DVD Support DVD Documentation User Guide and Feature Manual If any of...
User Guide
Page 8
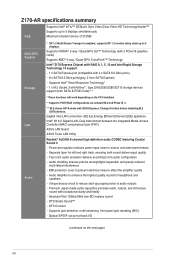
...1 x SATA Express port (compatible with exceptional clarity and fidelity - Change this item before installing M.2 SATA devices. Top notch audio sensation delivers according to the audio configuration - Dual interconnect between the integrated Media Access Controller (MAC) and physical layer (PHY) ASUS LAN Guard ASUS Turbo LAN Utility Realtek® ALC892 8-channel high definition audio CODEC featuring Crystal Sound 3 - Z170-AR specifications summary Supports Intel® InTru™ 3D/Quick Sync Video/Clear Video HD Technology/Insider™ Supports up to 2 displays simultaneously VGA...
...1 x SATA Express port (compatible with exceptional clarity and fidelity - Change this item before installing M.2 SATA devices. Top notch audio sensation delivers according to the audio configuration - Dual interconnect between the integrated Media Access Controller (MAC) and physical layer (PHY) ASUS LAN Guard ASUS Turbo LAN Utility Realtek® ALC892 8-channel high definition audio CODEC featuring Crystal Sound 3 - Z170-AR specifications summary Supports Intel® InTru™ 3D/Quick Sync Video/Clear Video HD Technology/Insider™ Supports up to 2 displays simultaneously VGA...
User Guide
Page 12
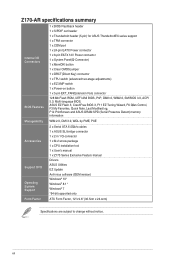
... and ASUS DRAM SPD (Serial Presence Detect) memory information WfM 2.0, DMI 3.0, WOL by PME, PXE 2 x Serial ATA 6.0Gb/s cables 1 x ASUS SLI bridge connector 1 x 2 in 1 Q-connector 1 x M.2 screw package 1 x CPU installation tool 1 x User's manual 1 x Z170 Series Exclusive Feature manual Drivers ASUS Utilities EZ Update Anti-virus software (OEM version) Windows® 10* Windows® 8.1* Windows® 7 *64-bit supported only ATX Form Factor, 12"x 9.6" (30.5cm x 24.4cm) Specifications are subject to change without notice. Z170-AR specifications summary Internal I/O Connectors BIOS Features...
... and ASUS DRAM SPD (Serial Presence Detect) memory information WfM 2.0, DMI 3.0, WOL by PME, PXE 2 x Serial ATA 6.0Gb/s cables 1 x ASUS SLI bridge connector 1 x 2 in 1 Q-connector 1 x M.2 screw package 1 x CPU installation tool 1 x User's manual 1 x Z170 Series Exclusive Feature manual Drivers ASUS Utilities EZ Update Anti-virus software (OEM version) Windows® 10* Windows® 8.1* Windows® 7 *64-bit supported only ATX Form Factor, 12"x 9.6" (30.5cm x 24.4cm) Specifications are subject to change without notice. Z170-AR specifications summary Internal I/O Connectors BIOS Features...
User Guide
Page 15
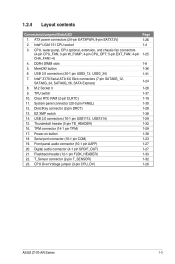
... Layout contents Connectors/Jumpers/Slots/LED 1. button 6. Thunderbolt header (5-pin TB_HEADER) 16. CPU Over Voltage jumper (3-pin CPU_OV) Page 1-26 1-4 1-25 1-8 1-36 1-31 1-24 1-28 1-37 1-19 1-30 1-28 1-38 1-29 1-32 1-29 1-38 1-23 1-27 1-27 1-33 1-32 1-20 ASUS Z170-AR Series 1-3 DDR4 DIMM slots 5. M.2 Socket 3 9. System panel connector (20-3 pin PANEL) 12. Serial port connector (10-1 pin COM) 19. Digital audio connector (4-1 pin SPDIF_OUT) 21. Front panel audio connector (10-1 pin AAFP) 20. CPU, water pump, CPU optional, extension, and chassis fan connectors...
... Layout contents Connectors/Jumpers/Slots/LED 1. button 6. Thunderbolt header (5-pin TB_HEADER) 16. CPU Over Voltage jumper (3-pin CPU_OV) Page 1-26 1-4 1-25 1-8 1-36 1-31 1-24 1-28 1-37 1-19 1-30 1-28 1-38 1-29 1-32 1-29 1-38 1-23 1-27 1-27 1-33 1-32 1-20 ASUS Z170-AR Series 1-3 DDR4 DIMM slots 5. M.2 Socket 3 9. System panel connector (20-3 pin PANEL) 12. Serial port connector (10-1 pin COM) 19. Digital audio connector (4-1 pin SPDIF_OUT) 21. Front panel audio connector (10-1 pin AAFP) 20. CPU, water pump, CPU optional, extension, and chassis fan connectors...
User Guide
Page 21
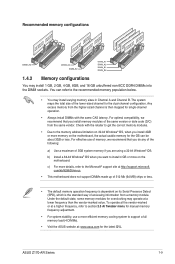
... to section 2.5 Ai Tweaker menu for the dual-channel configuration. com/kb/929605/en-us. • This motherboard does not support DIMMs made up of 512 Mb (64 MB) chips or less. • The default memory operation frequency is the standard way of 3GB system memory if you are using a 32-bit Windows® OS. Recommended memory configurations 1.4.2 Memory configurations You may install varying memory sizes in Channel A and Channel B. ASUS Z170-AR Series 1-9 You can be...
... to section 2.5 Ai Tweaker menu for the dual-channel configuration. com/kb/929605/en-us. • This motherboard does not support DIMMs made up of 512 Mb (64 MB) chips or less. • The default memory operation frequency is the standard way of 3GB system memory if you are using a 32-bit Windows® OS. Recommended memory configurations 1.4.2 Memory configurations You may install varying memory sizes in Channel A and Channel B. ASUS Z170-AR Series 1-9 You can be...

User Guide
Page 29
..." or that comply with the PCI Express specifications. 1.5.5 PCI Express 3.0 / 2.0 x16 slots This motherboard supports PCI Express x16 network cards, SCSI cards, and other cards that the cards do not need IRQ assignments. Expansion slot PCIe 3.0/2.0 x1_1 slot PCIe 3.0/2.0 x16_1 slot PCIe 3.0/2.0 x1_2 slot PCI slot PCIe 3.0/2.0 x16_2 slot PCIe 3.0/2.0 x1_3 slot PCIe 3.0/2.0 x16_3 slot ASUS Z170-AR Series 1-17 See Chapter 2 for the expansion card. Install the software drivers for information on the system and change the necessary BIOS settings, if any. Turn on BIOS setup. 2.
..." or that comply with the PCI Express specifications. 1.5.5 PCI Express 3.0 / 2.0 x16 slots This motherboard supports PCI Express x16 network cards, SCSI cards, and other cards that the cards do not need IRQ assignments. Expansion slot PCIe 3.0/2.0 x1_1 slot PCIe 3.0/2.0 x16_1 slot PCIe 3.0/2.0 x1_2 slot PCI slot PCIe 3.0/2.0 x16_2 slot PCIe 3.0/2.0 x1_3 slot PCIe 3.0/2.0 x16_3 slot ASUS Z170-AR Series 1-17 See Chapter 2 for the expansion card. Install the software drivers for information on the system and change the necessary BIOS settings, if any. Turn on BIOS setup. 2.
User Guide
Page 41
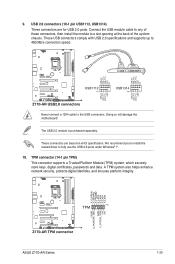
... connector (14-1 pin TPM) This connector supports a Trusted Platform Module (TPM) system, which securely store keys, digital certificates, passwords and data. 9. Never connect a 1394 cable to 480 Mb/s connection speed. We recommend you to install the related driver to a slot opening at the back of these connectors, then install the module to fully use the USB 2.0 ports under Windows® 7. 10. ASUS Z170-AR Series 1-29 Connect the USB module cable to any of the system chassis...
... connector (14-1 pin TPM) This connector supports a Trusted Platform Module (TPM) system, which securely store keys, digital certificates, passwords and data. 9. Never connect a 1394 cable to 480 Mb/s connection speed. We recommend you to install the related driver to a slot opening at the back of these connectors, then install the module to fully use the USB 2.0 ports under Windows® 7. 10. ASUS Z170-AR Series 1-29 Connect the USB module cable to any of the system chassis...

User Guide
Page 43
... of USB 3.0 including faster data transfer speeds of up to 5 Gb/s, faster charging time for additional USB 3.0 front or rear panel ports. USB 3.0 connectors (20-1 pin USB3_12, USB3_34) This connector allows you to install the related driver to connect a USB 3.0 module for USB-chargeable devices, optimized power efficiency, and backward compatibility with USB 2.0. We recommend you to fully use the USB 3.0 ports under Windows® 7. • The plugged USB 3.0 device will run on xHCI specification. ASUS Z170-AR Series 1-31...
... of USB 3.0 including faster data transfer speeds of up to 5 Gb/s, faster charging time for additional USB 3.0 front or rear panel ports. USB 3.0 connectors (20-1 pin USB3_12, USB3_34) This connector allows you to install the related driver to connect a USB 3.0 module for USB-chargeable devices, optimized power efficiency, and backward compatibility with USB 2.0. We recommend you to fully use the USB 3.0 ports under Windows® 7. • The plugged USB 3.0 device will run on xHCI specification. ASUS Z170-AR Series 1-31...
User Guide
Page 51
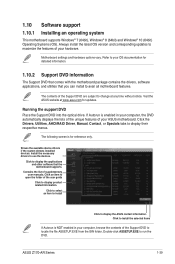
... ASUS contact information. ASUS Z170-AR Series 1-39 The contents of the user guide Click to locate the file ASSETUP.EXE from the BIN folder. Click the Drivers, Utilities, AHCI/RAID Driver, Manual, Contact, or Specials tabs to use the devices. Contains the list of your computer, the DVD automatically displays the lists of the unique features of the Support DVD to display product related information. Install the necessary drivers to display their respective menus. 1.10 Software support 1.10.1 Installing...
... ASUS contact information. ASUS Z170-AR Series 1-39 The contents of the user guide Click to locate the file ASSETUP.EXE from the BIN folder. Click the Drivers, Utilities, AHCI/RAID Driver, Manual, Contact, or Specials tabs to use the devices. Contains the list of your computer, the DVD automatically displays the lists of the unique features of the Support DVD to display product related information. Install the necessary drivers to display their respective menus. 1.10 Software support 1.10.1 Installing...
User Guide
Page 55
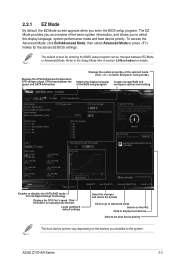
...Rapid Storage Technology Displays the CPU Fan's speed. ASUS Z170-AR Series 2-3 Displays the CPU/motherboard temperature, CPU voltage output, CPU/chassis/power fan speed, and SATA information Displays the system properties of the basic system information, and allows you enter the BIOS setup program. Click < or > to switch EZ System Tuning modes Selects the display language Creates storage RAID and of the BIOS setup program configures system overclocking Enables or disables the SATA RAID mode for entering the BIOS setup program can be changed between EZ Mode or Advanced Mode...
...Rapid Storage Technology Displays the CPU Fan's speed. ASUS Z170-AR Series 2-3 Displays the CPU/motherboard temperature, CPU voltage output, CPU/chassis/power fan speed, and SATA information Displays the system properties of the basic system information, and allows you enter the BIOS setup program. Click < or > to switch EZ System Tuning modes Selects the display language Creates storage RAID and of the BIOS setup program configures system overclocking Enables or disables the SATA RAID mode for entering the BIOS setup program can be changed between EZ Mode or Advanced Mode...
User Guide
Page 77
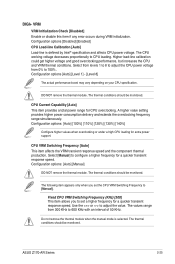
... you to set the CPU VRM Switching Frequency to 600 KHz with an interval of 50 KHz. CPU Current Capability [Auto] This item provides a total power range for extra power support. Do not remove the thermal module when the manual mode is defined by Intel® specification and affects CPU power voltage. Configuration options [Disabled] [Enabled] CPU Load-line Calibration [Auto] Load-line is selected. Higher load-line calibration could get higher voltage and good overclocking performance...
... you to set the CPU VRM Switching Frequency to 600 KHz with an interval of 50 KHz. CPU Current Capability [Auto] This item provides a total power range for extra power support. Do not remove the thermal module when the manual mode is defined by Intel® specification and affects CPU power voltage. Configuration options [Disabled] [Enabled] CPU Load-line Calibration [Auto] Load-line is selected. Higher load-line calibration could get higher voltage and good overclocking performance...
User Guide
Page 91
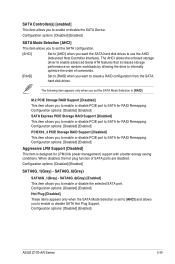
... to enable or disable SATA Hot Plug Support. When disabled, the hot plug function of commands. [RAID] Set to [RAID] when you want to internally optimize the order of SATA ports are disabled. Configuration options: [Disabled] [Enabled] Hot Plug [Disabled] These items appears only when the SATA Mode Selection is designed for RAID Remapping. Configuration options: [Disabled] [Enabled] SATA Mode Selection [AHCI] This item allows you to set the SATA Mode Selection to use the AHCI (Advanced Host Controller Interface). The AHCI allows the onboard storage driver to enable advanced...
... to enable or disable SATA Hot Plug Support. When disabled, the hot plug function of commands. [RAID] Set to [RAID] when you want to internally optimize the order of SATA ports are disabled. Configuration options: [Disabled] [Enabled] Hot Plug [Disabled] These items appears only when the SATA Mode Selection is designed for RAID Remapping. Configuration options: [Disabled] [Enabled] SATA Mode Selection [AHCI] This item allows you to set the SATA Mode Selection to use the AHCI (Advanced Host Controller Interface). The AHCI allows the onboard storage driver to enable advanced...
User Guide
Page 94
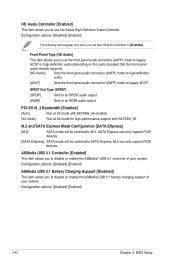
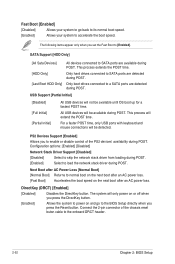
... to high definition audio. [AC97] Sets the front panel audio connector (AAFP) mode to legacy AC'97 SPDIF Out Type [SPDIF] [SPDIF] Sets to an SPDIF audio output. [HDMI] Sets to an HDMI audio output. HD Audio Controller [Enabled] This item allows you to use the Azalia High Definition Audio Controller Configuration options: [Disabled] [Enabled] The following items appear only when you to disable or enable the ASMedia USB 3.1 battery charging support of your system. SATA Express can only support PCIE devices. Configuration options: [Disabled] [Enabled] 2-42 Chapter 2: BIOS Setup...
... to high definition audio. [AC97] Sets the front panel audio connector (AAFP) mode to legacy AC'97 SPDIF Out Type [SPDIF] [SPDIF] Sets to an SPDIF audio output. [HDMI] Sets to an HDMI audio output. HD Audio Controller [Enabled] This item allows you to use the Azalia High Definition Audio Controller Configuration options: [Disabled] [Enabled] The following items appear only when you to disable or enable the ASMedia USB 3.1 battery charging support of your system. SATA Express can only support PCIE devices. Configuration options: [Disabled] [Enabled] 2-42 Chapter 2: BIOS Setup...
User Guide
Page 104
... the Reset button. Only hard drives connected to SATA ports are available during POST. SATA Support [HDD Only] [All Sata Devices] [HDD Only] [Last Boot HDD Only] All devices connected to SATA ports are detected during POST. The system will be available until OS boot up for a fastest POST time. Connect the 2-pin connector of the PS2 devices' availability during POST. The following items appear only when you to enable or disable control of the chassis reset buton cable to the onboard DRCT header. 2-52 Chapter 2: BIOS Setup USB Support...
... the Reset button. Only hard drives connected to SATA ports are available during POST. SATA Support [HDD Only] [All Sata Devices] [HDD Only] [Last Boot HDD Only] All devices connected to SATA ports are detected during POST. The system will be available until OS boot up for a fastest POST time. Connect the 2-pin connector of the PS2 devices' availability during POST. The following items appear only when you to enable or disable control of the chassis reset buton cable to the onboard DRCT header. 2-52 Chapter 2: BIOS Setup USB Support...
User Guide
Page 109
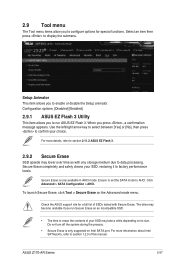
... SATA port. Select an item then press to run Secure Erase on its size. Configuration options: [Disabled] [Enabled] 2.9.1 ASUS EZ Flash 3 Utility This item allows you to display the submenu. Setup Animator This item allows you to confirm your SSD, restoring it to AHCI. Use the left/right arrow key to select between [Yes] or [No], then press to enable or disable the Setup animator. 2.9 Tool menu The Tool menu...
... SATA port. Select an item then press to run Secure Erase on its size. Configuration options: [Disabled] [Enabled] 2.9.1 ASUS EZ Flash 3 Utility This item allows you to display the submenu. Setup Animator This item allows you to confirm your SSD, restoring it to AHCI. Use the left/right arrow key to select between [Yes] or [No], then press to enable or disable the Setup animator. 2.9 Tool menu The Tool menu...
User Guide
Page 114
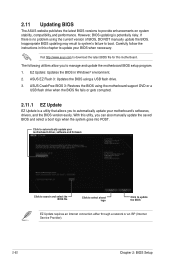
... motherboard driver, software and firmware Click to search and select the BIOS file Click to select a boot logo Click to boot. Inappropriate BIOS updating may result to system's failure to update the BIOS EZ Update requires an Internet connection either through a network or an ISP (Internet Service Provider). 2-62 Chapter 2: BIOS Setup If there is no problem using a USB flash drive. 3. Visit http://www.asus.com to provide enhancements on system stability, compatibility,and performance. 2.11 Updating BIOS...
... motherboard driver, software and firmware Click to search and select the BIOS file Click to select a boot logo Click to boot. Inappropriate BIOS updating may result to system's failure to update the BIOS EZ Update requires an Internet connection either through a network or an ISP (Internet Service Provider). 2-62 Chapter 2: BIOS Setup If there is no problem using a USB flash drive. 3. Visit http://www.asus.com to provide enhancements on system stability, compatibility,and performance. 2.11 Updating BIOS...
User Guide
Page 117
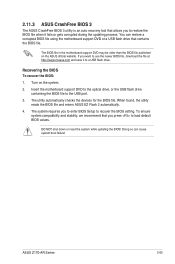
... the BIOS setting. When found, the utility reads the BIOS file and enters ASUS EZ Flash 2 automatically. 4. The system requires you to enter BIOS Setup to a USB flash drive. ASUS Z170-AR Series 2-65 The utility automatically checks the devices for the BIOS file. Recovering the BIOS To recover the BIOS: 1. You can cause system boot failure! If you press to load default BIOS values. Doing so can restore a corrupted BIOS file using the motherboard support DVD or a USB flash drive that you want to use the newer BIOS file, download the file...
... the BIOS setting. When found, the utility reads the BIOS file and enters ASUS EZ Flash 2 automatically. 4. The system requires you to enter BIOS Setup to a USB flash drive. ASUS Z170-AR Series 2-65 The utility automatically checks the devices for the BIOS file. Recovering the BIOS To recover the BIOS: 1. You can cause system boot failure! If you press to load default BIOS values. Doing so can restore a corrupted BIOS file using the motherboard support DVD or a USB flash drive that you want to use the newer BIOS file, download the file...
User Guide
Page 118
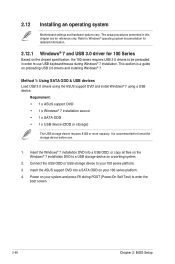
... chipset specification, the 100 series requires USB 3.0 drivers to be preloaded in this chapter are for 100 Series Based on your 100 series platform. 3. Insert the Windows® 7 installation DVD into a SATA ODD on a working system. 2. Connect the USB ODD or USB storage device to your system and press F8 during Windows® 7 installation. The setup procedures presented in order to enter the boot screen. 2-66 Chapter 2: BIOS Setup 2.12 Installing an operating system Motherboard settings and hardware options...
... chipset specification, the 100 series requires USB 3.0 drivers to be preloaded in this chapter are for 100 Series Based on your 100 series platform. 3. Insert the Windows® 7 installation DVD into a SATA ODD on a working system. 2. Connect the USB ODD or USB storage device to your system and press F8 during Windows® 7 installation. The setup procedures presented in order to enter the boot screen. 2-66 Chapter 2: BIOS Setup 2.12 Installing an operating system Motherboard settings and hardware options...
User Guide
Page 120
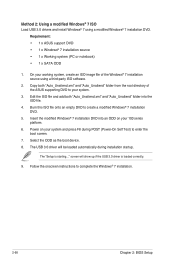
... ASUS supporting DVD to your system and press F8 during installation startup. The "Setup is loaded correctly. 9. screen will be loaded automatically during POST (Power-On Self Test) to enter the boot screen. 7. Insert the modified Windows® 7 installation DVD into the ISO file. 4. The USB 3.0 driver will show up if the USB 3.0 driver is starting..." Follow the onscreen instructions to create a modified Windows® 7 installation DVD. 5. On your 100 series platform. 6. Method 2: Using a modified Windows® 7 ISO Load USB 3.0 drivers and install Windows...
... ASUS supporting DVD to your system and press F8 during installation startup. The "Setup is loaded correctly. 9. screen will be loaded automatically during POST (Power-On Self Test) to enter the boot screen. 7. Insert the modified Windows® 7 installation DVD into the ISO file. 4. The USB 3.0 driver will show up if the USB 3.0 driver is starting..." Follow the onscreen instructions to create a modified Windows® 7 installation DVD. 5. On your 100 series platform. 6. Method 2: Using a modified Windows® 7 ISO Load USB 3.0 drivers and install Windows...


