
ASUS Xonar D2 audio card User Manual
Page 16
...signal to 5.1 or 7.1 channel surround sound. Connect the audio output header from the TV tuner card to the Aux-In header of the audio card, as shown in one PCI slot and screw it back to your TV set! 10 ASUS Xonar D2 Secure the PCI TV tuner card in the figure below. Please select ... output. TV audio on your PC will become even better than on sound effects such as the recording source in the Xonar Audio Center's recording mixer and enable the monitoring button to pass this setup, you may need to connect it to the audio card to send the tuner card's sound to DAC playback.
...signal to 5.1 or 7.1 channel surround sound. Connect the audio output header from the TV tuner card to the Aux-In header of the audio card, as shown in one PCI slot and screw it back to your TV set! 10 ASUS Xonar D2 Secure the PCI TV tuner card in the figure below. Please select ... output. TV audio on your PC will become even better than on sound effects such as the recording source in the Xonar Audio Center's recording mixer and enable the monitoring button to pass this setup, you may need to connect it to the audio card to send the tuner card's sound to DAC playback.
ASUS Xonar D2 audio card User Manual
Page 17
...drive, the CD starts running automatically. If it before you understand and accept it doesn't start the installation, double-click the setup. exe icon located on the screen to restart the computer later if desired. When the installation finishes, you have installed your audio... read the "END USER LICENCE AGREEMENT" in the process and make sure you continue the installation. Installing Software 4.1 Installing the Audio Card Driver 1. ASUS Xonar D2 11 4. When prompted for the audio drivers, click the "Cancel" button. 2. You can choose to complete the installation.
...drive, the CD starts running automatically. If it before you understand and accept it doesn't start the installation, double-click the setup. exe icon located on the screen to restart the computer later if desired. When the installation finishes, you have installed your audio... read the "END USER LICENCE AGREEMENT" in the process and make sure you continue the installation. Installing Software 4.1 Installing the Audio Card Driver 1. ASUS Xonar D2 11 4. When prompted for the audio drivers, click the "Cancel" button. 2. You can choose to complete the installation.
ASUS Xonar D2 audio card User Manual
Page 19
ASUS Xonar D2 13 Insert the Ableton Live installation CD into the CD/DVD-ROM drive. 2. Follow the instructions on the screen to complete the installation. After the installation is complete, click Finish. The installation program will start automatically. Please read the "END USER LICENCE AGREEMENT" and make sure you continue the installation. If it before you understand and accept it does not, double click the setup program. 3. 4.3 Installing the Ableton Live 1.
ASUS Xonar D2 13 Insert the Ableton Live installation CD into the CD/DVD-ROM drive. 2. Follow the instructions on the screen to complete the installation. After the installation is complete, click Finish. The installation program will start automatically. Please read the "END USER LICENCE AGREEMENT" and make sure you continue the installation. If it before you understand and accept it does not, double click the setup program. 3. 4.3 Installing the Ableton Live 1.
ASUS Xonar D2 audio card User Manual
Page 20
... the setup program. 3. Follow the instructions on the screen to run the VST Adapter Configuration Wizard. ROM drive. 2. The installation program will start automatically. You may be prompted to select the language, installed components, and associated file types, and to complete the installation. After the installation is complete, click "Finish". 14 ASUS Xonar D2...
... the setup program. 3. Follow the instructions on the screen to run the VST Adapter Configuration Wizard. ROM drive. 2. The installation program will start automatically. You may be prompted to select the language, installed components, and associated file types, and to complete the installation. After the installation is complete, click "Finish". 14 ASUS Xonar D2...
ASUS Xonar D2 audio card User Manual
Page 54
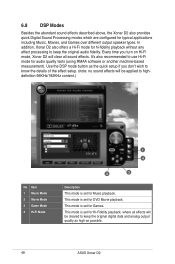
... audio fidelity. Every time you don't wish to know the details of the effect setup. (note: no sound effects will be cleared to keep the original digital data and analog output quality as high as possible. 48 ASUS Xonar D2 This mode is set for audio quality tests (using RMAA software or another machine-based...
... audio fidelity. Every time you don't wish to know the details of the effect setup. (note: no sound effects will be cleared to keep the original digital data and analog output quality as high as possible. 48 ASUS Xonar D2 This mode is set for audio quality tests (using RMAA software or another machine-based...

ASUS Xonar D2 audio card User Manual
Page 55
... rate from the Options tab. When Using Ableton Live... 2 3 4 5 1 No Item 1 Preferences 2 Driver Type 3 Audio Device 4 Hardware Setup Description Step 1 is to choose "ASUS Xonar D2 ASIO" as the Audio Device. Step 4 is to click the Hardware Setup to configure the Bitdepth (16/24bit) and latency (1ms~300ms). 5 Sample Rate Step 5 is to open the...
... rate from the Options tab. When Using Ableton Live... 2 3 4 5 1 No Item 1 Preferences 2 Driver Type 3 Audio Device 4 Hardware Setup Description Step 1 is to choose "ASUS Xonar D2 ASIO" as the Audio Device. Step 4 is to click the Hardware Setup to configure the Bitdepth (16/24bit) and latency (1ms~300ms). 5 Sample Rate Step 5 is to open the...

ASUS Xonar D2 audio card User Manual
Page 57
Make sure you are using 00 or another one. Step 6 is to select "ASIO" as WaveLab, Cubase, Reason, Winamp, etc, the setup will be very similar to the above. 3 4 5 6 7 No Item 1 Audio Options 2 Driver Mode 3 Playback Timing Master 4 Recording Timing Master 5 Sample Rate 6 Bit-depth 7... to select the default file sample rate (44.1, 48, 96, or 192KHz) for your Sonar project. After step 2, Sonar LE will display 1 input driver: "ASUS Xonar D2 ASIO In -00". For other applications that support ASIO, such as the driver mode in Advanced tab. (WDM and MME are using it. Make sure...
Make sure you are using 00 or another one. Step 6 is to select "ASIO" as WaveLab, Cubase, Reason, Winamp, etc, the setup will be very similar to the above. 3 4 5 6 7 No Item 1 Audio Options 2 Driver Mode 3 Playback Timing Master 4 Recording Timing Master 5 Sample Rate 6 Bit-depth 7... to select the default file sample rate (44.1, 48, 96, or 192KHz) for your Sonar project. After step 2, Sonar LE will display 1 input driver: "ASUS Xonar D2 ASIO In -00". For other applications that support ASIO, such as the driver mode in Advanced tab. (WDM and MME are using it. Make sure...

ASUS Xonar D2 audio card User Manual
Page 59
... page 3 Software Update Description Default page to setup and start the music conversion This page will find a PMP shortcut icon on the desktop. 4. You will also need an MP3 encoder installed to encode music into MP3 format (If you don't have this already, the Xonar D2 installer will provide a guide message to the... software and download it for upgrade (make sure your computer is connected to download a free MP3 encoder) After PMP is installed, you click the button) ASUS Xonar D2 53
... page 3 Software Update Description Default page to setup and start the music conversion This page will find a PMP shortcut icon on the desktop. 4. You will also need an MP3 encoder installed to encode music into MP3 format (If you don't have this already, the Xonar D2 installer will provide a guide message to the... software and download it for upgrade (make sure your computer is connected to download a free MP3 encoder) After PMP is installed, you click the button) ASUS Xonar D2 53

ASUS Xonar D2 audio card User Manual
Page 67
Select 24bit and 48KHz for human hearing) in the Xonar D2 Audio Center) 1 2 3. Select both of the playback/recording devices as "ASUS Xonar D2 Audio". 2. Click "Test options" button in RMAA and check "Analyze noise and distortion only in 20Hz-20KHz range" (audio in-band for the test signals. (If you change the format here, remember to go back to set the same sample rate output in the General tab. 3 ASUS Xonar D2 61 10.2 Configuration and Test with RMAA Start RMAA and follow the setup procedure below. 1.
Select 24bit and 48KHz for human hearing) in the Xonar D2 Audio Center) 1 2 3. Select both of the playback/recording devices as "ASUS Xonar D2 Audio". 2. Click "Test options" button in RMAA and check "Analyze noise and distortion only in 20Hz-20KHz range" (audio in-band for the test signals. (If you change the format here, remember to go back to set the same sample rate output in the General tab. 3 ASUS Xonar D2 61 10.2 Configuration and Test with RMAA Start RMAA and follow the setup procedure below. 1.

ASUS Xonar D2 audio card User Manual
Page 78
...setup. Make sure that you don't have installed the driver 2. Windows Media Player Ver. 10 or above before you have plugged the audio card in your motherboard. 2. PMP will provide a guide message to encode music into another PCI slot, and try installing the driver package again. 72 ASUS Xonar D2... If the icon could not be installed on your PC (If it hasn't, the Xonar D2 installer will ...
...setup. Make sure that you don't have installed the driver 2. Windows Media Player Ver. 10 or above before you have plugged the audio card in your motherboard. 2. PMP will provide a guide message to encode music into another PCI slot, and try installing the driver package again. 72 ASUS Xonar D2... If the icon could not be installed on your PC (If it hasn't, the Xonar D2 installer will ...