

User Manual
Page 8
... Right Side 12 3 4 56 1 Headphone Output Jack The stereo headphone jack (1/8 inch) is compatible with some peripherals acting as keyboards, pointing devices, cameras, hard disk drives, printers, and scanners connected in a series up to 12Mbits/sec (USB 1.1) and 480Mbits/sec (USB 2.0). Using this jack automatically disables the built-in microphone.
... Right Side 12 3 4 56 1 Headphone Output Jack The stereo headphone jack (1/8 inch) is compatible with some peripherals acting as keyboards, pointing devices, cameras, hard disk drives, printers, and scanners connected in a series up to 12Mbits/sec (USB 1.1) and 480Mbits/sec (USB 2.0). Using this jack automatically disables the built-in microphone.
User Manual
Page 9
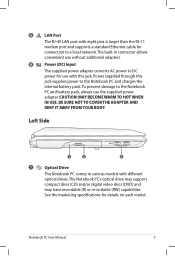
... NOT TO COVER THE ADAPTER AND KEEP IT AWAY FROM YOUR BODY. 5 LAN Port The RJ-45 LAN port with different optical drives.The Notebook PC's optical drive may support compact discs (CD) and/or digital video discs (DVD) and may have recordable (R) or re-writable (RW) capabilities...jack supplies power to the Notebook PC and charges the internal battery pack.To prevent damage to a local network. Left Side 1 2 3 1 Optical Drive The Notebook PC comes in connector allows convenient use without additional adapters. 6 Power (DC) Input The supplied power adapter converts AC power to DC ...
... NOT TO COVER THE ADAPTER AND KEEP IT AWAY FROM YOUR BODY. 5 LAN Port The RJ-45 LAN port with different optical drives.The Notebook PC's optical drive may support compact discs (CD) and/or digital video discs (DVD) and may have recordable (R) or re-writable (RW) capabilities...jack supplies power to the Notebook PC and charges the internal battery pack.To prevent damage to a local network. Left Side 1 2 3 1 Optical Drive The Notebook PC comes in connector allows convenient use without additional adapters. 6 Power (DC) Input The supplied power adapter converts AC power to DC ...
User Manual
Page 10
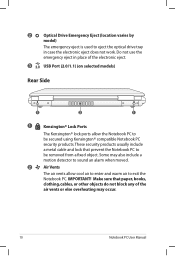
... case the electronic eject does not work. IMPORTANT! Some may occur. 10 Notebook PC User Manual 2 Optical Drive Emergency Eject (location varies by model) The emergency eject is used to eject the optical drive tray in place of the air vents or else overheating may also include a motion detector to sound an...
... case the electronic eject does not work. IMPORTANT! Some may occur. 10 Notebook PC User Manual 2 Optical Drive Emergency Eject (location varies by model) The emergency eject is used to eject the optical drive tray in place of the air vents or else overheating may also include a motion detector to sound an...
User Manual
Page 12
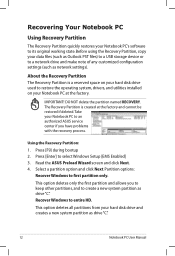
..., copy your Notebook PC to an authorized ASUS service center if you to keep other partitions, and to restore the operating system, drivers, and utilities installed on your hard disk drive used to create a new system partition as drive "C". The Recovery Partition is a reserved space... with the recovery process. Recovering Your Notebook PC Using Recovery Partition The Recovery Partition quickly restores your hard disk drive and creates a new system partition as drive "C". 12 Notebook PC User Manual Press [Enter] to its original working state. This option deletes all partitions ...
..., copy your Notebook PC to an authorized ASUS service center if you to keep other partitions, and to restore the operating system, drivers, and utilities installed on your hard disk drive used to create a new system partition as drive "C". The Recovery Partition is a reserved space... with the recovery process. Recovering Your Notebook PC Using Recovery Partition The Recovery Partition quickly restores your hard disk drive and creates a new system partition as drive "C". 12 Notebook PC User Manual Press [Enter] to its original working state. This option deletes all partitions ...
User Manual
Page 13
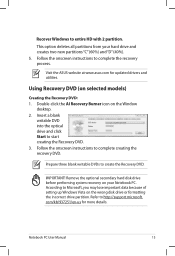
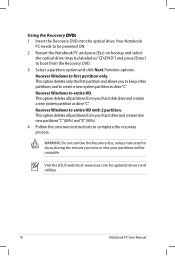
... the recovery process. Follow the onscreen instructions to complete creating the recovery DVD. Visit the ASUS website at www.asus.com for more details. This option deletes all partitions from your Notebook PC. According to start... creating the Recovery DVD. 3. Using Recovery DVD (on the Window desktop. 2. Double-click the AI Recovery Burner icon on selected models) Creating the Recovery DVD: 1. IMPORTANT! Insert a blank writable DVD into the optical drive...
... the recovery process. Follow the onscreen instructions to complete creating the recovery DVD. Visit the ASUS website at www.asus.com for more details. This option deletes all partitions from your Notebook PC. According to start... creating the Recovery DVD. 3. Using Recovery DVD (on the Window desktop. 2. Double-click the AI Recovery Burner icon on selected models) Creating the Recovery DVD: 1. IMPORTANT! Insert a blank writable DVD into the optical drive...
User Manual
Page 14
... and press [Enter] to create a new system partition as drive"C". Select a partition option and click Next. WARNING: Do not remove the Recovery disc, unless instructed to first partition only. Visit the ASUS website at www.asus.com for updated drivers and utilities. 14 Notebook PC User Manual ...Partition options: Recover Windows to do so, during the recovery process or else your hard drive and creates two new partitions"C"(60%) and"D"(40...
... and press [Enter] to create a new system partition as drive"C". Select a partition option and click Next. WARNING: Do not remove the Recovery disc, unless instructed to first partition only. Visit the ASUS website at www.asus.com for updated drivers and utilities. 14 Notebook PC User Manual ...Partition options: Recover Windows to do so, during the recovery process or else your hard drive and creates two new partitions"C"(60%) and"D"(40...

