
User Manual
Page 24
... process will reduce air circulation such as a permanent part of a new operating system. Press [ESC] and you will display a message on the screen when you turn ON the Notebook PC, it back ON. In most cases the record should take your available drives. This record is not a... If the POST discovers a difference between the record and the existing hardware, it will be seen. If warnings are still given during the splash screen, standard boot information such as the BIOS version can also select "Scan ... IMPORTANT! 3 Getting Started Powering ON the Notebook PC The Notebook PC...
... process will reduce air circulation such as a permanent part of a new operating system. Press [ESC] and you will display a message on the screen when you turn ON the Notebook PC, it back ON. In most cases the record should take your available drives. This record is not a... If the POST discovers a difference between the record and the existing hardware, it will be seen. If warnings are still given during the splash screen, standard boot information such as the BIOS version can also select "Scan ... IMPORTANT! 3 Getting Started Powering ON the Notebook PC The Notebook PC...

User Manual
Page 25
... is available due to complete battery depletion or no power supply (e.g. Fully charge the battery pack before the Notebook PC is turned ON. WARNING! Note: Screen captures shown here are examples only and may take twice the time when the Notebook PC is disconnected from external power. WARNING! removing both the...
... is available due to complete battery depletion or no power supply (e.g. Fully charge the battery pack before the Notebook PC is turned ON. WARNING! Note: Screen captures shown here are examples only and may take twice the time when the Notebook PC is disconnected from external power. WARNING! removing both the...

User Manual
Page 28
...Toggles the internal wireless LAN or Bluetooth (on selected models) ON or OFF with an on the Notebook PC's keyboard. stretches the screen area to fill the entire display when using low resolution modes.) LCD/Monitor Icons (F8): Toggles between the touchpad buttons will prevent you...an external monitor "before" booting up. 3 Getting Started Special Keyboard Functions Colored Hot Keys The following defines the colored hot keys on -screen-display. Windows software settings are necessary to -RAM or Saveto-Disk depending on model but the functions should remain the same. NOTE: Selected...
...Toggles the internal wireless LAN or Bluetooth (on selected models) ON or OFF with an on the Notebook PC's keyboard. stretches the screen area to fill the entire display when using low resolution modes.) LCD/Monitor Icons (F8): Toggles between the touchpad buttons will prevent you...an external monitor "before" booting up. 3 Getting Started Special Keyboard Functions Colored Hot Keys The following defines the colored hot keys on -screen-display. Windows software settings are necessary to -RAM or Saveto-Disk depending on model but the functions should remain the same. NOTE: Selected...

User Manual
Page 29
Fn+C: Toggles "Splendid Video Intelligent Technology" function ON and OFF. You can see the current mode through the on -screen display (OSD). Fn+T: Toggles "Power For Phone" software application. Colored Hot Keys (cont.) 3 Getting Started ON OFF Speaker Icons (F10): ...eXtreme (Fn+Space Bar): This key toggles power savings between various power saving modes. You can see the current mode through the on -screen display (OSD). 29 The power saving modes control many aspects of the keyboard for cell navigation. Allows you to maximize performance versus battery time...
Fn+C: Toggles "Splendid Video Intelligent Technology" function ON and OFF. You can see the current mode through the on -screen display (OSD). Fn+T: Toggles "Power For Phone" software application. Colored Hot Keys (cont.) 3 Getting Started ON OFF Speaker Icons (F10): ...eXtreme (Fn+Space Bar): This key toggles power savings between various power saving modes. You can see the current mode through the on -screen display (OSD). 29 The power saving modes control many aspects of the keyboard for cell navigation. Allows you to maximize performance versus battery time...

User Manual
Page 31
... or OFF with an on the display. 31 Windows software settings are necessary to maximize performance versus battery time. The selected mode is shown on -screen display. The power saving modes control many aspects of the Notebook PC to use the wireless LAN or Bluetooth. Power4Gear eXtreme Key The Power4Gear eXtreme...
... or OFF with an on the display. 31 Windows software settings are necessary to maximize performance versus battery time. The selected mode is shown on -screen display. The power saving modes control many aspects of the Notebook PC to use the wireless LAN or Bluetooth. Power4Gear eXtreme Key The Power4Gear eXtreme...
User Manual
Page 36
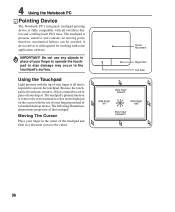
... two/three-button and scrolling knob PS/2 mice. IMPORTANT! Because the touchpad is required to move the cursor around or select items displayed on the screen with the tip of your fingers. The touchpad's primary function is pressure sensitive and contains no moving parts; Do not use of your fingertip instead...
... two/three-button and scrolling knob PS/2 mice. IMPORTANT! Because the touchpad is required to move the cursor around or select items displayed on the screen with the tip of your fingers. The touchpad's primary function is pressure sensitive and contains no moving parts; Do not use of your fingertip instead...
User Manual
Page 37
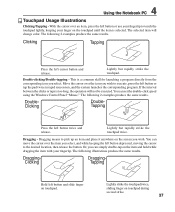
... touchpad twice. Double-clicking/Double-tapping - Move the cursor over the icon you wish to pick up an item and place it anywhere on the screen you can simply double-tap on touchpad. Dragging means to execute, press the left button and slide finger on the item and hold while dragging...
... touchpad twice. Double-clicking/Double-tapping - Move the cursor over the icon you wish to pick up an item and place it anywhere on the screen you can simply double-tap on touchpad. Dragging means to execute, press the left button and slide finger on the item and hold while dragging...

User Manual
Page 54
Or double click the Wireless Console icon on the bottom of the mouse. Or Launch Bluetooth Devices from this screen. 4. The bottom sensor should glow red. • Push the "RESET" button on the taskbar and select either the Wireless LAN + Bluetooth or just the Bluetooth. 3. ...
Or double click the Wireless Console icon on the bottom of the mouse. Or Launch Bluetooth Devices from this screen. 4. The bottom sensor should glow red. • Push the "RESET" button on the taskbar and select either the Wireless LAN + Bluetooth or just the Bluetooth. 3. ...

User Manual
Page 57
On the Security screen, select Change Supervisor or Change User Password. Type in a password and press [Enter]. 3. Re-type the password and press [Enter]. 1. Password is then set. 2. Security Setting 1. Leave the password field blank and press [Enter]. 4. System BIOS Settings Boot Device A Appendix 1. Select each item and press [Enter] to select a device. To clear the password: 2. On the Boot screen, select Boot Device Priority. 2. Password is then cleared.
On the Security screen, select Change Supervisor or Change User Password. Type in a password and press [Enter]. 3. Re-type the password and press [Enter]. 1. Password is then set. 2. Security Setting 1. Leave the password field blank and press [Enter]. 4. System BIOS Settings Boot Device A Appendix 1. Select each item and press [Enter] to select a device. To clear the password: 2. On the Boot screen, select Boot Device Priority. 2. Password is then cleared.

User Manual
Page 61
... your system. If the problem still exist, contact your problem. It is due to see if the problem is available on the ASUS website. If additional memory was installed after system bootup. 1. Un-install software applications. Check your Notebook PC does not loose power ...memory, and power ON to incompatible memory. 2. Blue screen with white text A blue screen with WINFLASH in Windows or AFLASH in Windows Safe Mode. 3. Try to protect yourself from the ASUS website. (WARNING: Make sure your system for assistance. ASUS bundled software When I power ON the Notebook PC, there...
... your system. If the problem still exist, contact your problem. It is due to see if the problem is available on the ASUS website. If additional memory was installed after system bootup. 1. Un-install software applications. Check your Notebook PC does not loose power ...memory, and power ON to incompatible memory. 2. Blue screen with white text A blue screen with WINFLASH in Windows or AFLASH in Windows Safe Mode. 3. Try to protect yourself from the ASUS website. (WARNING: Make sure your system for assistance. ASUS bundled software When I power ON the Notebook PC, there...
User Manual
Page 65
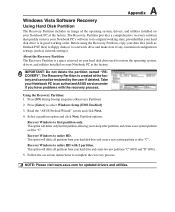
... Press [F9] during bootup (requires a Recovery Partition) 2. Select a partition option and click Next. Recover Windows to entire HD. Read the "ASUS Preload Wizard" screen and click Next. 4. This option will delete all partitions from your data files (such as Outlook PST files) to floppy disks or to a ...network drive and make note of the operating system, drivers, and utilities installed on -screen instructions to keep other partitions, and create a new system partition as drive "C". This option will delete only the first partition, allowing you...
... Press [F9] during bootup (requires a Recovery Partition) 2. Select a partition option and click Next. Recover Windows to entire HD. Read the "ASUS Preload Wizard" screen and click Next. 4. This option will delete all partitions from your data files (such as Outlook PST files) to floppy disks or to a ...network drive and make note of the operating system, drivers, and utilities installed on -screen instructions to keep other partitions, and create a new system partition as drive "C". This option will delete only the first partition, allowing you...
User Manual
Page 66
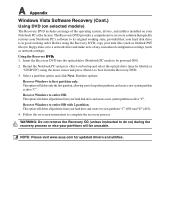
... partition as "CD/DVD") using the Recovery DVD, copy your partitions will delete all partitions from the Recovery DVD. 3. NOTE: Please visit www.asus.com for updated drivers and utilities. A Appendix Windows Vista Software Recovery (Cont.) Using DVD (on selected models) The Recovery DVD includes an image... Outlook PST files) to floppy disks or to a network drive and make note of the operating system, drivers, and utilities installed on -screen instructions to complete the recovery process. WARNING: Do not remove the Recovery CD (unless instructed to boot from your hard disk drive is in...
... partition as "CD/DVD") using the Recovery DVD, copy your partitions will delete all partitions from the Recovery DVD. 3. NOTE: Please visit www.asus.com for updated drivers and utilities. A Appendix Windows Vista Software Recovery (Cont.) Using DVD (on selected models) The Recovery DVD includes an image... Outlook PST files) to floppy disks or to a network drive and make note of the operating system, drivers, and utilities installed on -screen instructions to complete the recovery process. WARNING: Do not remove the Recovery CD (unless instructed to boot from your hard disk drive is in...


