VM65 Series user s manual English
Page 3
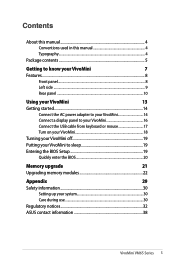
... the AC power adapter to your VivoMini 14 Connect a display panel to your VivoMini 16 Connect the USB cable from keyboard or mouse 17 Turn on your VivoMini 18 Turning your VivoMini off 19 Putting your VivoMini to sleep 19 Entering the BIOS ...Setup 19 Quickly enter the BIOS 20 Memory upgrade 21 Upgrading memory modules 22 Appendix 29 Safety information 30 Setting up your system 30 Care during use 30 Regulatory notices 32 ASUS contact information 38 VivoMini VM65...
... the AC power adapter to your VivoMini 14 Connect a display panel to your VivoMini 16 Connect the USB cable from keyboard or mouse 17 Turn on your VivoMini 18 Turning your VivoMini off 19 Putting your VivoMini to sleep 19 Entering the BIOS ...Setup 19 Quickly enter the BIOS 20 Memory upgrade 21 Upgrading memory modules 22 Appendix 29 Safety information 30 Setting up your system 30 Care during use 30 Regulatory notices 32 ASUS contact information 38 VivoMini VM65...
VM65 Series user s manual English
Page 4
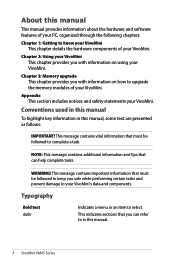
... an item to upgrade the memory modules of your VivoMini's data and components. WARNING! This message contains important information that you safe while performing certain tasks and prevent damage to in this manual. 4 VivoMini VM65 Series This indicates sections that must be followed to ...keep you can help complete tasks. Chapter 2: Using your VivoMini This chapter provides you with information on how to select. Chapter 3: ...
... an item to upgrade the memory modules of your VivoMini's data and components. WARNING! This message contains important information that you safe while performing certain tasks and prevent damage to in this manual. 4 VivoMini VM65 Series This indicates sections that must be followed to ...keep you can help complete tasks. Chapter 2: Using your VivoMini This chapter provides you with information on how to select. Chapter 3: ...
VM65 Series user s manual English
Page 5
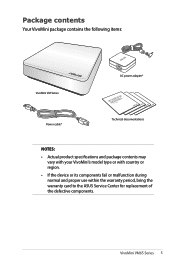
VivoMini VM65 Series 5 Package contents Your VivoMini package contains the following items: VivoMini VM Series AC power adapter* Power cable* Technical documentations NOTES: • Actual product specifications and package contents may vary with your VivoMini's model type or with country or region. • If the device or its components fail or malfunction during normal and proper use within the warranty period, bring the warranty card to the ASUS Service Center for replacement of the defective components.
VivoMini VM65 Series 5 Package contents Your VivoMini package contains the following items: VivoMini VM Series AC power adapter* Power cable* Technical documentations NOTES: • Actual product specifications and package contents may vary with your VivoMini's model type or with country or region. • If the device or its components fail or malfunction during normal and proper use within the warranty period, bring the warranty card to the ASUS Service Center for replacement of the defective components.
VM65 Series user s manual English
Page 8
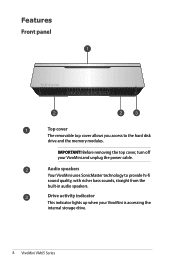
Audio speakers Your VivoMini uses SonicMaster technology to the hard disk drive and the memory modules. Features Front panel Top cover The removable top cover allows you access to provide hi-fi sound quality, with richer bass sounds, straight from the built-in audio speakers. Drive activity indicator This indicator lights up when your VivoMini and unplug the power cable. Before removing the top cover, turn off your VivoMini is accessing the internal storage drive. 8 VivoMini VM65 Series IMPORTANT!
Audio speakers Your VivoMini uses SonicMaster technology to the hard disk drive and the memory modules. Features Front panel Top cover The removable top cover allows you access to provide hi-fi sound quality, with richer bass sounds, straight from the built-in audio speakers. Drive activity indicator This indicator lights up when your VivoMini and unplug the power cable. Before removing the top cover, turn off your VivoMini is accessing the internal storage drive. 8 VivoMini VM65 Series IMPORTANT!

VM65 Series user s manual English
Page 9
For optimum heat dissipation and air ventilation, ensure that the air vents are free from obstructions. VivoMini VM65 Series 9 IMPORTANT! Left side Air vents The air vents on the left side allow cooler air to enter your VivoMini chassis.
For optimum heat dissipation and air ventilation, ensure that the air vents are free from obstructions. VivoMini VM65 Series 9 IMPORTANT! Left side Air vents The air vents on the left side allow cooler air to enter your VivoMini chassis.

VM65 Series user s manual English
Page 10
... Kensington® security products. The Kensington security slot allows you to 5 Gbit/s and are backward compatible with USB 2.0. 10 VivoMini VM65 Series You can also press the power button once to sleep mode. Top cover lock latch + Kensington security slot The top cover lock latch fastens ...the top cover on or off. USB 3.0 ports These Universal Serial Bus 3.0 (USB 3.0) ports provide a transfer rate of up to turn the VivoMini on your VivoMini to put your...
... Kensington® security products. The Kensington security slot allows you to 5 Gbit/s and are backward compatible with USB 2.0. 10 VivoMini VM65 Series You can also press the power button once to sleep mode. Top cover lock latch + Kensington security slot The top cover lock latch fastens ...the top cover on or off. USB 3.0 ports These Universal Serial Bus 3.0 (USB 3.0) ports provide a transfer rate of up to turn the VivoMini on your VivoMini to put your...
VM65 Series user s manual English
Page 11
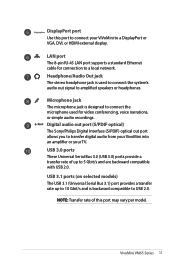
Microphone jack The microphone jack is used for connection to 5 Gbit/s and are backward compatible with USB 2.0. VivoMini VM65 Series 11 Headphone/Audio Out jack The stereo headphone jack is designed to a DisplayPort or VGA, DVI, or HDMI external display. Digital audio out port ... to connect your TV. NOTE: Transfer rate of up to 10 Gbit/s and is backward compatible to transfer digital audio from your VivoMini into an amplifier or your ViVoMini to connect the microphone used to connect the system's audio out signal to amplified speakers or headphones. LAN port The 8-pin RJ...
Microphone jack The microphone jack is used for connection to 5 Gbit/s and are backward compatible with USB 2.0. VivoMini VM65 Series 11 Headphone/Audio Out jack The stereo headphone jack is designed to a DisplayPort or VGA, DVI, or HDMI external display. Digital audio out port ... to connect your TV. NOTE: Transfer rate of up to 10 Gbit/s and is backward compatible to transfer digital audio from your VivoMini into an amplifier or your ViVoMini to connect the microphone used to connect the system's audio out signal to amplified speakers or headphones. LAN port The 8-pin RJ...

VM65 Series user s manual English
Page 12
..., keep it away from any obstructions. WARNING! Do not cover the adapter and keep the air vents at least 10cm away from your body. 12 VivoMini VM65 Series To prevent damage to the PC, always use . IMPORTANT! The power adapter may become warm to hot when in use the bundled power adapter... Interface) port supports a Full-HD device such as an LCD TV or monitor to allow viewing on the rear allow warm air to exit the VivoMini.
..., keep it away from any obstructions. WARNING! Do not cover the adapter and keep the air vents at least 10cm away from your body. 12 VivoMini VM65 Series To prevent damage to the PC, always use . IMPORTANT! The power adapter may become warm to hot when in use the bundled power adapter... Interface) port supports a Full-HD device such as an LCD TV or monitor to allow viewing on the rear allow warm air to exit the VivoMini.

VM65 Series user s manual English
Page 14
C. B. Connect the AC power cord to your VivoMini: A. Connect the DC power connector into a 100V~240V power source. Plug the AC power cord into your region. 14 VivoMini VM65 Series NOTE: The power adapter may vary in appearance, depending on models and your VivoMini's power (DC) input port. Getting started Connect the AC power adapter to your VivoMini To connect the AC power adapter to the AC/DC adapter.
C. B. Connect the AC power cord to your VivoMini: A. Connect the DC power connector into a 100V~240V power source. Plug the AC power cord into your region. 14 VivoMini VM65 Series NOTE: The power adapter may vary in appearance, depending on models and your VivoMini's power (DC) input port. Getting started Connect the AC power adapter to your VivoMini To connect the AC power adapter to the AC/DC adapter.

VM65 Series user s manual English
Page 15
... use a grounded wall socket while using your VivoMini. • The socket outlet must be easily accessible and near your VivoMini. • To disconnect your VivoMini from its main power supply, unplug your VivoMini from the power socket. NOTE: Power adapter ...information: • Input voltage: 100-240Vac • Input frequency: 50-60Hz • Rating output current: 3.42A(65W) or 4.74A(90W) (varies per model) • Rating output voltage: 19V VivoMini VM65...
... use a grounded wall socket while using your VivoMini. • The socket outlet must be easily accessible and near your VivoMini. • To disconnect your VivoMini from its main power supply, unplug your VivoMini from the power socket. NOTE: Power adapter ...information: • Input voltage: 100-240Vac • Input frequency: 50-60Hz • Rating output current: 3.42A(65W) or 4.74A(90W) (varies per model) • Rating output voltage: 19V VivoMini VM65...

VM65 Series user s manual English
Page 16
Connecting display via HDMI port Connecting display via DisplayPort port 16 VivoMini VM65 Series To connect a display panel to your VivoMini that has the following connectors: • HDMI connector • DisplayPort connector • VGA connector (use with a DisplayPort to VGA adapter or HDMI to VGA adapter...) NOTE: The HDMI to DVI adapter, DisplayPort to VGA adapter, or HDMI to the HDMI or DisplayPort port. Connect a display panel to your VivoMini You can connect a display panel or projector to your VivoMini: Connect a display cable either to VGA adapter are each sold separately.
Connecting display via HDMI port Connecting display via DisplayPort port 16 VivoMini VM65 Series To connect a display panel to your VivoMini that has the following connectors: • HDMI connector • DisplayPort connector • VGA connector (use with a DisplayPort to VGA adapter or HDMI to VGA adapter...) NOTE: The HDMI to DVI adapter, DisplayPort to VGA adapter, or HDMI to the HDMI or DisplayPort port. Connect a display panel to your VivoMini You can connect a display panel or projector to your VivoMini: Connect a display cable either to VGA adapter are each sold separately.
VM65 Series user s manual English
Page 17
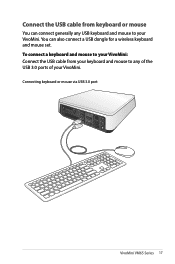
To connect a keyboard and mouse to your VivoMini: Connect the USB cable from keyboard or mouse You can also connect a USB dongle for a wireless keyboard and mouse set. Connect the USB cable from your keyboard and mouse to your VivoMini. You can connect generally any USB keyboard and mouse to any of the USB 3.0 ports of your VivoMini. Connecting keyboard or mouse via USB 3.0 port VivoMini VM65 Series 17
To connect a keyboard and mouse to your VivoMini: Connect the USB cable from keyboard or mouse You can also connect a USB dongle for a wireless keyboard and mouse set. Connect the USB cable from your keyboard and mouse to your VivoMini. You can connect generally any USB keyboard and mouse to any of the USB 3.0 ports of your VivoMini. Connecting keyboard or mouse via USB 3.0 port VivoMini VM65 Series 17

VM65 Series user s manual English
Page 18
Turn on your VivoMini Press the power button to turn on your VivoMini. 18 VivoMini VM65 Series
Turn on your VivoMini Press the power button to turn on your VivoMini. 18 VivoMini VM65 Series
VM65 Series user s manual English
Page 19
...update. Inappropriate BIOS settings may result to ensure optimal performance. Turning your VivoMini off . WARNING! Do not change the BIOS settings only with the help of a trained service personnel. VivoMini VM65 Series 19 In normal circumstances, the default BIOS settings apply to most conditions... to instability or boot failure. We strongly recommend that you to sleep To put your VivoMini turns off If your VivoMini is unresponsive, press and ...
...update. Inappropriate BIOS settings may result to ensure optimal performance. Turning your VivoMini off . WARNING! Do not change the BIOS settings only with the help of a trained service personnel. VivoMini VM65 Series 19 In normal circumstances, the default BIOS settings apply to most conditions... to instability or boot failure. We strongly recommend that you to sleep To put your VivoMini turns off If your VivoMini is unresponsive, press and ...

VM65 Series user s manual English
Page 20
Quickly enter the BIOS To quickly enter the BIOS: • Press the power button for at least four (4) seconds to shut down your VivoMini, then press the power button again to turn on your PC. 20 VivoMini VM65 Series Reconnect the power cable and press the power button to turn your VivoMini back on your VivoMini. Press or during POST. • When your VivoMini's power connector. NOTE: POST (Power-On Self Test) is off, disconnect the power cord from your PC is a series of software controlled diagnostic tests that run when you turn on , then press or during POST.
Quickly enter the BIOS To quickly enter the BIOS: • Press the power button for at least four (4) seconds to shut down your VivoMini, then press the power button again to turn on your PC. 20 VivoMini VM65 Series Reconnect the power cable and press the power button to turn your VivoMini back on your VivoMini. Press or during POST. • When your VivoMini's power connector. NOTE: POST (Power-On Self Test) is off, disconnect the power cord from your PC is a series of software controlled diagnostic tests that run when you turn on , then press or during POST.
VM65 Series user s manual English
Page 22
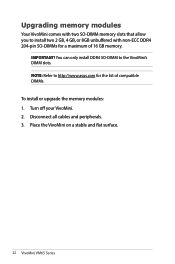
Turn off your VivoMini. 2. Disconnect all cables and peripherals. 3. Place the VivoMini on a stable and flat surface. 22 VivoMini VM65 Series IMPORTANT! NOTE: Refer to http://www.asus.com for a maximum of compatible DIMMs. To install or upgrade the memory modules: 1. You can only install DDR4 SO-DIMM to the VivoMini's DIMM slots. Upgrading memory modules Your VivoMini comes with two SO-DIMM memory slots that allow you to install two 2 GB, 4 GB, or 8GB unbuffered with non-ECC DDR4 204-pin SO-DIMMs for the list of 16 GB memory.
Turn off your VivoMini. 2. Disconnect all cables and peripherals. 3. Place the VivoMini on a stable and flat surface. 22 VivoMini VM65 Series IMPORTANT! NOTE: Refer to http://www.asus.com for a maximum of compatible DIMMs. To install or upgrade the memory modules: 1. You can only install DDR4 SO-DIMM to the VivoMini's DIMM slots. Upgrading memory modules Your VivoMini comes with two SO-DIMM memory slots that allow you to install two 2 GB, 4 GB, or 8GB unbuffered with non-ECC DDR4 204-pin SO-DIMMs for the list of 16 GB memory.

VM65 Series user s manual English
Page 23
VivoMini VM65 Series 23 Press down the latch at the rear panel to release the top cover. 5. 4. Slide the top cover towards the rear of VivoMini until it is detached from the chassis. 6. Remove the cover and set aside.
VivoMini VM65 Series 23 Press down the latch at the rear panel to release the top cover. 5. 4. Slide the top cover towards the rear of VivoMini until it is detached from the chassis. 6. Remove the cover and set aside.

VM65 Series user s manual English
Page 24
Removing the HDD from drive bay Removing the dualbay adapter (with SSD or 2.5inch HDD inside ) from the drive bay. 7. Carefully slide the HDD or the dualbay adapter (with SSD or 2.5-inch HDD inside ) from the SATA connector, then remove it from drive bay 24 VivoMini VM65 Series
Removing the HDD from drive bay Removing the dualbay adapter (with SSD or 2.5inch HDD inside ) from the drive bay. 7. Carefully slide the HDD or the dualbay adapter (with SSD or 2.5-inch HDD inside ) from the SATA connector, then remove it from drive bay 24 VivoMini VM65 Series

VM65 Series user s manual English
Page 25
HD Serial ATA connector SO-DIMM slot cover Serial ATA HDD drive bay Memory 10. Memory 9. 8. VivoMini VM65 Series 25 Release the screw that secures the SO-DIMM slot cover, then pry the slot cover open. Align and insert the memory module into the slot (A) and press it down (B), until it is securely seated in place. Prepare the memory module.
HD Serial ATA connector SO-DIMM slot cover Serial ATA HDD drive bay Memory 10. Memory 9. 8. VivoMini VM65 Series 25 Release the screw that secures the SO-DIMM slot cover, then pry the slot cover open. Align and insert the memory module into the slot (A) and press it down (B), until it is securely seated in place. Prepare the memory module.

VM65 Series user s manual English
Page 26
11. Replace the SO-DIMM slot cover and secure it with the four screw slots on the drive bay. 26 VivoMini VM65 Series For HDD and dualbay adapter, match the rubber heads of the screws with the screw. 12.
11. Replace the SO-DIMM slot cover and secure it with the four screw slots on the drive bay. 26 VivoMini VM65 Series For HDD and dualbay adapter, match the rubber heads of the screws with the screw. 12.