
VivoMiniVM45 Users ManualEnglish
Page 2
... ANY DEFECT OR ERROR IN THIS MANUAL OR PRODUCT. ASUS will only be registered trademarks or copyrights of their respective companies, and are collectively responsible. SERVICE AND SUPPORT Visit our multi-language web site at https://www.asus.com/support/ LIMITATION OF LIABILITY Circumstances may not be responsible for identification or explanation and to the owners' benefit, without...
... ANY DEFECT OR ERROR IN THIS MANUAL OR PRODUCT. ASUS will only be registered trademarks or copyrights of their respective companies, and are collectively responsible. SERVICE AND SUPPORT Visit our multi-language web site at https://www.asus.com/support/ LIMITATION OF LIABILITY Circumstances may not be responsible for identification or explanation and to the owners' benefit, without...

VivoMiniVM45 Users ManualEnglish
Page 3
... ...9 Rear panel...10 Using your VivoMini Getting started 14 Connect the AC power adapter to your VivoMini 14 Connect a display panel to your VivoMini 16 Connect the USB cable from keyboard or mouse 17 Turn on your VivoMini 18 Turning your VivoMini off 19 Putting your VivoMini to sleep 19 Entering the BIOS Setup 19 Quickly enter the BIOS 20 Memory upgrade Upgrading memory modules 22 Appendix Safety information 30 Setting up your system 30 Care during use 31 Regulatory notices 32 ASUS contact information 36 VivoMini VM45 3
... ...9 Rear panel...10 Using your VivoMini Getting started 14 Connect the AC power adapter to your VivoMini 14 Connect a display panel to your VivoMini 16 Connect the USB cable from keyboard or mouse 17 Turn on your VivoMini 18 Turning your VivoMini off 19 Putting your VivoMini to sleep 19 Entering the BIOS Setup 19 Quickly enter the BIOS 20 Memory upgrade Upgrading memory modules 22 Appendix Safety information 30 Setting up your system 30 Care during use 31 Regulatory notices 32 ASUS contact information 36 VivoMini VM45 3
VivoMiniVM45 Users ManualEnglish
Page 5
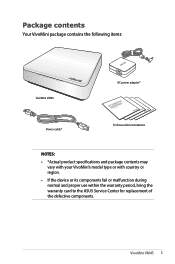
Package contents Your VivoMini package contains the following items: VivoMini VM45 AC power adapter* Power cable* Technical documentations NOTES: • *Actual product specifications and package contents may vary with your VivoMini's model type or with country or region. • If the device or its components fail or malfunction during normal and proper use within the warranty period, bring the warranty card to the ASUS Service Center for replacement of the defective components. VivoMini VM45 5
Package contents Your VivoMini package contains the following items: VivoMini VM45 AC power adapter* Power cable* Technical documentations NOTES: • *Actual product specifications and package contents may vary with your VivoMini's model type or with country or region. • If the device or its components fail or malfunction during normal and proper use within the warranty period, bring the warranty card to the ASUS Service Center for replacement of the defective components. VivoMini VM45 5

VivoMiniVM45 Users ManualEnglish
Page 8
IMPORTANT! Audio speakers Your VivoMini uses SonicMaster technology to the hard disk drive and the memory modules. Drive activity indicator This indicator lights up when your VivoMini and unplug the power cable. Before removing the top cover, turn off your VivoMini is accessing the internal storage drive. 8 VivoMini VM45 Features Front panel Top cover The removable top cover allows you access to provide hi-fi sound quality, with richer bass sounds, straight from the built-in audio speakers.
IMPORTANT! Audio speakers Your VivoMini uses SonicMaster technology to the hard disk drive and the memory modules. Drive activity indicator This indicator lights up when your VivoMini and unplug the power cable. Before removing the top cover, turn off your VivoMini is accessing the internal storage drive. 8 VivoMini VM45 Features Front panel Top cover The removable top cover allows you access to provide hi-fi sound quality, with richer bass sounds, straight from the built-in audio speakers.

VivoMiniVM45 Users ManualEnglish
Page 10
... Serial Bus) ports provide a transfer rate of up to sleep mode. You can also press the power button once to put your VivoMini to 5 Gbit/s and are backward compatible with USB 2.0. 10 VivoMini VM45 Memory card slot The built-in memory card reader enables your VivoMini to read and write data to secure your VivoMini using Kensington® security products. The Kensington security slot allows you to turn the VivoMini on your VivoMini. Top cover...
... Serial Bus) ports provide a transfer rate of up to sleep mode. You can also press the power button once to put your VivoMini to 5 Gbit/s and are backward compatible with USB 2.0. 10 VivoMini VM45 Memory card slot The built-in memory card reader enables your VivoMini to read and write data to secure your VivoMini using Kensington® security products. The Kensington security slot allows you to turn the VivoMini on your VivoMini. Top cover...

VivoMiniVM45 Users ManualEnglish
Page 11
... peripheral acting as keyboards, mouse devices, cameras, and hard disk drives. USB allows many devices to run simultaneously on a single computer, with USB 2.0/1.1 devices such as additional plug-in sites or hubs. VivoMini VM45 11 Headphone/Audio Out jack The stereo headphone jack is designed to connect the microphone used to connect the system's audio out signal to amplified speakers or headphones. LAN port The 8-pin RJ-45 LAN port supports a standard Ethernet cable for video conferencing, voice narrations...
... peripheral acting as keyboards, mouse devices, cameras, and hard disk drives. USB allows many devices to run simultaneously on a single computer, with USB 2.0/1.1 devices such as additional plug-in sites or hubs. VivoMini VM45 11 Headphone/Audio Out jack The stereo headphone jack is designed to connect the microphone used to connect the system's audio out signal to amplified speakers or headphones. LAN port The 8-pin RJ-45 LAN port supports a standard Ethernet cable for video conferencing, voice narrations...

VivoMiniVM45 Users ManualEnglish
Page 12
.... Power input (DC 19V) The supplied power adapter converts AC power to DC power for use with this jack supplies power to the PC, always use . To prevent damage to the PC. Do not cover the adapter and keep the air vents at least 10cm away from your body. 12 VivoMini VM45 Rear air vents The air vents on the rear allow viewing on a larger external display. IMPORTANT...
.... Power input (DC 19V) The supplied power adapter converts AC power to DC power for use with this jack supplies power to the PC, always use . To prevent damage to the PC. Do not cover the adapter and keep the air vents at least 10cm away from your body. 12 VivoMini VM45 Rear air vents The air vents on the rear allow viewing on a larger external display. IMPORTANT...
VivoMiniVM45 Users ManualEnglish
Page 14
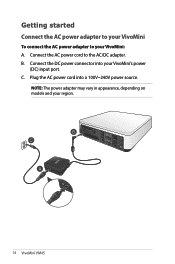
Connect the DC power connector into a 100V~240V power source. B. C. NOTE: The power adapter may vary in appearance, depending on models and your VivoMini: A. Getting started Connect the AC power adapter to your VivoMini To connect the AC power adapter to the AC/DC adapter. Plug the AC power cord into your VivoMini's power (DC) input port. Connect the AC power cord to your region. 14 VivoMini VM45
Connect the DC power connector into a 100V~240V power source. B. C. NOTE: The power adapter may vary in appearance, depending on models and your VivoMini: A. Getting started Connect the AC power adapter to your VivoMini To connect the AC power adapter to the AC/DC adapter. Plug the AC power cord into your VivoMini's power (DC) input port. Connect the AC power cord to your region. 14 VivoMini VM45

VivoMiniVM45 Users ManualEnglish
Page 16
To connect a display panel to your VivoMini that has the following connectors: • HDMI connector • DisplayPort connector • VGA connector (use with a DisplayPort to VGA adapter or HDMI to VGA adapter) • DVI connector (use with an HDMI to DVI adapter) NOTE: The HDMI to DVI adapter, DisplayPort to VGA adapter, or HDMI to the HDMI or DisplayPort port. Connect a display panel to your VivoMini You can connect a display panel or projector to your VivoMini: Connect a display cable either to VGA adapter are each sold separately. Connecting display via HDMI port Connecting...
To connect a display panel to your VivoMini that has the following connectors: • HDMI connector • DisplayPort connector • VGA connector (use with a DisplayPort to VGA adapter or HDMI to VGA adapter) • DVI connector (use with an HDMI to DVI adapter) NOTE: The HDMI to DVI adapter, DisplayPort to VGA adapter, or HDMI to the HDMI or DisplayPort port. Connect a display panel to your VivoMini You can connect a display panel or projector to your VivoMini: Connect a display cable either to VGA adapter are each sold separately. Connecting display via HDMI port Connecting...

VivoMiniVM45 Users ManualEnglish
Page 17
To connect a keyboard and mouse to your VivoMini: Connect the USB cable from keyboard or mouse You can also connect a USB dongle for a wireless keyboard and mouse set. Connecting keyboard or mouse via USB 2.0 port VivoMini VM45 17 Connect the USB cable from your keyboard and mouse to your VivoMini. You can connect generally any USB keyboard and mouse to any of the USB 2.0 ports of your VivoMini.
To connect a keyboard and mouse to your VivoMini: Connect the USB cable from keyboard or mouse You can also connect a USB dongle for a wireless keyboard and mouse set. Connecting keyboard or mouse via USB 2.0 port VivoMini VM45 17 Connect the USB cable from your keyboard and mouse to your VivoMini. You can connect generally any USB keyboard and mouse to any of the USB 2.0 ports of your VivoMini.
VivoMiniVM45 Users ManualEnglish
Page 19
... Sleep mode, press the Power button once. Entering the BIOS Setup BIOS (Basic Input and Output System) stores system hardware settings that requires further BIOS settings or update. Inappropriate BIOS settings may result to ensure optimal performance. WARNING! Putting your VivoMini to run the BIOS Setup. • You have installed a new system component that are needed for at least four (4) seconds until your VivoMini on the screen during the system bootup and requests you change...
... Sleep mode, press the Power button once. Entering the BIOS Setup BIOS (Basic Input and Output System) stores system hardware settings that requires further BIOS settings or update. Inappropriate BIOS settings may result to ensure optimal performance. WARNING! Putting your VivoMini to run the BIOS Setup. • You have installed a new system component that are needed for at least four (4) seconds until your VivoMini on the screen during the system bootup and requests you change...
VivoMiniVM45 Users ManualEnglish
Page 20
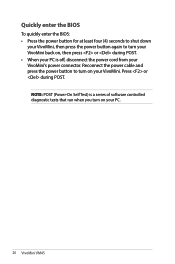
NOTE: POST (Power-On Self Test) is off, disconnect the power cord from your VivoMini's power connector. Quickly enter the BIOS To quickly enter the BIOS: • Press the power button for at least four (4) seconds to shut down your VivoMini, then press the power button again to turn on your PC. 20 VivoMini VM45 Press or during POST. • When your PC is a series of software controlled diagnostic tests that run when you turn on , then press or during POST. Reconnect the power cable and press the power button to turn your VivoMini back on your VivoMini.
NOTE: POST (Power-On Self Test) is off, disconnect the power cord from your VivoMini's power connector. Quickly enter the BIOS To quickly enter the BIOS: • Press the power button for at least four (4) seconds to shut down your VivoMini, then press the power button again to turn on your PC. 20 VivoMini VM45 Press or during POST. • When your PC is a series of software controlled diagnostic tests that run when you turn on , then press or during POST. Reconnect the power cable and press the power button to turn your VivoMini back on your VivoMini.
VivoMiniVM45 Users ManualEnglish
Page 22
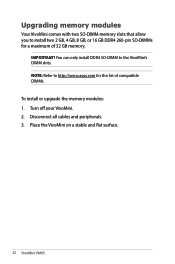
Turn off your VivoMini. 2. You can only install DDR4 SO-DIMM to the VivoMini's DIMM slots. Disconnect all cables and peripherals. 3. NOTE: Refer to http://www.asus.com for a maximum of compatible DIMMs. To install or upgrade the memory modules: 1. IMPORTANT! Upgrading memory modules Your VivoMini comes with two SO-DIMM memory slots that allow you to install two 2 GB, 4 GB, 8 GB, or 16 GB DDR4 260-pin SO-DIMMs for the list of 32 GB memory. Place the VivoMini on a stable and flat surface. 22 VivoMini VM45
Turn off your VivoMini. 2. You can only install DDR4 SO-DIMM to the VivoMini's DIMM slots. Disconnect all cables and peripherals. 3. NOTE: Refer to http://www.asus.com for a maximum of compatible DIMMs. To install or upgrade the memory modules: 1. IMPORTANT! Upgrading memory modules Your VivoMini comes with two SO-DIMM memory slots that allow you to install two 2 GB, 4 GB, 8 GB, or 16 GB DDR4 260-pin SO-DIMMs for the list of 32 GB memory. Place the VivoMini on a stable and flat surface. 22 VivoMini VM45
VivoMiniVM45 Users ManualEnglish
Page 23
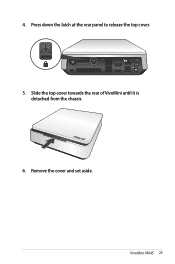
VivoMini VM45 23 Remove the cover and set aside. 4. Slide the top cover towards the rear of VivoMini until it is detached from the chassis. 6. Press down the latch at the rear panel to release the top cover. 5.
VivoMini VM45 23 Remove the cover and set aside. 4. Slide the top cover towards the rear of VivoMini until it is detached from the chassis. 6. Press down the latch at the rear panel to release the top cover. 5.

VivoMiniVM45 Users ManualEnglish
Page 30
... following safety instructions. Safety information Your VivoMini is important that the total ampere rating of the devices plugged into the extension cord does not exceed its ampere rating. • This equipment should be installed and operated with a minimum distance of 20cm between the radiator and your safety, it is designed and tested to ensure your body. 30 VivoMini VM45
... following safety instructions. Safety information Your VivoMini is important that the total ampere rating of the devices plugged into the extension cord does not exceed its ampere rating. • This equipment should be installed and operated with a minimum distance of 20cm between the radiator and your safety, it is designed and tested to ensure your body. 30 VivoMini VM45

VivoMiniVM45 Users ManualEnglish
Page 31
... the operating instructions. - Liquid has been spilled into the system. - Dispose of parts and recycling. The system was dropped or the cabinet is turned off, a small amount of electrical current still flows. This symbol of explosion if battery is damaged. - Check local technical support services for product recycling. The power cord or plug is incorrectly replaced. The system performance changes. NO DISASSEMBLY The...
... the operating instructions. - Liquid has been spilled into the system. - Dispose of parts and recycling. The system was dropped or the cabinet is turned off, a small amount of electrical current still flows. This symbol of explosion if battery is damaged. - Check local technical support services for product recycling. The power cord or plug is incorrectly replaced. The system performance changes. NO DISASSEMBLY The...
VivoMiniVM45 Users ManualEnglish
Page 32
... to radio communications. These limits are located. Please go to the following two conditions: • This device may not cause harmful interference, and • This device must accept any interference received including interference that interference will not occur in a particular installation. 32 VivoMini VM45 Operation is subject to http://csr.asus.com/english/Takeback.htm for protecting our...
... to radio communications. These limits are located. Please go to the following two conditions: • This device may not cause harmful interference, and • This device must accept any interference received including interference that interference will not occur in a particular installation. 32 VivoMini VM45 Operation is subject to http://csr.asus.com/english/Takeback.htm for protecting our...

VivoMiniVM45 Users ManualEnglish
Page 33
...exposure limits set forth for an uncontrolled environment. VivoMini VM45 33 End users must be provide with any interference, including interference that to which can be determined by turning the equipment...device may not cause interference and • This device must not be installed and operated in conjunction with antenna installation instructions and transmitter operating conditions for satisfying RF exposure compliance. Any changes or modifications not expressly approved by one or more of the device. End-users and installers must follow the specific operating instructions...
...exposure limits set forth for an uncontrolled environment. VivoMini VM45 33 End users must be provide with any interference, including interference that to which can be determined by turning the equipment...device may not cause interference and • This device must not be installed and operated in conjunction with antenna installation instructions and transmitter operating conditions for satisfying RF exposure compliance. Any changes or modifications not expressly approved by one or more of the device. End-users and installers must follow the specific operating instructions...

VivoMiniVM45 Users ManualEnglish
Page 35
... of user inactivity. The monitor and computer are automatically set to the environment. NOTE: Energy Star is enabled by default. To wake your computer, click the mouse or press any key on power management and its benefits to sleep after 10 and 30 minutes of Energy helping us all save money and protect the environment through energy efficient products and practices. VivoMini VM45...
... of user inactivity. The monitor and computer are automatically set to the environment. NOTE: Energy Star is enabled by default. To wake your computer, click the mouse or press any key on power management and its benefits to sleep after 10 and 30 minutes of Energy helping us all save money and protect the environment through energy efficient products and practices. VivoMini VM45...
VivoMiniVM45 Users ManualEnglish
Page 37
.... 170324 VivoMini VM45 37 Operation is subject to the following two conditions: (1) This device may not cause harmful interference, and (2) this device must accept any interference received, including interference that may cause undesired operation. Phone/Fax No: (510)739-3777/(510)608-4555 hereby declares that the product Product Name : VivoMini Model Number : VM45 Conforms to the following specifications: FCC Part 15...
.... 170324 VivoMini VM45 37 Operation is subject to the following two conditions: (1) This device may not cause harmful interference, and (2) this device must accept any interference received, including interference that may cause undesired operation. Phone/Fax No: (510)739-3777/(510)608-4555 hereby declares that the product Product Name : VivoMini Model Number : VM45 Conforms to the following specifications: FCC Part 15...


