E12343_VC66_Series Users ManualEnglish
Page 2
... companies, and are used only for identification or explanation and to the owners' benefit, without the express written permission of ASUSTeK COMPUTER INC. ("ASUS"). ASUS will only be responsible for or indemnify you are entitled to recover damages from ASUS, ASUS is the maximum for...), EVEN IF ASUS, ITS SUPPLIERS OR YOUR RESELLER IS INFORMED OF THEIR POSSIBILITY. SERVICE AND SUPPORT Visit our multi-language web site at https://www.asus.com/support/ E12343 Revised Edition V2 December 2016 COPYRIGHT INFORMATION No part of this manual, including the products and software described in it...
... companies, and are used only for identification or explanation and to the owners' benefit, without the express written permission of ASUSTeK COMPUTER INC. ("ASUS"). ASUS will only be responsible for or indemnify you are entitled to recover damages from ASUS, ASUS is the maximum for...), EVEN IF ASUS, ITS SUPPLIERS OR YOUR RESELLER IS INFORMED OF THEIR POSSIBILITY. SERVICE AND SUPPORT Visit our multi-language web site at https://www.asus.com/support/ E12343 Revised Edition V2 December 2016 COPYRIGHT INFORMATION No part of this manual, including the products and software described in it...
E12343_VC66_Series Users ManualEnglish
Page 3
... ...10 Right side...10 Rear panel...11 Using your VivoMini Getting started 14 Connect the AC power adapter to your VivoMini 14 Connect the USB cable from keyboard or mouse 15 Connect a display panel to your VivoMini 16 Turn on your VivoMini 18 Turning your VivoMini off 19 Putting your VivoMini to sleep 19 Entering the BIOS Setup 19 Quickly enter the BIOS 20 Load default BIOS settings 20 Upgrading your VivoMini Upgrading memory modules 22 Installing or upgrading the M.2 SSD 27 Installing or upgrading the wireless card 28 Installing 2.5" HDD / SSD 29 Appendix...
... ...10 Right side...10 Rear panel...11 Using your VivoMini Getting started 14 Connect the AC power adapter to your VivoMini 14 Connect the USB cable from keyboard or mouse 15 Connect a display panel to your VivoMini 16 Turn on your VivoMini 18 Turning your VivoMini off 19 Putting your VivoMini to sleep 19 Entering the BIOS Setup 19 Quickly enter the BIOS 20 Load default BIOS settings 20 Upgrading your VivoMini Upgrading memory modules 22 Installing or upgrading the M.2 SSD 27 Installing or upgrading the wireless card 28 Installing 2.5" HDD / SSD 29 Appendix...
E12343_VC66_Series Users ManualEnglish
Page 4
... a task. Typography Bold text Italic Indicates a menu or an item to upgrade the memory modules, wireless modules, and hard disk drive / solid state drive of your VivoMini. Conventions used in this manual To highlight key information in this manual, some text are presented as follows: IMPORTANT! This indicates sections that must be followed to in this manual. 4 VivoMini VC66 Series This message contains vital information that...
... a task. Typography Bold text Italic Indicates a menu or an item to upgrade the memory modules, wireless modules, and hard disk drive / solid state drive of your VivoMini. Conventions used in this manual To highlight key information in this manual, some text are presented as follows: IMPORTANT! This indicates sections that must be followed to in this manual. 4 VivoMini VC66 Series This message contains vital information that...
E12343_VC66_Series Users ManualEnglish
Page 8
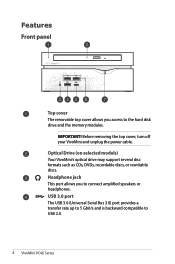
... to connect amplified speakers or headphones. Headphone jack This port allows you access to USB 2.0. 8 VivoMini VC66 Series USB 3.0 port The USB 3.0 (Universal Serial Bus 3.0) port provides a transfer rate up to 5 Gbit/s and is backward compatible to the hard disk drive and the memory modules. Optical Drive (on selected models) Your VivoMini's optical drive may support several disc formats such as CDs, DVDs, recordable discs, or rewritable discs. Before removing the top cover, turn off your VivoMini and unplug the power cable. IMPORTANT...
... to connect amplified speakers or headphones. Headphone jack This port allows you access to USB 2.0. 8 VivoMini VC66 Series USB 3.0 port The USB 3.0 (Universal Serial Bus 3.0) port provides a transfer rate up to 5 Gbit/s and is backward compatible to the hard disk drive and the memory modules. Optical Drive (on selected models) Your VivoMini's optical drive may support several disc formats such as CDs, DVDs, recordable discs, or rewritable discs. Before removing the top cover, turn off your VivoMini and unplug the power cable. IMPORTANT...

E12343_VC66_Series Users ManualEnglish
Page 9
... 1.5A output current, transfer rate of up to 5 Gbit/s, and is compatible with USB 2.0 or USB 1.1 devices such as keyboards, pointing devices, flash disk drives, external HDDs, speakers, cameras and printers. NOTE: The Type C port has a reversible-plug connector. You can also press the power button once to put your VivoMini to turn the VivoMini on or off. USB 2.0 port The USB (Universal Serial Bus) port is backward compatible to USB 2.0. Power button The power button allows you to sleep mode. VivoMini VC66 Series 9
... 1.5A output current, transfer rate of up to 5 Gbit/s, and is compatible with USB 2.0 or USB 1.1 devices such as keyboards, pointing devices, flash disk drives, external HDDs, speakers, cameras and printers. NOTE: The Type C port has a reversible-plug connector. You can also press the power button once to put your VivoMini to turn the VivoMini on or off. USB 2.0 port The USB (Universal Serial Bus) port is backward compatible to USB 2.0. Power button The power button allows you to sleep mode. VivoMini VC66 Series 9

E12343_VC66_Series Users ManualEnglish
Page 11
...) connector The 9-pin serial (COM) connector allows you to an external display. Rear panel Kensington® security slot The Kensington® security slot allows you to secure your body. WARNING! DVI port This port allows you to connect your VivoMini to connect devices that have serial ports such as mouse, modem, or printers. VivoMini VC66 Series 11 To prevent damage to the VivoMini, always use with this jack supplies power to DC power for use the bundled power adapter. Power...
...) connector The 9-pin serial (COM) connector allows you to an external display. Rear panel Kensington® security slot The Kensington® security slot allows you to secure your body. WARNING! DVI port This port allows you to connect your VivoMini to connect devices that have serial ports such as mouse, modem, or printers. VivoMini VC66 Series 11 To prevent damage to the VivoMini, always use with this jack supplies power to DC power for use the bundled power adapter. Power...
E12343_VC66_Series Users ManualEnglish
Page 12
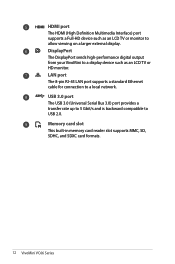
USB 3.0 port The USB 3.0 (Universal Serial Bus 3.0) port provides a transfer rate up to 5 Gbit/s and is backward compatible to a local network. LAN port The 8-pin RJ-45 LAN port supports a standard Ethernet cable for connection to USB 2.0. HDMI port The HDMI (High Definition Multimedia Interface) port supports a Full-HD device such as an LCD TV or HD monitor. Memory card slot This built-in memory card reader slot supports MMC, SD, SDHC, and SDXC card formats. 12 VivoMini VC66 Series DisplayPort The DisplayPort sends high...
USB 3.0 port The USB 3.0 (Universal Serial Bus 3.0) port provides a transfer rate up to 5 Gbit/s and is backward compatible to a local network. LAN port The 8-pin RJ-45 LAN port supports a standard Ethernet cable for connection to USB 2.0. HDMI port The HDMI (High Definition Multimedia Interface) port supports a Full-HD device such as an LCD TV or HD monitor. Memory card slot This built-in memory card reader slot supports MMC, SD, SDHC, and SDXC card formats. 12 VivoMini VC66 Series DisplayPort The DisplayPort sends high...
E12343_VC66_Series Users ManualEnglish
Page 15
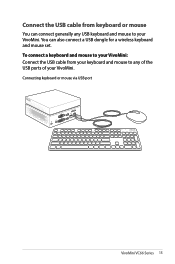
You can connect generally any USB keyboard and mouse to any of the USB ports of your VivoMini. Connecting keyboard or mouse via USB port VivoMini VC66 Series 15 Connect the USB cable from your keyboard and mouse to your VivoMini. To connect a keyboard and mouse to your VivoMini: Connect the USB cable from keyboard or mouse You can also connect a USB dongle for a wireless keyboard and mouse set.
You can connect generally any USB keyboard and mouse to any of the USB ports of your VivoMini. Connecting keyboard or mouse via USB port VivoMini VC66 Series 15 Connect the USB cable from your keyboard and mouse to your VivoMini. To connect a keyboard and mouse to your VivoMini: Connect the USB cable from keyboard or mouse You can also connect a USB dongle for a wireless keyboard and mouse set.
E12343_VC66_Series Users ManualEnglish
Page 19
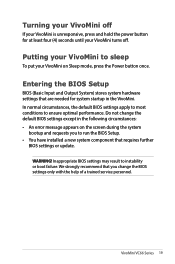
... circumstances: • An error message appears on Sleep mode, press the Power button once. Do not change the BIOS settings only with the help of a trained service personnel. WARNING! VivoMini VC66 Series 19 In normal circumstances, the default BIOS settings apply to most conditions to instability or boot failure. We strongly recommend that requires further BIOS settings or update. Putting your VivoMini to run the BIOS Setup. • You have installed a new system component that...
... circumstances: • An error message appears on Sleep mode, press the Power button once. Do not change the BIOS settings only with the help of a trained service personnel. WARNING! VivoMini VC66 Series 19 In normal circumstances, the default BIOS settings apply to most conditions to instability or boot failure. We strongly recommend that requires further BIOS settings or update. Putting your VivoMini to run the BIOS Setup. • You have installed a new system component that...
E12343_VC66_Series Users ManualEnglish
Page 20
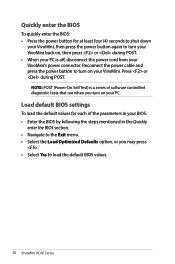
... Optimized Defaults option, or you turn your VivoMini back on, then press or during POST. NOTE: POST (Power-On Self Test) is off, disconnect the power cord from your VivoMini's power connector. Quickly enter the BIOS To quickly enter the BIOS: • Press the power button for each of software controlled diagnostic tests that run when you may press . • Select Yes to load the default BIOS values. 20 VivoMini VC66 Series Reconnect the power cable and...
... Optimized Defaults option, or you turn your VivoMini back on, then press or during POST. NOTE: POST (Power-On Self Test) is off, disconnect the power cord from your VivoMini's power connector. Quickly enter the BIOS To quickly enter the BIOS: • Press the power button for each of software controlled diagnostic tests that run when you may press . • Select Yes to load the default BIOS values. 20 VivoMini VC66 Series Reconnect the power cable and...

E12343_VC66_Series Users ManualEnglish
Page 22
... to the VivoMini's DIMM slots. IMPORTANT! To install or upgrade the memory modules: 1. Using a flat-head screwdriver or straightened paper clip, remove the rubber feet from the compartment cover. 22 VivoMini VC66 Series Turn off your VivoMini then disconnect all cables and peripherals. 2. IMPORTANT! Upgrading memory modules Your VivoMini comes with its bottom side facing up. 3. Refer to http://www.asus.com for the list of 32GB memory. NOTE...
... to the VivoMini's DIMM slots. IMPORTANT! To install or upgrade the memory modules: 1. Using a flat-head screwdriver or straightened paper clip, remove the rubber feet from the compartment cover. 22 VivoMini VC66 Series Turn off your VivoMini then disconnect all cables and peripherals. 2. IMPORTANT! Upgrading memory modules Your VivoMini comes with its bottom side facing up. 3. Refer to http://www.asus.com for the list of 32GB memory. NOTE...
E12343_VC66_Series Users ManualEnglish
Page 28
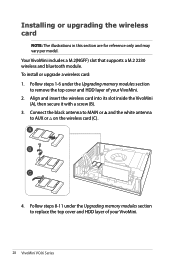
... the Upgrading memory modules section to replace the top cover and HDD layer of your VivoMini. 28 VivoMini VC66 Series Align and insert the wireless card into its slot inside the VivoMini (A), then secure it with a screw (B). 3. Your VivoMini includes a M.2(NGFF) slot that supports a M.2 2230 wireless and bluetooth module. To install or upgrade a wireless card: 1. Follow steps 8-11 under the Upgrading memory modules section to AUX or on the wireless card (C). 4. Installing or upgrading the wireless card NOTE: The...
... the Upgrading memory modules section to replace the top cover and HDD layer of your VivoMini. 28 VivoMini VC66 Series Align and insert the wireless card into its slot inside the VivoMini (A), then secure it with a screw (B). 3. Your VivoMini includes a M.2(NGFF) slot that supports a M.2 2230 wireless and bluetooth module. To install or upgrade a wireless card: 1. Follow steps 8-11 under the Upgrading memory modules section to AUX or on the wireless card (C). 4. Installing or upgrading the wireless card NOTE: The...
VC66Series Users ManualEnglish
Page 2
...ERRORS OR INACCURACIES THAT MAY APPEAR IN THIS MANUAL, INCLUDING THE PRODUCTS AND SOFTWARE DESCRIBED IN IT. All Rights Reserved. This limit also applies to ASUS' suppliers and its suppliers, and your reseller are used only for identification or explanation and to the owners' benefit, without the express written permission of ASUSTeK COMPUTER INC. ("ASUS"). SPECIFICATIONS...of a default on which you are entitled to claim damages from ASUS, ASUS is the maximum for which ASUS, its reseller. SERVICE AND SUPPORT Visit our multi-language web site at https://www.asus.com/support/ or ...
...ERRORS OR INACCURACIES THAT MAY APPEAR IN THIS MANUAL, INCLUDING THE PRODUCTS AND SOFTWARE DESCRIBED IN IT. All Rights Reserved. This limit also applies to ASUS' suppliers and its suppliers, and your reseller are used only for identification or explanation and to the owners' benefit, without the express written permission of ASUSTeK COMPUTER INC. ("ASUS"). SPECIFICATIONS...of a default on which you are entitled to claim damages from ASUS, ASUS is the maximum for which ASUS, its reseller. SERVICE AND SUPPORT Visit our multi-language web site at https://www.asus.com/support/ or ...

VC66Series Users ManualEnglish
Page 3
... ...10 Right side...10 Rear panel...11 Using your VivoMini Getting started 16 Connect the AC power adapter to your VivoMini 16 Connect the USB cable from keyboard or mouse 17 Connect a display panel to your VivoMini 18 Turn on your VivoMini 20 Turning your VivoMini off 21 Putting your VivoMini to sleep 21 Entering the BIOS Setup 21 Quickly enter the BIOS 22 Load default BIOS settings 22 Upgrading your VivoMini Upgrading memory modules 24 Installing or upgrading the M.2 SSD 29 Installing or upgrading the wireless card 30 Installing 2.5" HDD / SSD 31 Appendix...
... ...10 Right side...10 Rear panel...11 Using your VivoMini Getting started 16 Connect the AC power adapter to your VivoMini 16 Connect the USB cable from keyboard or mouse 17 Connect a display panel to your VivoMini 18 Turn on your VivoMini 20 Turning your VivoMini off 21 Putting your VivoMini to sleep 21 Entering the BIOS Setup 21 Quickly enter the BIOS 22 Load default BIOS settings 22 Upgrading your VivoMini Upgrading memory modules 24 Installing or upgrading the M.2 SSD 29 Installing or upgrading the wireless card 30 Installing 2.5" HDD / SSD 31 Appendix...

VC66Series Users ManualEnglish
Page 4
... text Italic Indicates a menu or an item to your VivoMini. Conventions used in this manual To highlight key information in this manual. 4 VivoMini VC66 Series Chapter 3: Upgrading your VivoMini This chapter provides you can help complete tasks. This message contains important information that you with information on how to in this manual This manual provides information about the hardware and software features of your...
... text Italic Indicates a menu or an item to your VivoMini. Conventions used in this manual To highlight key information in this manual. 4 VivoMini VC66 Series Chapter 3: Upgrading your VivoMini This chapter provides you can help complete tasks. This message contains important information that you with information on how to in this manual This manual provides information about the hardware and software features of your...

VC66Series Users ManualEnglish
Page 8
... port allows you access to the hard disk drive and the memory modules. USB 3.0 port The USB 3.0 (Universal Serial Bus 3.0) port provides a transfer rate up to 5 Gbit/s and is backward compatible to connect amplified speakers or headphones. Optical Drive (on selected models) Your VivoMini's optical drive may support several disc formats such as CDs, DVDs, recordable discs, or rewritable discs. Before removing the top cover, turn off your VivoMini and unplug the power cable. IMPORTANT! Features Front panel Top cover The removable top cover...
... port allows you access to the hard disk drive and the memory modules. USB 3.0 port The USB 3.0 (Universal Serial Bus 3.0) port provides a transfer rate up to 5 Gbit/s and is backward compatible to connect amplified speakers or headphones. Optical Drive (on selected models) Your VivoMini's optical drive may support several disc formats such as CDs, DVDs, recordable discs, or rewritable discs. Before removing the top cover, turn off your VivoMini and unplug the power cable. IMPORTANT! Features Front panel Top cover The removable top cover...

VC66Series Users ManualEnglish
Page 12
... network. DisplayPort The DisplayPort sends high-performance digital output from your body. Power supplied through this jack. HDMI port The HDMI (High Definition Multimedia Interface) port supports a Full-HD device such as an LCD TV or monitor to the VivoMini, always use the bundled power adapter. To prevent damage to allow viewing on a larger external display. Intel® LAN port The 8-pin RJ-45 LAN port supports a standard Ethernet cable for use . Do not cover the adapter...
... network. DisplayPort The DisplayPort sends high-performance digital output from your body. Power supplied through this jack. HDMI port The HDMI (High Definition Multimedia Interface) port supports a Full-HD device such as an LCD TV or monitor to the VivoMini, always use the bundled power adapter. To prevent damage to allow viewing on a larger external display. Intel® LAN port The 8-pin RJ-45 LAN port supports a standard Ethernet cable for use . Do not cover the adapter...

VC66Series Users ManualEnglish
Page 17
Connect the USB cable from your keyboard and mouse to your VivoMini. You can connect generally any USB keyboard and mouse to any of the USB ports of your VivoMini. NOTE: The illustrations in this section are for a wireless keyboard and mouse set. To connect a keyboard and mouse to your VivoMini: Connect the USB cable from keyboard or mouse You can also connect a USB dongle for reference only and may vary per model. Connecting keyboard or mouse via USB port VivoMini VC66 Series 17
Connect the USB cable from your keyboard and mouse to your VivoMini. You can connect generally any USB keyboard and mouse to any of the USB ports of your VivoMini. NOTE: The illustrations in this section are for a wireless keyboard and mouse set. To connect a keyboard and mouse to your VivoMini: Connect the USB cable from keyboard or mouse You can also connect a USB dongle for reference only and may vary per model. Connecting keyboard or mouse via USB port VivoMini VC66 Series 17

VC66Series Users ManualEnglish
Page 21
... system startup in the following circumstances: • An error message appears on Sleep mode, press the Power button once. Entering the BIOS Setup BIOS (Basic Input and Output System) stores system hardware settings that are needed for at least four (4) seconds until your VivoMini turns off. WARNING! We strongly recommend that requires further BIOS settings or update. Do not change the BIOS settings only with the help of a trained service personnel. VivoMini VC66 Series...
... system startup in the following circumstances: • An error message appears on Sleep mode, press the Power button once. Entering the BIOS Setup BIOS (Basic Input and Output System) stores system hardware settings that are needed for at least four (4) seconds until your VivoMini turns off. WARNING! We strongly recommend that requires further BIOS settings or update. Do not change the BIOS settings only with the help of a trained service personnel. VivoMini VC66 Series...

VC66Series Users ManualEnglish
Page 30
... slot inside the VivoMini (A), then secure it with a screw (B). 3. Connect the black antenna to MAIN or and the white antenna to remove the top cover and HDD layer of your VivoMini. 2. Follow steps 1-6 under the Upgrading memory modules section to replace the top cover and HDD layer of your VivoMini. 30 VivoMini VC66 Series Follow steps 8-11 under the Upgrading memory modules section to AUX or on the wireless card (C). 4. Installing or upgrading...
... slot inside the VivoMini (A), then secure it with a screw (B). 3. Connect the black antenna to MAIN or and the white antenna to remove the top cover and HDD layer of your VivoMini. 2. Follow steps 1-6 under the Upgrading memory modules section to replace the top cover and HDD layer of your VivoMini. 30 VivoMini VC66 Series Follow steps 8-11 under the Upgrading memory modules section to AUX or on the wireless card (C). 4. Installing or upgrading...


