Asus VW199D Support and Manuals
Get Help and Manuals for this Asus item
Popular Asus VW199D Manual Pages
User Manual - Page 2

..., without the express written permission of ASUSTeK COMPUTER INC. ("ASUS"). No part of this manual may or may be registered trademarks or copyrights of the product is repaired, modified or altered, unless such repair, modification of the LED monitor 1-5 2.1 Detaching the arm/stand (for VESA wall mount 2-1 2.2 Adjusting the monitor 2-2 3.1 OSD (On-Screen Display) menu 2-3 3.1.1 How to...
User Manual - Page 4

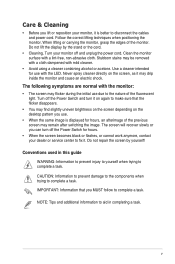
... rain or moisture.
• Never try to power surges.
• Never push objects or spill liquid of any kind into the slots on the monitor cabinet.
• To ensure satisfactory operation, use the monitor only with UL listed computers which complies with the monitor, contact a qualified service technician or your dealer immediately.
• Slots and openings...
User Manual - Page 5
...Power Switch for hours.
• When the screen becomes black or flashes, or cannot work anymore, contact your dealer or service center to fix it. Do not repair the screen by the stand or the cord.
• Cleaning. Follow the correct lifting techniques when positioning the monitor... guide WARNING: Information to prevent injury to yourself when trying to complete a task. Clean the monitor ...
User Manual - Page 7

...User manual CD Quick start guide
Warranty card Power cord VGA cable Audio cable (VW199T/S)
If any of features that the VW199 Series brings you can enjoy the convenience and delightful visual experience that enhance your retailer immediately. 1.1 Welcome! With these features, you !
1.2 Package contents
Check your VW199 Series LED Monitor package for purchasing the ASUS® VW199...
User Manual - Page 8

We recommend that you cover the table surface with the monitor. Adjust the monitor to the monitor.
1
2
1.4 Monitor introduction
1.4.1 Front of the LED monitor 1.4.1.1 VW199T/VW199S
123 456
1-2
Chapter 1: Product Introduction Connect the base with soft cloth to prevent damage to the angle that the base has been
connected successfully. 2. A click ...
User Manual - Page 9

... this button to decrease the value of the function selected or move to the next fuction. Power Button: • Press this button for 2-4 seconds (for Volume adjustment.
3. Status Blue Amber OFF
Description ON Standby mode OFF
ASUS LED Monitor VW199 Series
1-3 1. • •
•
Button:
Automatically adjust the image to its optimized position, clock, and phase...
User Manual - Page 11

6. Power Indicator • The color definition of the LED monitor
Screw holes for VESA Wall Mount
Rear connectors
1
234
1 AC-IN port 2 Audio Line-in port (VW199T/S) 3 DVI port (VW199T/N) 4 VGA port
ASUS LED Monitor VW199 Series
1-5
Status Blue Amber OFF
Description ON Standby mode OFF
1.4.2 Rear of the power indicator is as the below table.
User Manual - Page 12
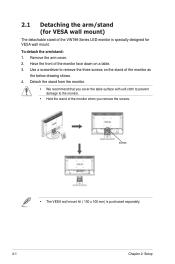
.../stand: 1.
Have the front of the VW199 Series LED monitor is purchased separately.
2-1
Chapter 2: Setup Remove the arm cover. 2. Use a screwdriver to the monitor.
• Hold the stand of the monitor as the below drawing shows. 4. screws
• The VESA wall mount kit ( 100 x 100 mm) is specially designed for VESA wall mount)
The detachable stand of the...
User Manual - Page 13

2.2 Adjusting the monitor
• For optimal viewing, we recommend that you look at the full face of the monitor, then adjust the monitor to the angle that is most comfortable for you.
• Hold the stand to prevent the monitor from falling while changing its angle. • You can adjust the monitor's angle from -5˚ to 20˚.
-5º~20º
ASUS LED Monitor VW199 Series
2-2
User Manual - Page 14

... your setting or return to maintain your preference. Press and to change the settings of the selected function.
4. Splendid
This function contains six sub-functions that you to the preset mode. VW199 Splendid Color Image Input Select System Setup
Scenery Mode Standard Mode Theater Mode Game Mode Night View Mode sRGB
Move
Menu
Exit
2-3
Chapter 3: General Instruction...
User Manual - Page 15

...Mode: This is from this function.
VW199 Splendid Color Image Input Select System Setup
Brightness Contrast Saturation Color Temp Skin Tone Smart View
100 80 50
User Mode ...modes (Cool, Normal, Warm)
and one User Mode.
• Skin Tone: Contains three color modes including Reddish, Natural, and Yellowish.
• Smart View: Turns the Smart View Function on or off.
ASUS LED Monitor VW199...
User Manual - Page 16

...VGA only) from VGA or DVI (VW199T/N). VW199
Splendid
Sharpness
40
Color
Aspect Control
Full
Image
ASCR
OFF
Input Select
Position
System Setup
Focus
Move
Menu
Exit
• ...(Only available for VGA input).
4.
VW199
Splendid
VGA
Color
DVI
Image
Input Select
System Setup
Move
Menu
Exit
2-5
Chapter 3: General Instruction Input Select Selects the input source from...
User Manual - Page 17

...Reset: Selects "Yes" to revert all settings to the factory default mode. ASUS LED Monitor VW199 Series
2-6
System Setup Adjusts the system configuration. 5. VW199 Splendid Color Image Input Select System Setup
Splendid Demo Mode Volume ECO Mode OSD Setup Language Information
Move
Menu
Exit
VW199 Splendid Color Image Input Select System Setup
All Reset
OFF 83
OFF English
1/2
2/2
Move...
User Manual - Page 19

...; Connect the computer with another available
monitor to check if the computer is blurry or fuzzy
• Press the
button for two seconds to
automatically adjust the image (for VGA input only).
• Adjust the Phase and Clock settings via OSD
(for VGA input only).
• Adjust the H-Position or V-Position settings via OSD. ASUS LED Monitor VW199 Series...
User Manual - Page 20

3.4 Supported timing list
PC Supported Primary Timing
Mode
Resolution
640x480
VGA
640x480
640x480
800x600
SVGA
800x600 800x600
800x600
1024x768
XGA
1024x768
SXGA WXGA+
1024x768
1152x864 1280x960 1280x1024 1280x1024 1440x900 1440x900
H(KHz) 31.469
37.861
37.5
35.156
37.879
48.077
46.875
48.363...
Pixel (MHz) 25.175 28.322
Pixel (MHz) 30.24 57.2832
2-9
Chapter 3: General Instruction
Asus VW199D Reviews
We have not received any reviews for Asus yet.