VP247 Series User Guide
Page 2
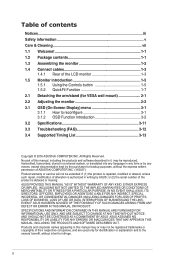
... companies, and are used only for VESA wall mount 2-1 2.2 Adjusting the monitor 2-2 3.1 OSD (On-Screen Display) menu 3-1 3.1.1 How to infringe. ii or (2) the serial number of alteration is defaced or missing. Product warranty or service will not be reproduced, transmitted, transcribed, stored in a retrieval system, or translated into any means, except documentation kept by ASUS; All Rights Reserved. No part of this manual may or may...
... companies, and are used only for VESA wall mount 2-1 2.2 Adjusting the monitor 2-2 3.1 OSD (On-Screen Display) menu 3-1 3.1.1 How to infringe. ii or (2) the serial number of alteration is defaced or missing. Product warranty or service will not be reproduced, transmitted, transcribed, stored in a retrieval system, or translated into any means, except documentation kept by ASUS; All Rights Reserved. No part of this manual may or may...

VP247 Series User Guide
Page 3
...8226; Connect the equipment to an outlet on , the user is connected. • Consult the dealer or an experienced radio/TV technician for radio noise emissions from digital apparatus set out in China iii This equipment generates, uses and can be determined by turning the equipment...radiate radio frequency energy and, if not installed and used in a residential installation. Canadian Department of Communications. Made in the Radio Interference Regulations of the Canadian Department of Communications Statement This digital apparatus does not exceed the Class B limits for help. This ...
...8226; Connect the equipment to an outlet on , the user is connected. • Consult the dealer or an experienced radio/TV technician for radio noise emissions from digital apparatus set out in China iii This equipment generates, uses and can be determined by turning the equipment...radiate radio frequency energy and, if not installed and used in a residential installation. Canadian Department of Communications. Made in the Radio Interference Regulations of the Canadian Department of Communications Statement This digital apparatus does not exceed the Class B limits for help. This ...

VP247 Series User Guide
Page 4
... downloaded from surrounding light and bright surfaces For more user-friendly direction. For displays with displays in on- TCO Certified is a third party verified program, where every product model is designed, manufactured and tested according to rigorous safety standards at an impartial laboratory. • Electric and magnetic fields emissions as low as manufacturers all displays worldwide are luminance, contrast, resolution, black...
... downloaded from surrounding light and bright surfaces For more user-friendly direction. For displays with displays in on- TCO Certified is a third party verified program, where every product model is designed, manufactured and tested according to rigorous safety standards at an impartial laboratory. • Electric and magnetic fields emissions as low as manufacturers all displays worldwide are luminance, contrast, resolution, black...

VP247 Series User Guide
Page 5
... of the type of power source indicated on the monitor cabinet. • To ensure satisfactory operation, use the monitor only with UL listed computers which complies with the monitor, contact a qualified servic er. • Provide an earthing connection before the mains plug is connected to open the monitor cabinet. Contact a qualified service technician or your retailer. • Before using the product, make sure all the...
... of the type of power source indicated on the monitor cabinet. • To ensure satisfactory operation, use the monitor only with UL listed computers which complies with the monitor, contact a qualified servic er. • Provide an earthing connection before the mains plug is connected to open the monitor cabinet. Contact a qualified service technician or your retailer. • Before using the product, make sure all the...

VP247 Series User Guide
Page 7
... lifting techniques when positioning the monitor. Do not lift the display by yourself! Turn off the Power Switch and turn off and unplug the power cord. vii Clean the monitor surface with the LCD. Never spray cleaner directly on the desktop pattern you use. • When the same image is better to fix it. Do not repair the screen by the stand or the cord. • Cleaning. Use a cleaner intended for...
... lifting techniques when positioning the monitor. Do not lift the display by yourself! Turn off the Power Switch and turn off and unplug the power cord. vii Clean the monitor surface with the LCD. Never spray cleaner directly on the desktop pattern you use. • When the same image is better to fix it. Do not repair the screen by the stand or the cord. • Cleaning. Use a cleaner intended for...

VP247 Series User Guide
Page 11
1.4 Connect cables 1.4.1 Rear of the LCD monitor 6 HDMI DVI VGA VP247H 1 2 3 45 DVI VGA VP247T 1 3 45 DVI VGA VP247N 1 3 4 VGA VP247D 1 4 HDMI VGA 7 2 4 VP247QG ASUS LCD Monitor VP247 Series 1-3
1.4 Connect cables 1.4.1 Rear of the LCD monitor 6 HDMI DVI VGA VP247H 1 2 3 45 DVI VGA VP247T 1 3 45 DVI VGA VP247N 1 3 4 VGA VP247D 1 4 HDMI VGA 7 2 4 VP247QG ASUS LCD Monitor VP247 Series 1-3

VP247 Series User Guide
Page 13
1.5 Monitor introduction 1.5.1 Using the Controls button Use the control button on /off. Power Indicator: • The color definition of the monitor to turn the monitor on the back of the power indicator is as the below table. ASUS LCD Monitor VP247 Series 1-5 Power Button: • Press this button to adjust the image settings. Status Description White ON Amber Standby mode OFF OFF 2. VP247H/VP247QG 8 76 5 43 21 VP247T/VP247N/VP247D Auto 9 1.
1.5 Monitor introduction 1.5.1 Using the Controls button Use the control button on /off. Power Indicator: • The color definition of the monitor to turn the monitor on the back of the power indicator is as the below table. ASUS LCD Monitor VP247 Series 1-5 Power Button: • Press this button to adjust the image settings. Status Description White ON Amber Standby mode OFF OFF 2. VP247H/VP247QG 8 76 5 43 21 VP247T/VP247N/VP247D Auto 9 1.
VP247 Series User Guide
Page 14
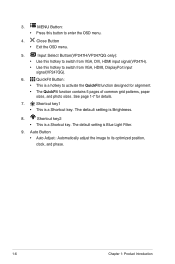
... is Brightness. 8. Auto Button • Auto Adjust.: Automatically adjust the image to enter the OSD menu. 4. The default setting is a Shortcut key. Close Button • Exit the OSD menu. 5. The default setting is a Shortcut key. Shortcut key1 • This is Blue Light Filter. 9. MENU Button: • Press this hotkey to activate the QuickFit function designed for details. 7. Input Select Button(VP247H/VP247QG only): • Use this hotkey to switch from VGA, DVI, HDMI input signal(VP247H). • Use this button to its optimized position...
... is Brightness. 8. Auto Button • Auto Adjust.: Automatically adjust the image to enter the OSD menu. 4. The default setting is a Shortcut key. Close Button • Exit the OSD menu. 5. The default setting is a Shortcut key. Shortcut key1 • This is Blue Light Filter. 9. MENU Button: • Press this hotkey to activate the QuickFit function designed for details. 7. Input Select Button(VP247H/VP247QG only): • Use this hotkey to switch from VGA, DVI, HDMI input signal(VP247H). • Use this button to its optimized position...

VP247 Series User Guide
Page 16
ASUS LCD Monitor VP247 Series 2-1 Use your fingers. 3. Use a screwdriver to remove the two screw on a clean table. 2. 2.1 Detaching the arm/stand (for VESA wall mount. Carefully put the front of the monitor face down on the arm (Figure 1),and then detach the arm/stand from monitor body by using your fingers to the monitor. • Hold the stand of the monitor while removing the screws. 2 1 • The VESA wall mount kit ( 100 x 100 mm) is...
ASUS LCD Monitor VP247 Series 2-1 Use your fingers. 3. Use a screwdriver to remove the two screw on a clean table. 2. 2.1 Detaching the arm/stand (for VESA wall mount. Carefully put the front of the monitor face down on the arm (Figure 1),and then detach the arm/stand from monitor body by using your fingers to the monitor. • Hold the stand of the monitor while removing the screws. 2 1 • The VESA wall mount kit ( 100 x 100 mm) is...

VP247 Series User Guide
Page 19
..., Sharpness, Brightness, Contrast and ASCR functions are not user-configurable. • In the Reading Mode, the Saturation, SkinTone, Sharpness, ASCR, contrast, and Color Temp functions are not user-configurable. 3-2 Chapter 3: General Instruction Splendid Scenery Mode Standard Mode Theater Mode Game Mode Night View Mode sRGB Mode Reading Mode Darkroom Mode ASUS VP247 Standard Mode VGA 1920x1080@60Hz • Scenery Mode: This is the best choice for scenery photo displaying with SPLENDID™ Video Intelligence...
..., Sharpness, Brightness, Contrast and ASCR functions are not user-configurable. • In the Reading Mode, the Saturation, SkinTone, Sharpness, ASCR, contrast, and Color Temp functions are not user-configurable. 3-2 Chapter 3: General Instruction Splendid Scenery Mode Standard Mode Theater Mode Game Mode Night View Mode sRGB Mode Reading Mode Darkroom Mode ASUS VP247 Standard Mode VGA 1920x1080@60Hz • Scenery Mode: This is the best choice for scenery photo displaying with SPLENDID™ Video Intelligence...

VP247 Series User Guide
Page 20
... by focusing on objects that are far away. • Eye exercises can help to Level 3, the Brightness function is user-configurable. • Level 4 is activated,the default settings of Standard Mode will be reduced. • When Blue Light Filter is optimized setting. Blue Light Filter Adjust the energy level of continuous working for long hours. If eye strain continues please consult a physician. Eye exercises...
... by focusing on objects that are far away. • Eye exercises can help to Level 3, the Brightness function is user-configurable. • Level 4 is activated,the default settings of Standard Mode will be reduced. • When Blue Light Filter is optimized setting. Blue Light Filter Adjust the energy level of continuous working for long hours. If eye strain continues please consult a physician. Eye exercises...

VP247 Series User Guide
Page 21
... Instruction Color Brightness Contrast Saturation Color Temp. the adjusting range is from 0 to 100. • Color Temp.: Contains three preset color modes (Cool, Normal, Warm) and User Mode. • Skin Tone: Contains three color modes including Reddish, Natural, and Yellowish. • Smart View:The versatile viewing positions with Smart View Technology. • In the User Mode, colors of R (Red), G (Green), and B (Blue) are userconfigurable; Skin Tone Smart View ASUS VP247 Standard Mode VGA 1920x1080@60Hz • Brightness: The adjusting range is...
... Instruction Color Brightness Contrast Saturation Color Temp. the adjusting range is from 0 to 100. • Color Temp.: Contains three preset color modes (Cool, Normal, Warm) and User Mode. • Skin Tone: Contains three color modes including Reddish, Natural, and Yellowish. • Smart View:The versatile viewing positions with Smart View Technology. • In the User Mode, colors of R (Red), G (Green), and B (Blue) are userconfigurable; Skin Tone Smart View ASUS VP247 Standard Mode VGA 1920x1080@60Hz • Brightness: The adjusting range is...

VP247 Series User Guide
Page 22
... adjust the image Sharpness, Trace Free, Aspect Control, VividPixel, ASCR, Adaptive-Sync/Freesync (VP247QG only), Position (VGA only), Focus (VGA only), and Auto Adjust (VGA only), from 0 to 100. • ASCR: Select ON or OFF to enable or disable dynamic contrast ratio function. • Adaptive-Sync/FreeSync: It can allow a Adaptive-Sync/FreeSync supported graphics source to 100 (Only available for power efficient, virtually stutter free and low-latency display update. • Position: Adjusts the horizontal position (H-Position) and the vertical position (V-Position...
... adjust the image Sharpness, Trace Free, Aspect Control, VividPixel, ASCR, Adaptive-Sync/Freesync (VP247QG only), Position (VGA only), Focus (VGA only), and Auto Adjust (VGA only), from 0 to 100. • ASCR: Select ON or OFF to enable or disable dynamic contrast ratio function. • Adaptive-Sync/FreeSync: It can allow a Adaptive-Sync/FreeSync supported graphics source to 100 (Only available for power efficient, virtually stutter free and low-latency display update. • Position: Adjusts the horizontal position (H-Position) and the vertical position (V-Position...
VP247 Series User Guide
Page 23
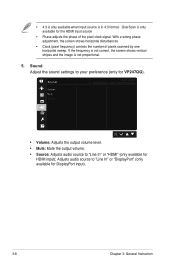
... the image is only available for VP247QG). Sound Volume Mute Source ASUS VP247 Standard Mode VGA 1920x1080@60Hz • Volume: Adjusts the output volume level. • Mute: Mute the output volume. • Source: Adjusts audio source to "Line In" or "HDMI" (only available for DisplayPort input). 3-6 Chapter 3: General Instruction With a wrong phase adjustment, the screen shows horizontal disturbances. • Clock (pixel frequency) controls the number of the pixel clock signal. Adjusts audio source to your preference (only for the HDMI input source • Phase adjusts...
... the image is only available for VP247QG). Sound Volume Mute Source ASUS VP247 Standard Mode VGA 1920x1080@60Hz • Volume: Adjusts the output volume level. • Mute: Mute the output volume. • Source: Adjusts audio source to "Line In" or "HDMI" (only available for DisplayPort input). 3-6 Chapter 3: General Instruction With a wrong phase adjustment, the screen shows horizontal disturbances. • Clock (pixel frequency) controls the number of the pixel clock signal. Adjusts audio source to your preference (only for the HDMI input source • Phase adjusts...

VP247 Series User Guide
Page 24
6. System Setup Splendid Demo Mode Volume GamePlus DisplayPort Stream ECO Mode OSD Setup Language Key Lock More ASUS VP247 Standard Mode VGA 1920x1080@60Hz ASUS LCD Monitor VP247 Series 3-7 Input Select Select the input source from VGA, DVI(VP247H/T/N), HDMI(Only For VP247H/QG), DisplayPort(Only for VP247QG) input signal. Input Select VGA DVI HDMI DisplayPort ASUS VP247 Standard Mode VGA 1920x1080@60Hz 7. System Setup Adjusts the system configuration.
6. System Setup Splendid Demo Mode Volume GamePlus DisplayPort Stream ECO Mode OSD Setup Language Key Lock More ASUS VP247 Standard Mode VGA 1920x1080@60Hz ASUS LCD Monitor VP247 Series 3-7 Input Select Select the input source from VGA, DVI(VP247H/T/N), HDMI(Only For VP247H/QG), DisplayPort(Only for VP247QG) input signal. Input Select VGA DVI HDMI DisplayPort ASUS VP247 Standard Mode VGA 1920x1080@60Hz 7. System Setup Adjusts the system configuration.

VP247 Series User Guide
Page 26
... next page of System Setting. • Back: Return the previous page of the OSD screen. • Language: Select OSD language. Pressing the second button on the right for power saving. • OSD Setup: Adjusts the OSD Timeout, DDC/CI, and Transparency of System Setting. • Information:Displays the monitor information. • Power Indicator: Turn the power LED indicator on/off. • Power Key Lock: To disable / enable power key • All Reset: Selects "Yes" to...
... next page of System Setting. • Back: Return the previous page of the OSD screen. • Language: Select OSD language. Pressing the second button on the right for power saving. • OSD Setup: Adjusts the OSD Timeout, DDC/CI, and Transparency of System Setting. • Information:Displays the monitor information. • Power Indicator: Turn the power LED indicator on/off. • Power Key Lock: To disable / enable power key • All Reset: Selects "Yes" to...

VP247 Series User Guide
Page 27
...from "Blue Light Filter" "Splendid", "Brightness", "Auto Adjust(Only For VP247H/QG)", "Contrast", "Color Temp.", "Volume(Only for VP247H/T/QG)", "GamePlus", and set as shortcut key. Shortcut Shortcut 1 Shortcut 2 ASUS VP247 Standard Mode VGA 1920x1080@60Hz Blue Light Filter Splendid Brightness Auto Adjust Contrast Color Temp. The default setting is Blue Light Filter. 3-10 Chapter 3: General Instruction Volume GamePlus • Shortcut 1: User can select from "Blue Light Filter" "Splendid", "Brightness", "Auto Adjust(Only For VP247H/QG)", "Contrast", "Color Temp.", "Volume(Only...
...from "Blue Light Filter" "Splendid", "Brightness", "Auto Adjust(Only For VP247H/QG)", "Contrast", "Color Temp.", "Volume(Only for VP247H/T/QG)", "GamePlus", and set as shortcut key. Shortcut Shortcut 1 Shortcut 2 ASUS VP247 Standard Mode VGA 1920x1080@60Hz Blue Light Filter Splendid Brightness Auto Adjust Contrast Color Temp. The default setting is Blue Light Filter. 3-10 Chapter 3: General Instruction Volume GamePlus • Shortcut 1: User can select from "Blue Light Filter" "Splendid", "Brightness", "Auto Adjust(Only For VP247H/QG)", "Contrast", "Color Temp.", "Volume(Only...
VP247 Series User Guide
Page 28
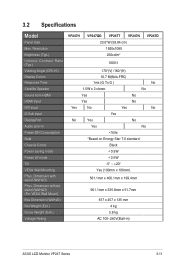
3.2 Specifications Model Panel Size Max. Dimension without stand (WxHxD) (For VESA Wall Mount) Box Dimension (WxHxD) Net Weight (Esti.) Gross Weight (Esti.) Voltage Rating VP247H VP247QG VP247T VP247N 23.6"W (59.94 cm) 1920x1080 ...Yes No Yes No Dimension with stand (WxHxD) Phys. Resolution Brightness (Typ.) Intrinsic Contrast Ratio (Typ.) Viewing Angle (CR>10) Display Colors Response Time Satellite Speaker Sound from HDMI HDMI input DVI input D-Sub input DisplayPort Audio Line-in Power ON Consumption Note Chassis Colors Power saving mode Power off mode Tilt VESA Wall Mounting Phys.
3.2 Specifications Model Panel Size Max. Dimension without stand (WxHxD) (For VESA Wall Mount) Box Dimension (WxHxD) Net Weight (Esti.) Gross Weight (Esti.) Voltage Rating VP247H VP247QG VP247T VP247N 23.6"W (59.94 cm) 1920x1080 ...Yes No Yes No Dimension with stand (WxHxD) Phys. Resolution Brightness (Typ.) Intrinsic Contrast Ratio (Typ.) Viewing Angle (CR>10) Display Colors Response Time Satellite Speaker Sound from HDMI HDMI input DVI input D-Sub input DisplayPort Audio Line-in Power ON Consumption Note Chassis Colors Power saving mode Power off mode Tilt VESA Wall Mounting Phys.
VP247 Series User Guide
Page 29
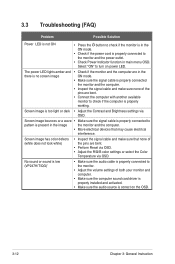
...; Make sure the computer sound card driver is properly installed and activated. • Make sure the audio source is correct on power LED. No sound or sound is low (VP247H/T/QG)' • Make sure the audio cable is properly connected to turn on the OSD. 3-12 Chapter 3: General Instruction Screen image is too light or dark • Adjust the Contrast and Brightness settings via OSD. 3.3 Troubleshooting (FAQ) Problem Possible Solution Power LED is not ON • Press the button to check if the monitor...
...; Make sure the computer sound card driver is properly installed and activated. • Make sure the audio source is correct on power LED. No sound or sound is low (VP247H/T/QG)' • Make sure the audio cable is properly connected to turn on the OSD. 3-12 Chapter 3: General Instruction Screen image is too light or dark • Adjust the Contrast and Brightness settings via OSD. 3.3 Troubleshooting (FAQ) Problem Possible Solution Power LED is not ON • Press the button to check if the monitor...
VP247 Series User Guide
Page 30
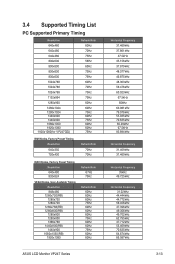
... 75Hz IBM Modes, Factory Preset Timing Resolution 640x350 720x400 Refresh Rate 70Hz 70Hz MAC Modes, Factory Preset Timing Resolution 640x480 832x624 VESA Modes, User Available Timing Resolution 848x480 1280x720(RB) 1280x720 1280x720 1280x768(RB) 1280x800(RB) 1280x800 1280x800 1366x768 1440x900(RB) 1440x900 1680x1050(RB) 1920x1080 Refresh Rate 67Hz 75Hz Refresh Rate 60Hz 60Hz 60Hz 75Hz 60Hz 60Hz 60Hz 75Hz 60Hz 60Hz 75Hz 60Hz 60Hz ASUS LCD Monitor VP247 Series Horizontal Frequency 31.469kHz...
... 75Hz IBM Modes, Factory Preset Timing Resolution 640x350 720x400 Refresh Rate 70Hz 70Hz MAC Modes, Factory Preset Timing Resolution 640x480 832x624 VESA Modes, User Available Timing Resolution 848x480 1280x720(RB) 1280x720 1280x720 1280x768(RB) 1280x800(RB) 1280x800 1280x800 1366x768 1440x900(RB) 1440x900 1680x1050(RB) 1920x1080 Refresh Rate 67Hz 75Hz Refresh Rate 60Hz 60Hz 60Hz 75Hz 60Hz 60Hz 60Hz 75Hz 60Hz 60Hz 75Hz 60Hz 60Hz ASUS LCD Monitor VP247 Series Horizontal Frequency 31.469kHz...


