User Manual
Page 3
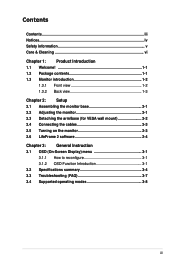
......iv Safety information v Care & Cleaning vi Chapter 1: Product Introduction 1.1 Welcome 1-1 1.2 Package contents 1-1 1.3 Monitor introduction 1-2 1.3.1 Front view 1-2 1.3.2 Back view 1-3 Chapter 2: Setup 2.1 Assembling the monitor base 2-1 2.2 Adjusting the monitor 2-1 2.3 Detaching the arm/base (for VESA wall mount 2-2 2.4 Connecting the cables 2-3 2.5 Turning on the monitor 2-3 2.6 LifeFrame 2 software 2-4 Chapter 3: General Instruction 3.1 OSD (On-Screen Display) menu 3-1 3.1.1 How to...
......iv Safety information v Care & Cleaning vi Chapter 1: Product Introduction 1.1 Welcome 1-1 1.2 Package contents 1-1 1.3 Monitor introduction 1-2 1.3.1 Front view 1-2 1.3.2 Back view 1-3 Chapter 2: Setup 2.1 Assembling the monitor base 2-1 2.2 Adjusting the monitor 2-1 2.3 Detaching the arm/base (for VESA wall mount 2-2 2.4 Connecting the cables 2-3 2.5 Turning on the monitor 2-3 2.6 LifeFrame 2 software 2-4 Chapter 3: General Instruction 3.1 OSD (On-Screen Display) menu 3-1 3.1.1 How to...

User Manual
Page 4
... for help. The use of shielded cables for radio noise emissions from that may cause harmful interference to assure compliance with Part 15 of the monitor to the graphics card is subject to the following measures: • Reorient or relocate the receiving antenna. • Increase the separation between the equipment and...
... for help. The use of shielded cables for radio noise emissions from that may cause harmful interference to assure compliance with Part 15 of the monitor to the graphics card is subject to the following measures: • Reorient or relocate the receiving antenna. • Increase the separation between the equipment and...
User Manual
Page 5
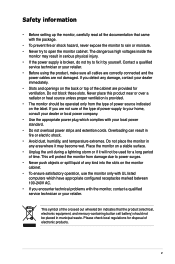
... of the type of the crossed out wheeled bin indicates that came with the package. • To prevent fire or shock hazard, never expose the monitor to rain or moisture. • Never try to fix it by yourself. If you detect any damage, contact your dealer immediately. • Slots ... that the product (electrical, electronic equipment, and mercury-containing button cell battery) should be used for a long period of time. Do not place the monitor in any kind into the slots on a stable surface. • Unplug the unit during a lightning storm or if it may result in serious physical ...
... of the type of the crossed out wheeled bin indicates that came with the package. • To prevent fire or shock hazard, never expose the monitor to rain or moisture. • Never try to fix it by yourself. If you detect any damage, contact your dealer immediately. • Slots ... that the product (electrical, electronic equipment, and mercury-containing button cell battery) should be used for a long period of time. Do not place the monitor in any kind into the slots on a stable surface. • Unplug the unit during a lightning storm or if it may result in serious physical ...

User Manual
Page 6
...dampened with a lint-free, non-abrasive cloth. Stubborn stains may remain after switching the image. Turn off and unplug the power cord. Clean the monitor surface with mild cleaner. • Avoid using a cleaner containing alcohol or acetone. Do not repair the screen by the stand or the cord. &#...electric shock. Use a cleaner intended for hours. • When the screen becomes black or flashes, or cannot work anymore, contact your monitor off the Power Switch and turn it . CAUTION: Information to prevent damage to the components when trying to make sure that you MUST ...
...dampened with a lint-free, non-abrasive cloth. Stubborn stains may remain after switching the image. Turn off and unplug the power cord. Clean the monitor surface with mild cleaner. • Avoid using a cleaner containing alcohol or acetone. Do not repair the screen by the stand or the cord. &#...electric shock. Use a cleaner intended for hours. • When the screen becomes black or flashes, or cannot work anymore, contact your monitor off the Power Switch and turn it . CAUTION: Information to prevent damage to the components when trying to make sure that you MUST ...
User Manual
Page 9
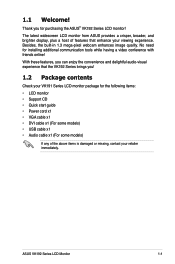
Thank you ! 1.2 Package contents Check your VK191 Series LCD monitor package for the following items: • LCD monitor • Support CD • Quick start guide • Power cord x1 • VGA cable x1 • DVI cable x1 (For some models..., you can enjoy the convenience and delightful audio-visual experience that enhance your retailer immediately. ASUS VK192 Series LCD Monitor 1-1 No need for purchasing the ASUS® VK192 Series LCD monitor! The latest widescreen LCD monitor from ASUS provides a crisper, broader, and brighter display, plus a host of the above items is...
Thank you ! 1.2 Package contents Check your VK191 Series LCD monitor package for the following items: • LCD monitor • Support CD • Quick start guide • Power cord x1 • VGA cable x1 • DVI cable x1 (For some models..., you can enjoy the convenience and delightful audio-visual experience that enhance your retailer immediately. ASUS VK192 Series LCD Monitor 1-1 No need for purchasing the ASUS® VK192 Series LCD monitor! The latest widescreen LCD monitor from ASUS provides a crisper, broader, and brighter display, plus a host of the above items is...

User Manual
Page 10
...). 2. Button: • Press this button to decrease the value of the function selected or move left /down to the previous function. • This is activated. 4. 1.3 Monitor introduction 1.3.1 Front view Webcam Base 1 2 3 4 5 1.
...). 2. Button: • Press this button to decrease the value of the function selected or move left /down to the previous function. • This is activated. 4. 1.3 Monitor introduction 1.3.1 Front view Webcam Base 1 2 3 4 5 1.

User Manual
Page 11
...some models) Screw holes for PC VGA connection. 4. This 24-pin port is for PC (Personal Computer) DVI-D digital signal connection. 3. ASUS VK192 Series LCD Monitor 1-3 This port connects the power connector from the bundled power cord. 2. This port is for the built-in port (For those models with ... wall mount kit (100 mm x 100 mm) is as the below table. Power button/power indicator • Press this button to turn the monitor on/off • The color definition of the power indicator is purchased separately. This port connects PC audio source by the bundled audio cable. 5....
...some models) Screw holes for PC VGA connection. 4. This 24-pin port is for PC (Personal Computer) DVI-D digital signal connection. 3. ASUS VK192 Series LCD Monitor 1-3 This port connects the power connector from the bundled power cord. 2. This port is for the built-in port (For those models with ... wall mount kit (100 mm x 100 mm) is as the below table. Power button/power indicator • Press this button to turn the monitor on/off • The color definition of the power indicator is purchased separately. This port connects PC audio source by the bundled audio cable. 5....

User Manual
Page 13
... to the monitor. 2.2 Adjusting the monitor • For optimal viewing, we recommend that you look at the full face of the monitor face down on a table. 2. Have the front of the monitor, then adjust the monitor to the angle that is normal that the base has been connected successfully. ASUS VK192 Series LCD Monitor 2-1 2.1 Assembling the monitor base...
... to the monitor. 2.2 Adjusting the monitor • For optimal viewing, we recommend that you look at the full face of the monitor face down on a table. 2. Have the front of the monitor, then adjust the monitor to the angle that is normal that the base has been connected successfully. ASUS VK192 Series LCD Monitor 2-1 2.1 Assembling the monitor base...
User Manual
Page 14
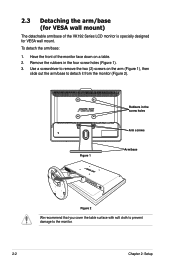
... the table surface with soft cloth to prevent damage to detach it from the monitor (Figure 2). Have the front of the VK192 Series LCD monitor is specially designed for VESA wall mount) The detachable arm/base of the monitor face down on the arm (Figure 1), then slide out the arm/base to the...
... the table surface with soft cloth to prevent damage to detach it from the monitor (Figure 2). Have the front of the VK192 Series LCD monitor is specially designed for VESA wall mount) The detachable arm/base of the monitor face down on the arm (Figure 1), then slide out the arm/base to the...
User Manual
Page 15
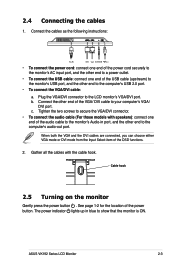
... of the VGA/ DVI cable to the LCD monitor's VGA/DVI port. When both the VGA and the DVI cables are connected, you can choose either VGA mode or DVI mode from the Input Select item of the power button. c. ASUS VK192 Series LCD Monitor 2-3 AC-IN DVI VGA AUDIO IN USB Cable... hook 2.5 Turning on the monitor Gently press the power button . Gather all the cables with speakers): connect one end of the audio cable...
... of the VGA/ DVI cable to the LCD monitor's VGA/DVI port. When both the VGA and the DVI cables are connected, you can choose either VGA mode or DVI mode from the Input Select item of the power button. c. ASUS VK192 Series LCD Monitor 2-3 AC-IN DVI VGA AUDIO IN USB Cable... hook 2.5 Turning on the monitor Gently press the power button . Gather all the cables with speakers): connect one end of the audio cable...

User Manual
Page 17
... SPLENDID™ Video Intelligence Technology. • In the Standard Mode, the Saturation and Sharpness functions are not user-configurable. • In the other function. ASUS VK192 Series LCD Monitor 3-1 If the function selected has a submenu, press and again to 3.1.2 OSD Function Introduction 1. Highlight and activate the desired sub-menu function by pressing...
... SPLENDID™ Video Intelligence Technology. • In the Standard Mode, the Saturation and Sharpness functions are not user-configurable. • In the other function. ASUS VK192 Series LCD Monitor 3-1 If the function selected has a submenu, press and again to 3.1.2 OSD Function Introduction 1. Highlight and activate the desired sub-menu function by pressing...

User Manual
Page 19
...postition (H-Position)/ the vertical position (V-Position) of the OSD from 0 to 100. *Adjusts the OSD timeout from 0 to 100. ASUS VK192 Series LCD Monitor 3-3 is from 10 to 120. *Enables or disables the DDC/CI function. • Language: there are ten languages for your ..., Traditional Chinese, Simplified Chinese, and Japanese. • Aspect Control: adjusts the aspect ratio to "Full" or "4:3". • Information: shows the monitor information. • Reset: "Yes" allows you to activate this function, you can select either VGA or DVI input source. 5. System Setup Allow ...
...postition (H-Position)/ the vertical position (V-Position) of the OSD from 0 to 100. *Adjusts the OSD timeout from 0 to 100. ASUS VK192 Series LCD Monitor 3-3 is from 10 to 120. *Enables or disables the DDC/CI function. • Language: there are ten languages for your ..., Traditional Chinese, Simplified Chinese, and Japanese. • Aspect Control: adjusts the aspect ratio to "Full" or "4:3". • Information: shows the monitor information. • Reset: "Yes" allows you to activate this function, you can select either VGA or DVI input source. 5. System Setup Allow ...

User Manual
Page 21
Resolution Pixel pitch Brightness (Typ.) Brightness (Max.) Contrast Ratio (Typ.) Contrast Ratio (Max.) Viewing angle(H/V) CR>10 Display colors Response time Webcam (Built-in) SPLENDID™ Video Intelligence Technology SPLENDID™ selection Auto adjustment Color temperature selection Skin-Tone selection Analog input Audio-in port Colors Speaker (Built-in) Power LED VESA wall mount Tilt Kensington lock Voltage rating Power consumption TFT LCD 19" (16:10) wide screen WXGA+ 1440 x 900 0.285mm 260cd/m2 350cd/m2 1000:1 4000:1 (with ASCR ON) 160˚/160˚ 16.7M 5ms 1.3 Mega pixel Yes 5 ...
Resolution Pixel pitch Brightness (Typ.) Brightness (Max.) Contrast Ratio (Typ.) Contrast Ratio (Max.) Viewing angle(H/V) CR>10 Display colors Response time Webcam (Built-in) SPLENDID™ Video Intelligence Technology SPLENDID™ selection Auto adjustment Color temperature selection Skin-Tone selection Analog input Audio-in port Colors Speaker (Built-in) Power LED VESA wall mount Tilt Kensington lock Voltage rating Power consumption TFT LCD 19" (16:10) wide screen WXGA+ 1440 x 900 0.285mm 260cd/m2 350cd/m2 1000:1 4000:1 (with ASCR ON) 160˚/160˚ 16.7M 5ms 1.3 Mega pixel Yes 5 ...
User Manual
Page 23
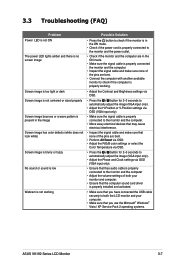
...• Adjust the H-Position or V-Position settings via OSD (VGA input only). • Make sure the signal cable is properly connected to the monitor and the computer. • Move away electrical devices that may cause electrical interference. • Inspect the signal cable and make sure that none of... driver is properly installed and activated. • Make sure that you have connected the USB cable securely to both the LCD monitor and your computer. • Make sure that you use the Microsoft® Windows® Vista / XP Service Pack 2 operating systems. ASUS VK192 Series LCD...
...• Adjust the H-Position or V-Position settings via OSD (VGA input only). • Make sure the signal cable is properly connected to the monitor and the computer. • Move away electrical devices that may cause electrical interference. • Inspect the signal cable and make sure that none of... driver is properly installed and activated. • Make sure that you have connected the USB cable securely to both the LCD monitor and your computer. • Make sure that you use the Microsoft® Windows® Vista / XP Service Pack 2 operating systems. ASUS VK192 Series LCD...


