Vintage-AH1 User's Manual for English Edtion
Page 4
... 3: Starting up 3.1 Installing an operating system 3-2 3.2 Powering up 3-2 3.3 Support CD information 3-2 3.3.1 Running the support CD 3-3 3.3.2 Utilities menu 3-4 3.3.3 ASUS Contact information 3-5 3.4 Software information 3-6 3.4.1 Cool 'n' Quiet!™ Technology 3-6 3.4.2 ASUS Update 3-8 3.4.3 ASUS PC Probe II 3-10 3.5 Installing the SATA controller driver 3-16 Chapter 4: Motherboard Info 4.1 Introduction 4-2 4.2 Motherboard layout 4-2 4.3 Jumpers 4-3 4.4 Connectors 4-6 Chapter 5: BIOS Information 5.1 Managing and updating your...
... 3: Starting up 3.1 Installing an operating system 3-2 3.2 Powering up 3-2 3.3 Support CD information 3-2 3.3.1 Running the support CD 3-3 3.3.2 Utilities menu 3-4 3.3.3 ASUS Contact information 3-5 3.4 Software information 3-6 3.4.1 Cool 'n' Quiet!™ Technology 3-6 3.4.2 ASUS Update 3-8 3.4.3 ASUS PC Probe II 3-10 3.5 Installing the SATA controller driver 3-16 Chapter 4: Motherboard Info 4.1 Introduction 4-2 4.2 Motherboard layout 4-2 4.3 Jumpers 4-3 4.4 Connectors 4-6 Chapter 5: BIOS Information 5.1 Managing and updating your...
Vintage-AH1 User's Manual for English Edtion
Page 31
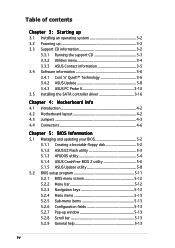
... PCI slot 1 PCI slot 2 PCI Express x16 slot PCI Express x1 slot Onboard USB controller 0 Onboard USB controller 1 Onboard USB controller 2 Onboard EHCI controller Onboard SATA Controller Onboard Audio Controller Onboard VGA Onboard IEEE1394 Onboard Gigabit LAN A B C D E -
... PCI slot 1 PCI slot 2 PCI Express x16 slot PCI Express x1 slot Onboard USB controller 0 Onboard USB controller 1 Onboard USB controller 2 Onboard EHCI controller Onboard SATA Controller Onboard Audio Controller Onboard VGA Onboard IEEE1394 Onboard Gigabit LAN A B C D E -
Vintage-AH1 User's Manual for English Edtion
Page 36
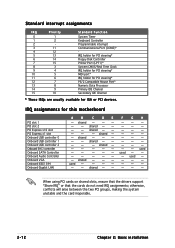
... power cable Serial ATA cable 5. ASUS Vintage-AH1 2-17 OR - See page 4-6 for the location of the drive, then connect the other end to a Serial ATA connector on the motherboard. Connect a 15-pin Serial ATA power plug from the power supply unit to the SATA connector at the back of the ... end of the Serial ATA cable to the 4-pin (male) power connector at the back of the drive. D O N O T use either the 15-pin SATA power adapter plug O R the legacy 4-pin power connector. Connect a 4-pin (female) power plug from the power supply unit to keep the system from becoming unstable...
... power cable Serial ATA cable 5. ASUS Vintage-AH1 2-17 OR - See page 4-6 for the location of the drive, then connect the other end to a Serial ATA connector on the motherboard. Connect a 15-pin Serial ATA power plug from the power supply unit to the SATA connector at the back of the ... end of the Serial ATA cable to the 4-pin (male) power connector at the back of the drive. D O N O T use either the 15-pin SATA power adapter plug O R the legacy 4-pin power connector. Connect a 4-pin (female) power plug from the power supply unit to keep the system from becoming unstable...
Vintage-AH1 User's Manual for English Edtion
Page 43
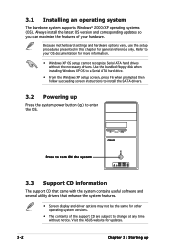
...3.1 Installing an operating system The barebone system supports Windows® 2000/XP operating systems (OS). Refer to enter the OS. Visit the ASUS website for updates. 3-2 Chapter 3: Starting up Press the system power button ( ) to your hardware. Because motherboard settings and hardware options... ATA hard drive. • From the Windows XP setup screen, press F6 when prompted then follow succeeding screen instructions to install the SATA drivers. 3.2 Powering up Always install the latest OS version and corresponding updates so you can maximize the features of the support CD are...
...3.1 Installing an operating system The barebone system supports Windows® 2000/XP operating systems (OS). Refer to enter the OS. Visit the ASUS website for updates. 3-2 Chapter 3: Starting up Press the system power button ( ) to your hardware. Because motherboard settings and hardware options... ATA hard drive. • From the Windows XP setup screen, press F6 when prompted then follow succeeding screen instructions to install the SATA drivers. 3.2 Powering up Always install the latest OS version and corresponding updates so you can maximize the features of the support CD are...
Vintage-AH1 User's Manual for English Edtion
Page 44
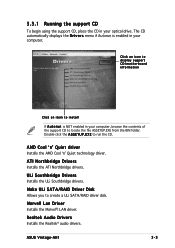
...A S S E T U P . ATI Northbridge Drivers Installs the ATI Northbridge drivers. Marvell Lan Driver Installs the Marvel®l LAN driver. ASUS Vintage-AH1 3-3 ULi Southbridge Drivers Installs the ULi Southbridge drivers. 3.3.1 Running the support CD To begin using the support CD, place the CD in your ... your computer, browse the contents of the support CD to install If A u t o r u n is enabled in your computer. Make ULi SATA/RAID Driver Disk Allows you to run the CD. Realtek Audio Drivers Installs the Realtek® audio drivers. AMD Cool 'n' Quiet driver Installs the AMD...
...A S S E T U P . ATI Northbridge Drivers Installs the ATI Northbridge drivers. Marvell Lan Driver Installs the Marvel®l LAN driver. ASUS Vintage-AH1 3-3 ULi Southbridge Drivers Installs the ULi Southbridge drivers. 3.3.1 Running the support CD To begin using the support CD, place the CD in your ... your computer, browse the contents of the support CD to install If A u t o r u n is enabled in your computer. Make ULi SATA/RAID Driver Disk Allows you to run the CD. Realtek Audio Drivers Installs the Realtek® audio drivers. AMD Cool 'n' Quiet driver Installs the AMD...
Vintage-AH1 User's Manual for English Edtion
Page 57
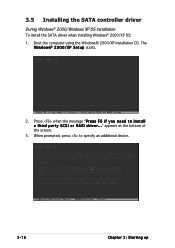
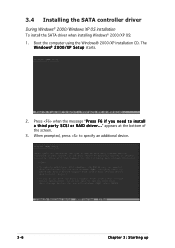
Press when the message "P r e s s F 6 i f y o u n e e d t o i n s t a l l a t h i r d p a r t y S C S I o r R A I D d r i v e r . . ." appears at the bottom of the screen. 3. Boot the computer using the Windows® 2000/XP installation CD. 3.5 Installing the SATA controller driver During Windows® 2000/Windows XP OS installation To install the SATA driver when installing Windows® 2000/XP OS: 1. The W i n d o w s® 2 0 0 0 / X P S e t u p starts. 2. When prompted, press to specify an additional device. 3-16 Chapter 3: Starting up
Press when the message "P r e s s F 6 i f y o u n e e d t o i n s t a l l a t h i r d p a r t y S C S I o r R A I D d r i v e r . . ." appears at the bottom of the screen. 3. Boot the computer using the Windows® 2000/XP installation CD. 3.5 Installing the SATA controller driver During Windows® 2000/Windows XP OS installation To install the SATA driver when installing Windows® 2000/XP OS: 1. The W i n d o w s® 2 0 0 0 / X P S e t u p starts. 2. When prompted, press to specify an additional device. 3-16 Chapter 3: Starting up
Vintage-AH1 User's Manual for English Edtion
Page 59
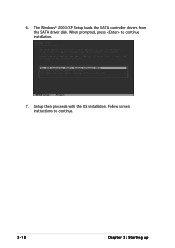
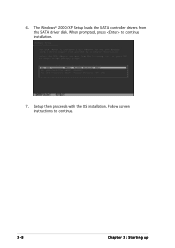
Follow screen instructions to continue installation. 7. The Windows® 2000/XP Setup loads the SATA controller drivers from the SATA driver disk. When prompted, press to continue. 3-18 Chapter 3: Starting up 6. Setup then proceeds with the OS installation.
Follow screen instructions to continue installation. 7. The Windows® 2000/XP Setup loads the SATA controller drivers from the SATA driver disk. When prompted, press to continue. 3-18 Chapter 3: Starting up 6. Setup then proceeds with the OS installation.

Vintage-AH1 User's Manual for English Edtion
Page 66
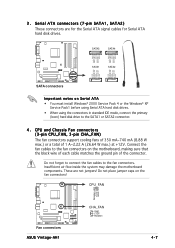
... GND GND RSATA_TXP3 RSATA_TXN3 GND RSATA_RXP3 RSATA_RXN3 GND SATA1 SATA2 ® GND RSATA_RXN2 RSATA_RXP2 GND RSATA_TXN2 RSATA_TXP2 GND GND RSATA_RXN1 RSATA_RXP1 GND RSATA_TXN1 RSATA_TXP1 GND SATA connectors Important notes on the fan connectors! CPU_FAN Rotation +12V GND ® Fan connectors ASUS Vintage-AH1 CHA_FAN GND +12V Rotation 4-7
... GND GND RSATA_TXP3 RSATA_TXN3 GND RSATA_RXP3 RSATA_RXN3 GND SATA1 SATA2 ® GND RSATA_RXN2 RSATA_RXP2 GND RSATA_TXN2 RSATA_TXP2 GND GND RSATA_RXN1 RSATA_RXP1 GND RSATA_TXN1 RSATA_TXP1 GND SATA connectors Important notes on the fan connectors! CPU_FAN Rotation +12V GND ® Fan connectors ASUS Vintage-AH1 CHA_FAN GND +12V Rotation 4-7

Vintage-AH1 User's Manual for English Edtion
Page 95
... a Windows® 98SE or Windows® ME OS. 5-22 Chapter 5: BIOS Setup Configuration options: [Disabled] [Enabled] OnBoard SATA Boot ROM [Enabled] Enables or disables the onboard Serial ATA boot ROM. Configuration options: [Disabled] [Enabled] Serial ATA Controller [...Enabled] Enables or disables the onboard Serial ATA controller. SouthBridge Configuration Azalia Audio Controller Serial ATA Controller OnBoard SATA Boot ROM USB Configuration [Enabled [Enabled] [Enabled] Azalia Audio Controller [Enabled] Enables or disables the onboard audio controller. USB ...
... a Windows® 98SE or Windows® ME OS. 5-22 Chapter 5: BIOS Setup Configuration options: [Disabled] [Enabled] OnBoard SATA Boot ROM [Enabled] Enables or disables the onboard Serial ATA boot ROM. Configuration options: [Disabled] [Enabled] Serial ATA Controller [...Enabled] Enables or disables the onboard Serial ATA controller. SouthBridge Configuration Azalia Audio Controller Serial ATA Controller OnBoard SATA Boot ROM USB Configuration [Enabled [Enabled] [Enabled] Azalia Audio Controller [Enabled] Enables or disables the onboard audio controller. USB ...
Vintage-AH1 User''s Manual for English Edition
Page 4
... CD information 3-2 3.3.1 Running the support CD 3-3 3.3.2 Utilities menu 3-4 3.3.3 ASUS Contact information 3-5 3.4 Installing the SATA controller driver 3-6 Chapter 4: Motherboard Info 4.1 Introduction 4-2 4.2 Motherboard layout 4-2 4.3 Jumpers 4-3 4.4 Connectors 4-6 Chapter 5: BIOS Information 5.1 Managing and updating your BIOS 5-2 5.1.1 Creating a bootable floppy disk 5-2 5.1.2 ASUS EZ Flash utility 5-3 5.1.3 AFUDOS utility 5-4 5.1.4 ASUS CrashFree BIOS 2 utility 5-6 5.1.5 ASUS Update utility 5-8 5.2 BIOS setup program 5-11 5.2.1 BIOS menu...
... CD information 3-2 3.3.1 Running the support CD 3-3 3.3.2 Utilities menu 3-4 3.3.3 ASUS Contact information 3-5 3.4 Installing the SATA controller driver 3-6 Chapter 4: Motherboard Info 4.1 Introduction 4-2 4.2 Motherboard layout 4-2 4.3 Jumpers 4-3 4.4 Connectors 4-6 Chapter 5: BIOS Information 5.1 Managing and updating your BIOS 5-2 5.1.1 Creating a bootable floppy disk 5-2 5.1.2 ASUS EZ Flash utility 5-3 5.1.3 AFUDOS utility 5-4 5.1.4 ASUS CrashFree BIOS 2 utility 5-6 5.1.5 ASUS Update utility 5-8 5.2 BIOS setup program 5-11 5.2.1 BIOS menu...
Vintage-AH1 User''s Manual for English Edition
Page 31
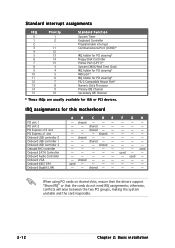
... PCI slot 1 PCI slot 2 PCI Express x16 slot PCI Express x1 slot Onboard USB controller 0 Onboard USB controller 1 Onboard USB controller 2 Onboard EHCI controller Onboard SATA Controller Onboard Audio Controller Onboard VGA Onboard IEEE1394 Onboard Gigabit LAN A B C D E - F used - - -- - - When using PCI cards on shared slots, ensure that the drivers support "Share...
... PCI slot 1 PCI slot 2 PCI Express x16 slot PCI Express x1 slot Onboard USB controller 0 Onboard USB controller 1 Onboard USB controller 2 Onboard EHCI controller Onboard SATA Controller Onboard Audio Controller Onboard VGA Onboard IEEE1394 Onboard Gigabit LAN A B C D E - F used - - -- - - When using PCI cards on shared slots, ensure that the drivers support "Share...

Vintage-AH1 User''s Manual for English Edition
Page 36
... from the power supply unit to the power connector at the back of the drive. - Connect a 15-pin Serial ATA power plug from becoming unstable. ASUS Vintage-AH1 2-17 D O N O T use both 4-pin and 15-pin connectors at the back of the Serial ATA connectors. 6. See page 4-6 for the location of the ... at the back of the drive, then connect the other end to the 4-pin (male) power connector at the back, use either the 15-pin SATA power adapter plug O R the legacy 4-pin power connector. Serial ATA power cable Serial ATA cable 5. OR - Connect a 4-pin (female) power plug from the...
... from the power supply unit to the power connector at the back of the drive. - Connect a 15-pin Serial ATA power plug from becoming unstable. ASUS Vintage-AH1 2-17 D O N O T use both 4-pin and 15-pin connectors at the back of the Serial ATA connectors. 6. See page 4-6 for the location of the ... at the back of the drive, then connect the other end to the 4-pin (male) power connector at the back, use either the 15-pin SATA power adapter plug O R the legacy 4-pin power connector. Serial ATA power cable Serial ATA cable 5. OR - Connect a 4-pin (female) power plug from the...
Vintage-AH1 User''s Manual for English Edition
Page 43
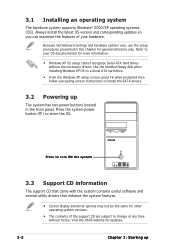
...a Serial ATA hard drive. • From the Windows XP setup screen, press F6 when prompted then follow succeeding screen instructions to install the SATA drivers. 3.2 Powering up Refer to change at any time without the necessary drivers. Press the system power button ( ) to turn ON the... presented in this chapter for updates. 3-2 Chapter 3: Starting up The system has two power buttons located in the front panel. Visit the ASUS website for general reference only. 3.1 Installing an operating system The barebone system supports Windows® 2000/XP operating systems (OS). Press to...
...a Serial ATA hard drive. • From the Windows XP setup screen, press F6 when prompted then follow succeeding screen instructions to install the SATA drivers. 3.2 Powering up Refer to change at any time without the necessary drivers. Press the system power button ( ) to turn ON the... presented in this chapter for updates. 3-2 Chapter 3: Starting up The system has two power buttons located in the front panel. Visit the ASUS website for general reference only. 3.1 Installing an operating system The barebone system supports Windows® 2000/XP operating systems (OS). Press to...
Vintage-AH1 User''s Manual for English Edition
Page 44
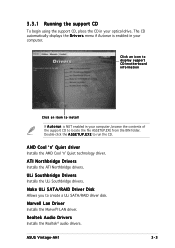
... ASSETUP.EXE from the BIN folder. AMD Cool 'n' Quiet driver Installs the AMD Cool 'n' Quiet technology driver. ASUS Vintage-AH1 3-3 E X E to create a ULi SATA/RAID driver disk. Realtek Audio Drivers Installs the Realtek® audio drivers. Make ULi SATA/RAID Driver Disk Allows you to run the CD. The CD automatically displays the D r i v e r s menu if...
... ASSETUP.EXE from the BIN folder. AMD Cool 'n' Quiet driver Installs the AMD Cool 'n' Quiet technology driver. ASUS Vintage-AH1 3-3 E X E to create a ULi SATA/RAID driver disk. Realtek Audio Drivers Installs the Realtek® audio drivers. Make ULi SATA/RAID Driver Disk Allows you to run the CD. The CD automatically displays the D r i v e r s menu if...
Vintage-AH1 User''s Manual for English Edition
Page 47
Press when the message "P r e s s F 6 i f y o u n e e d t o i n s t a l l a t h i r d p a r t y S C S I o r R A I D d r i v e r . . ." appears at the bottom of the screen. 3. When prompted, press to specify an additional device. 3-6 Chapter 3: Starting up 3.4 Installing the SATA controller driver During Windows® 2000/Windows XP OS installation To install the SATA driver when installing Windows® 2000/XP OS: 1. Boot the computer using the Windows® 2000/XP installation CD. The W i n d o w s® 2 0 0 0 / X P S e t u p starts. 2.
Press when the message "P r e s s F 6 i f y o u n e e d t o i n s t a l l a t h i r d p a r t y S C S I o r R A I D d r i v e r . . ." appears at the bottom of the screen. 3. When prompted, press to specify an additional device. 3-6 Chapter 3: Starting up 3.4 Installing the SATA controller driver During Windows® 2000/Windows XP OS installation To install the SATA driver when installing Windows® 2000/XP OS: 1. Boot the computer using the Windows® 2000/XP installation CD. The W i n d o w s® 2 0 0 0 / X P S e t u p starts. 2.
Vintage-AH1 User''s Manual for English Edition
Page 49
When prompted, press to continue. 3-8 Chapter 3: Starting up Setup then proceeds with the OS installation. Follow screen instructions to continue installation. 7. The Windows® 2000/XP Setup loads the SATA controller drivers from the SATA driver disk. 6.
When prompted, press to continue. 3-8 Chapter 3: Starting up Setup then proceeds with the OS installation. Follow screen instructions to continue installation. 7. The Windows® 2000/XP Setup loads the SATA controller drivers from the SATA driver disk. 6.
Vintage-AH1 User''s Manual for English Edition
Page 56
... SATA2 connector. 4. Insufficient air flow inside the system may damage the motherboard components. CPU_FAN Rotation +12V GND ® Fan connectors ASUS Vintage-AH1 CHA_FAN GND +12V Rotation 4-7 3 . CPU and Chassis Fan connectors (3-pin CPU_FAN, 3-pin CHA_FAN) The fan connectors support cooling fans... RSATA_RXP3 RSATA_RXN3 GND SATA1 SATA2 ® GND RSATA_RXN2 RSATA_RXP2 GND RSATA_TXN2 RSATA_TXP2 GND GND RSATA_RXN1 RSATA_RXP1 GND RSATA_TXN1 RSATA_TXP1 GND SATA connectors Important notes on Serial ATA • You must install Windows® 2000 Service Pack 4 or the Windows®...
... SATA2 connector. 4. Insufficient air flow inside the system may damage the motherboard components. CPU_FAN Rotation +12V GND ® Fan connectors ASUS Vintage-AH1 CHA_FAN GND +12V Rotation 4-7 3 . CPU and Chassis Fan connectors (3-pin CPU_FAN, 3-pin CHA_FAN) The fan connectors support cooling fans... RSATA_RXP3 RSATA_RXN3 GND SATA1 SATA2 ® GND RSATA_RXN2 RSATA_RXP2 GND RSATA_TXN2 RSATA_TXP2 GND GND RSATA_RXN1 RSATA_RXP1 GND RSATA_TXN1 RSATA_TXP1 GND SATA connectors Important notes on Serial ATA • You must install Windows® 2000 Service Pack 4 or the Windows®...

Vintage-AH1 User''s Manual for English Edition
Page 85
...show the auto-detected values. If no USB device is Enabled. SouthBridge Configuration Azalia Audio Controller Serial ATA Controller OnBoard SATA Boot ROM USB Configuration [Enabled [Enabled] [Enabled] Azalia Audio Controller [Enabled] Enables or disables the onboard audio ... Set the Onboard SISUSB1.1/2.0 DEVICE to [Disabled], if you to display the configuration options. Configuration options: [Disabled] [Enabled] OnBoard SATA Boot ROM [Enabled] Enables or disables the onboard Serial ATA boot ROM. Configuration options: [Disabled] [Enabled] Serial ATA Controller [Enabled...
...show the auto-detected values. If no USB device is Enabled. SouthBridge Configuration Azalia Audio Controller Serial ATA Controller OnBoard SATA Boot ROM USB Configuration [Enabled [Enabled] [Enabled] Azalia Audio Controller [Enabled] Enables or disables the onboard audio ... Set the Onboard SISUSB1.1/2.0 DEVICE to [Disabled], if you to display the configuration options. Configuration options: [Disabled] [Enabled] OnBoard SATA Boot ROM [Enabled] Enables or disables the onboard Serial ATA boot ROM. Configuration options: [Disabled] [Enabled] Serial ATA Controller [Enabled...