Vintage-AH1 User's Manual for English Edtion
Page 4
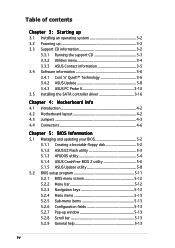
... CD information 3-2 3.3.1 Running the support CD 3-3 3.3.2 Utilities menu 3-4 3.3.3 ASUS Contact information 3-5 3.4 Software information 3-6 3.4.1 Cool 'n' Quiet!™ Technology 3-6 3.4.2 ASUS Update 3-8 3.4.3 ASUS PC Probe II 3-10 3.5 Installing the SATA controller driver 3-16 Chapter 4: ...Information 5.1 Managing and updating your BIOS 5-2 5.1.1 Creating a bootable floppy disk 5-2 5.1.2 ASUS EZ Flash utility 5-3 5.1.3 AFUDOS utility 5-4 5.1.4 ASUS CrashFree BIOS 2 utility 5-6 5.1.5 ASUS Update utility 5-8 5.2 BIOS setup program 5-11 5.2.1 BIOS menu screen 5-12 5.2.2 ...
... CD information 3-2 3.3.1 Running the support CD 3-3 3.3.2 Utilities menu 3-4 3.3.3 ASUS Contact information 3-5 3.4 Software information 3-6 3.4.1 Cool 'n' Quiet!™ Technology 3-6 3.4.2 ASUS Update 3-8 3.4.3 ASUS PC Probe II 3-10 3.5 Installing the SATA controller driver 3-16 Chapter 4: ...Information 5.1 Managing and updating your BIOS 5-2 5.1.1 Creating a bootable floppy disk 5-2 5.1.2 ASUS EZ Flash utility 5-3 5.1.3 AFUDOS utility 5-4 5.1.4 ASUS CrashFree BIOS 2 utility 5-6 5.1.5 ASUS Update utility 5-8 5.2 BIOS setup program 5-11 5.2.1 BIOS menu screen 5-12 5.2.2 ...
Vintage-AH1 User's Manual for English Edtion
Page 43
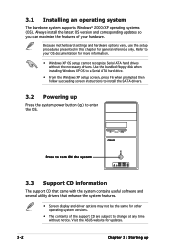
...3: Starting up Press the system power button ( ) to your hardware. Use the bundled floppy disk when installing Windows XP OS to a Serial ATA hard drive. • From the Windows XP setup screen, press F6 when prompted then follow succeeding screen instructions to install the SATA drivers. 3.2 Powering...not be the same for general reference only. Press to change at any time without the necessary drivers. Visit the ASUS website for more information. • Windows XP OS setup cannot recognize Serial ATA hard drives without notice. Refer to enter the OS. 3.1 Installing an ...
...3: Starting up Press the system power button ( ) to your hardware. Use the bundled floppy disk when installing Windows XP OS to a Serial ATA hard drive. • From the Windows XP setup screen, press F6 when prompted then follow succeeding screen instructions to install the SATA drivers. 3.2 Powering...not be the same for general reference only. Press to change at any time without the necessary drivers. Visit the ASUS website for more information. • Windows XP OS setup cannot recognize Serial ATA hard drives without notice. Refer to enter the OS. 3.1 Installing an ...
Vintage-AH1 User's Manual for English Edtion
Page 45
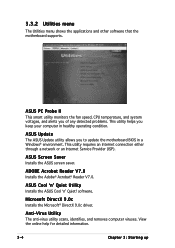
... the Microsoft® DirectX 9.0c driver. Anti-Virus Utility The anti-virus utility scans, identifies, and removes computer viruses. ASUS PC Probe II This smart utility monitors the fan speed, CPU temperature, and system voltages, and alerts you of any detected... network or an Internet Service Provider (ISP). ASUS Cool 'n' Quiet Utility Installs the ASUS Cool 'n' Quiet! View the online help for detailed information. 3-4 Chapter 3: Starting up ASUS Update The ASUS Update utility allows you keep your computer in a Windows® environment. 3.3.2 Utilities menu The Utilities ...
... the Microsoft® DirectX 9.0c driver. Anti-Virus Utility The anti-virus utility scans, identifies, and removes computer viruses. ASUS PC Probe II This smart utility monitors the fan speed, CPU temperature, and system voltages, and alerts you of any detected... network or an Internet Service Provider (ISP). ASUS Cool 'n' Quiet Utility Installs the ASUS Cool 'n' Quiet! View the online help for detailed information. 3-4 Chapter 3: Starting up ASUS Update The ASUS Update utility allows you keep your computer in a Windows® environment. 3.3.2 Utilities menu The Utilities ...

Vintage-AH1 User's Manual for English Edtion
Page 47
...menu, select the item A C P I 2 . 0 S u p p o r t and set it to E n a b l e d. Windows® 2000/XP 1. Make sure the Control Panel is set it to Classic View. 3. The following dialog box appears. 5. See section "5.4.1 CPU Configuration." ...e n t. 6. 3.4 Software information Most of power depending on the task the CPU performs. Enabling Cool 'n' Quiet!™ Technology To enable Cool 'n' Quiet!™ Technology: 1. From the Windows® 2000/XP operating system, click the S t a r t button. Reboot your operating system. Click the P o w e r . . . button. The Cool 'n' Quiet...
...menu, select the item A C P I 2 . 0 S u p p o r t and set it to E n a b l e d. Windows® 2000/XP 1. Make sure the Control Panel is set it to Classic View. 3. The following dialog box appears. 5. See section "5.4.1 CPU Configuration." ...e n t. 6. 3.4 Software information Most of power depending on the task the CPU performs. Enabling Cool 'n' Quiet!™ Technology To enable Cool 'n' Quiet!™ Technology: 1. From the Windows® 2000/XP operating system, click the S t a r t button. Reboot your operating system. Click the P o w e r . . . button. The Cool 'n' Quiet...
Vintage-AH1 User's Manual for English Edtion
Page 48
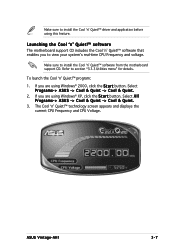
...Voltage. Make sure to section "3.3.3 Utilities menu" for details. Select A l l Programs-> ASUS -> Cool & Quiet -> Cool & Quiet. 3. Make sure to install the Cool 'n' Quiet!™ driver and application before using Windows® 2000, click the S t a r t button. Refer to install the Cool ... Quiet!™ software from the motherboard support CD. If you are using Windows® XP, click the S t a r t button. If you to view your system's real-time CPU Frequency and voltage. ASUS Vintage-AH1 3-7 Select Programs-> ASUS -> Cool & Quiet -> Cool & Quiet. 2. Launching the Cool 'n'...
...Voltage. Make sure to section "3.3.3 Utilities menu" for details. Select A l l Programs-> ASUS -> Cool & Quiet -> Cool & Quiet. 3. Make sure to install the Cool 'n' Quiet!™ driver and application before using Windows® 2000, click the S t a r t button. Refer to install the Cool ... Quiet!™ software from the motherboard support CD. If you are using Windows® XP, click the S t a r t button. If you to view your system's real-time CPU Frequency and voltage. ASUS Vintage-AH1 3-7 Select Programs-> ASUS -> Cool & Quiet -> Cool & Quiet. 2. Launching the Cool 'n'...
Vintage-AH1 User's Manual for English Edtion
Page 49
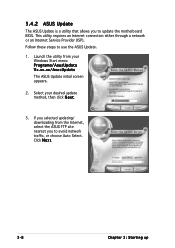
... N e x t. 3. This utility requires an Internet connection either through a network or an Internet Service Provider (ISP). Select your Windows Start menu: Programs/AsusUpdate Vx.xx.xx/AsusUpdate The ASUS Update initial screen appears. 2. 3.4.2 ASUS Update The ASUS Update is a utility that allows you to use the ASUS Update. 1. Follow these steps to update the motherboard BIOS.
... N e x t. 3. This utility requires an Internet connection either through a network or an Internet Service Provider (ISP). Select your Windows Start menu: Programs/AsusUpdate Vx.xx.xx/AsusUpdate The ASUS Update initial screen appears. 2. 3.4.2 ASUS Update The ASUS Update is a utility that allows you to use the ASUS Update. 1. Follow these steps to update the motherboard BIOS.

Vintage-AH1 User's Manual for English Edtion
Page 50
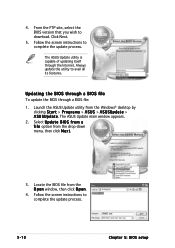
Click Flash to complete the update process. Click N e x t. 5. Select the file, click Save, then follow the screen instructions to update the BIOS. From the FTP site, select the BIOS version that you to download. The BIOS ROM information is displayed. If you selected the option to update the BIOS from a file, a window pops up prompting you wish to locate the file. ASUS Vintage-AH1 3-9 4.
Click Flash to complete the update process. Click N e x t. 5. Select the file, click Save, then follow the screen instructions to update the BIOS. From the FTP site, select the BIOS version that you to download. The BIOS ROM information is displayed. If you selected the option to update the BIOS from a file, a window pops up prompting you wish to locate the file. ASUS Vintage-AH1 3-9 4.
Vintage-AH1 User's Manual for English Edtion
Page 51
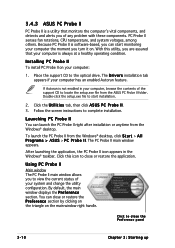
... appears in your computer has an enabled Autorun feature. Using PC Probe II Main window The PC Probe II main window allows you of any problem with these components. Click to the optical drive. 3.4.3 ASUS PC Probe II PC Probe II is a utility that your system and change the... restore the P r e f e r e n c e section by clicking on the triangle on the main window right handle. With this icon to complete installation. Double-click the setup.exe file to locate the setup.exe file from the ASUS PC Probe II folder. The D r i v e r s installation tab appears if your computer, browse the...
... appears in your computer has an enabled Autorun feature. Using PC Probe II Main window The PC Probe II main window allows you of any problem with these components. Click to the optical drive. 3.4.3 ASUS PC Probe II PC Probe II is a utility that your system and change the... restore the P r e f e r e n c e section by clicking on the triangle on the main window right handle. With this icon to complete installation. Double-click the setup.exe file to locate the setup.exe file from the ASUS PC Probe II folder. The D r i v e r s installation tab appears if your computer, browse the...
Vintage-AH1 User's Manual for English Edtion
Page 52
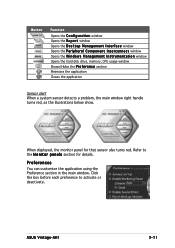
... or deactivate. ASUS Vintage-AH1 3-11 Click the box before each preference to the M o n i t o r p a n e l s section for that sensor also turns red. When displayed, the monitor panel for details. Preferences You can customize the application using the Preference section in the main window. Button Function Opens the C o n f i g u r a t i o n window Opens the R e p o r t window Opens the D e s k t o p M a n a g e m e n t I n t e r f a c e window Opens the P e r i p h e r a l C o m p o n e n t I n t e r c o n n e c t window Opens the...
... or deactivate. ASUS Vintage-AH1 3-11 Click the box before each preference to the M o n i t o r p a n e l s section for that sensor also turns red. When displayed, the monitor panel for details. Preferences You can customize the application using the Preference section in the main window. Button Function Opens the C o n f i g u r a t i o n window Opens the R e p o r t window Opens the D e s k t o p M a n a g e m e n t I n t e r f a c e window Opens the P e r i p h e r a l C o m p o n e n t I n t e r c o n n e c t window Opens the...

Vintage-AH1 User's Manual for English Edtion
Page 53
... panels All monitor panels move or reposition the panel independently. Click O K when finished. Adjusting the sensor threshold value You can now move together using the C o n f i g window. Click to increase value Click to detach a monitor panel from the P r e f e r e n c e section, the monitor panels appear on your computer's desktop. When you want to decrease...
... panels All monitor panels move or reposition the panel independently. Click O K when finished. Adjusting the sensor threshold value You can now move together using the C o n f i g window. Click to increase value Click to detach a monitor panel from the P r e f e r e n c e section, the monitor panels appear on your computer's desktop. When you want to decrease...

Vintage-AH1 User's Manual for English Edtion
Page 54
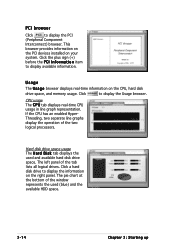
... display on the right panel. ASUS Vintage-AH1 3-13 Click the plus sign (+) before W M I I n f o r m a t i o n to display the available information. Click the plus sign (+) before D M I I n f o r m a t i o n to display the available information. This browser displays various desktop and system information. Click an item from the left panel to display the WMI (Windows Management Instrumentation) browser. DMI browser...
... display on the right panel. ASUS Vintage-AH1 3-13 Click the plus sign (+) before W M I I n f o r m a t i o n to display the available information. Click the plus sign (+) before D M I I n f o r m a t i o n to display the available information. This browser displays various desktop and system information. Click an item from the left panel to display the WMI (Windows Management Instrumentation) browser. DMI browser...
Vintage-AH1 User's Manual for English Edtion
Page 55
... the CPU, hard disk drive space, and memory usage. Click a hard disk drive to display available information. The pie chart at the bottom of the window represents the used and available hard disk drive space. If the CPU has an enabled HyperThreading, two separate line graphs display the operation of the...
... the CPU, hard disk drive space, and memory usage. Click a hard disk drive to display available information. The pie chart at the bottom of the window represents the used and available hard disk drive space. If the CPU has an enabled HyperThreading, two separate line graphs display the operation of the...
Vintage-AH1 User's Manual for English Edtion
Page 56
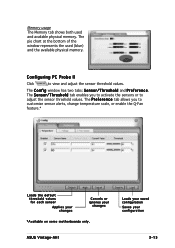
... the default threshold values for each sensor Applies your changes Cancels or ignores your configuration ASUS Vintage-AH1 3-15 The pie chart at the bottom of the window represents the used and available physical memory. Memory usage The Memory tab shows both used... (blue) and the available physical memory. Loads your saved configuration Saves your changes *Available on some motherboards only. The C o n f i g window has two tabs: S e n s o r / T h r e s h o l d and P r e f e r e n c e. The P r e f e r e n c e tab allows you to activate the sensors...
... the default threshold values for each sensor Applies your changes Cancels or ignores your configuration ASUS Vintage-AH1 3-15 The pie chart at the bottom of the window represents the used and available physical memory. Memory usage The Memory tab shows both used... (blue) and the available physical memory. Loads your saved configuration Saves your changes *Available on some motherboards only. The C o n f i g window has two tabs: S e n s o r / T h r e s h o l d and P r e f e r e n c e. The P r e f e r e n c e tab allows you to activate the sensors...
Vintage-AH1 User's Manual for English Edtion
Page 57
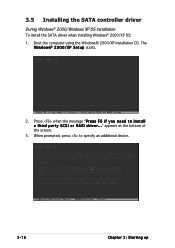
Boot the computer using the Windows® 2000/XP installation CD. appears at the bottom of the screen. 3. Press when the message "P r e s s F 6 i f y o u n e e d t o i n s t a l l a t h i r d p a r t y S C S I o r R A I D d r i v e r . . ." When prompted, press to specify an additional device. 3-16 Chapter 3: Starting up 3.5 Installing the SATA controller driver During Windows® 2000/Windows XP OS installation To install the SATA driver when installing Windows® 2000/XP OS: 1. The W i n d o w s® 2 0 0 0 / X P S e t u p starts. 2.
Boot the computer using the Windows® 2000/XP installation CD. appears at the bottom of the screen. 3. Press when the message "P r e s s F 6 i f y o u n e e d t o i n s t a l l a t h i r d p a r t y S C S I o r R A I D d r i v e r . . ." When prompted, press to specify an additional device. 3-16 Chapter 3: Starting up 3.5 Installing the SATA controller driver During Windows® 2000/Windows XP OS installation To install the SATA driver when installing Windows® 2000/XP OS: 1. The W i n d o w s® 2 0 0 0 / X P S e t u p starts. 2.
Vintage-AH1 User's Manual for English Edtion
Page 59
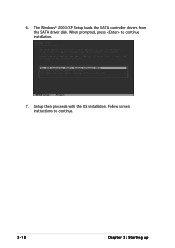
When prompted, press to continue. 3-18 Chapter 3: Starting up Setup then proceeds with the OS installation. 6. The Windows® 2000/XP Setup loads the SATA controller drivers from the SATA driver disk. Follow screen instructions to continue installation. 7.
When prompted, press to continue. 3-18 Chapter 3: Starting up Setup then proceeds with the OS installation. 6. The Windows® 2000/XP Setup loads the SATA controller drivers from the SATA driver disk. Follow screen instructions to continue installation. 7.

Vintage-AH1 User's Manual for English Edtion
Page 66
... RSATA_RXN1 RSATA_RXP1 GND RSATA_TXN1 RSATA_TXP1 GND SATA connectors Important notes on Serial ATA • You must install Windows® 2000 Service Pack 4 or the Windows® XP Service Pack1 before using Serial ATA hard disk drives. • When using the connectors in...the fan connectors! Serial ATA connectors (7-pin SATA1, SATA2) These connectors are not jumpers! CPU_FAN Rotation +12V GND ® Fan connectors ASUS Vintage-AH1 CHA_FAN GND +12V Rotation 4-7 3 . Insufficient air flow inside the system may damage the motherboard components. CPU and Chassis Fan connectors (3-pin...
... RSATA_RXN1 RSATA_RXP1 GND RSATA_TXN1 RSATA_TXP1 GND SATA connectors Important notes on Serial ATA • You must install Windows® 2000 Service Pack 4 or the Windows® XP Service Pack1 before using Serial ATA hard disk drives. • When using the connectors in...the fan connectors! Serial ATA connectors (7-pin SATA1, SATA2) These connectors are not jumpers! CPU_FAN Rotation +12V GND ® Fan connectors ASUS Vintage-AH1 CHA_FAN GND +12V Rotation 4-7 3 . Insufficient air flow inside the system may damage the motherboard components. CPU and Chassis Fan connectors (3-pin...
Vintage-AH1 User's Manual for English Edtion
Page 75
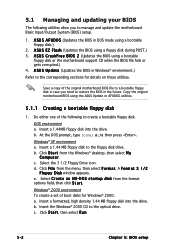
...Windows® XP environment a. Click F i l e from the Windows® desktop, then select M y C o m p u t e r. Select C r e a t e a n M S - Insert a formatted, high density 1.44 MB floppy disk into the drive. Click S t a r t, then select R u n. 5-2 Chapter 5: BIOS setup A S U S E Z F l a s h (Updates the BIOS using the ASUS... select F o r m a t. D O S s t a r t u p d i s k from the format options field, then click S t a r t. Windows® 2000 environment To create a set of the original motherboard BIOS file to a bootable floppy disk in case you to the floppy disk drive. Insert...
...Windows® XP environment a. Click F i l e from the Windows® desktop, then select M y C o m p u t e r. Select C r e a t e a n M S - Insert a formatted, high density 1.44 MB floppy disk into the drive. Click S t a r t, then select R u n. 5-2 Chapter 5: BIOS setup A S U S E Z F l a s h (Updates the BIOS using the ASUS... select F o r m a t. D O S s t a r t u p d i s k from the format options field, then click S t a r t. Windows® 2000 environment To create a set of the original motherboard BIOS file to a bootable floppy disk in case you to the floppy disk drive. Insert...
Vintage-AH1 User's Manual for English Edtion
Page 81
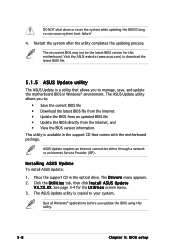
... U p d a t e V X . Doing so can cause system boot failure! 4. This utility is a utility that comes with the motherboard package. Place the support CD in Windows® environment. The ASUS Update utility is copied to : • Save the current BIOS file • Download the latest BIOS file from the Internet • Update the BIOS... The recovered BIOS may not be the latest BIOS version for the U t i l i t i e s screen menu. 3. Quit all Windows® applications before you to your system. DO NOT shut down or reset the system while updating the BIOS! X X . Restart the system ...
... U p d a t e V X . Doing so can cause system boot failure! 4. This utility is a utility that comes with the motherboard package. Place the support CD in Windows® environment. The ASUS Update utility is copied to : • Save the current BIOS file • Download the latest BIOS file from the Internet • Update the BIOS... The recovered BIOS may not be the latest BIOS version for the U t i l i t i e s screen menu. 3. Quit all Windows® applications before you to your system. DO NOT shut down or reset the system while updating the BIOS! X X . Restart the system ...
Vintage-AH1 User's Manual for English Edtion
Page 82
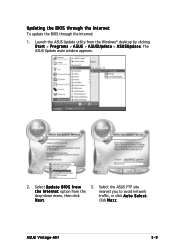
ASUS Vintage-AH1 5-9 Select the ASUS FTP site t h e I O S f r o m 3. N e x t. Updating the BIOS through the Internet To update the BIOS through the Internet: 1. Launch the ASUS Update utility from the nearest you to avoid network drop-down menu, then click traffic, or click A u t o S e l e c t. The ASUS Update main window appears. 2. Click N e x t. Select U p d a t e B I n t e r n e t option from the Windows® desktop by clicking S t a r t > P r o g r a m s > A S U S > A S U S U p d a t e > A S U S U p d a t e.
ASUS Vintage-AH1 5-9 Select the ASUS FTP site t h e I O S f r o m 3. N e x t. Updating the BIOS through the Internet To update the BIOS through the Internet: 1. Launch the ASUS Update utility from the nearest you to avoid network drop-down menu, then click traffic, or click A u t o S e l e c t. The ASUS Update main window appears. 2. Click N e x t. Select U p d a t e B I n t e r n e t option from the Windows® desktop by clicking S t a r t > P r o g r a m s > A S U S > A S U S U p d a t e > A S U S U p d a t e.
Vintage-AH1 User's Manual for English Edtion
Page 83
... utility is capable of updating itself through a BIOS file: 1. Launch the ASUS Update utility from the drop-down menu, then click N e x t. 3. Click Next. 5. The ASUS Update main window appears. 2. Select U p d a t e B I O S f r o m a f i l e option from the Windows® desktop by clicking S t a r t > P r o g r a m s > A S U S > A S U S U p d a t e > A S U S U p d a t e. Updating the BIOS through a BIOS file To update the BIOS through the Internet. 4. Follow the screen...
... utility is capable of updating itself through a BIOS file: 1. Launch the ASUS Update utility from the drop-down menu, then click N e x t. 3. Click Next. 5. The ASUS Update main window appears. 2. Select U p d a t e B I O S f r o m a f i l e option from the Windows® desktop by clicking S t a r t > P r o g r a m s > A S U S > A S U S U p d a t e > A S U S U p d a t e. Updating the BIOS through a BIOS file To update the BIOS through the Internet. 4. Follow the screen...