Vintage-AH1 User's Manual for English Edtion
Page 4
... 3: Starting up 3.1 Installing an operating system 3-2 3.2 Powering up 3-2 3.3 Support CD information 3-2 3.3.1 Running the support CD 3-3 3.3.2 Utilities menu 3-4 3.3.3 ASUS Contact information 3-5 3.4 Software information 3-6 3.4.1 Cool 'n' Quiet!™ Technology 3-6 3.4.2 ASUS Update 3-8 3.4.3 ASUS PC Probe II 3-10 3.5 Installing the SATA controller driver 3-16 Chapter 4: Motherboard Info 4.1 Introduction 4-2 4.2 Motherboard layout 4-2 4.3 Jumpers 4-3 4.4 Connectors 4-6 Chapter 5: BIOS Information 5.1 Managing and updating your BIOS...
... 3: Starting up 3.1 Installing an operating system 3-2 3.2 Powering up 3-2 3.3 Support CD information 3-2 3.3.1 Running the support CD 3-3 3.3.2 Utilities menu 3-4 3.3.3 ASUS Contact information 3-5 3.4 Software information 3-6 3.4.1 Cool 'n' Quiet!™ Technology 3-6 3.4.2 ASUS Update 3-8 3.4.3 ASUS PC Probe II 3-10 3.5 Installing the SATA controller driver 3-16 Chapter 4: Motherboard Info 4.1 Introduction 4-2 4.2 Motherboard layout 4-2 4.3 Jumpers 4-3 4.4 Connectors 4-6 Chapter 5: BIOS Information 5.1 Managing and updating your BIOS...
Vintage-AH1 User's Manual for English Edtion
Page 31
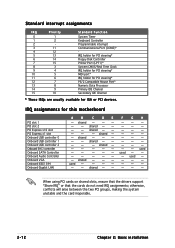
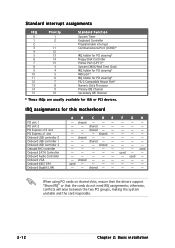
... PCI groups, making the system unstable and the card inoperable. 2-12 Chapter 2: Basic installation shared - - - - - When using PCI cards on shared slots, ensure that the drivers support "Share IRQ" or that the cards do not need IRQ assignments; shared - - - - G used - - - - H used - - -- - - used - - - - - Standard interrupt assignments IRQ Priority...Onboard USB controller 0 Onboard USB controller 1 Onboard USB controller 2 Onboard EHCI controller Onboard SATA Controller Onboard Audio Controller Onboard VGA Onboard IEEE1394 Onboard Gigabit LAN A B C D E -
... PCI groups, making the system unstable and the card inoperable. 2-12 Chapter 2: Basic installation shared - - - - - When using PCI cards on shared slots, ensure that the drivers support "Share IRQ" or that the cards do not need IRQ assignments; shared - - - - G used - - - - H used - - -- - - used - - - - - Standard interrupt assignments IRQ Priority...Onboard USB controller 0 Onboard USB controller 1 Onboard USB controller 2 Onboard EHCI controller Onboard SATA Controller Onboard Audio Controller Onboard VGA Onboard IEEE1394 Onboard Gigabit LAN A B C D E -
Vintage-AH1 User's Manual for English Edtion
Page 43
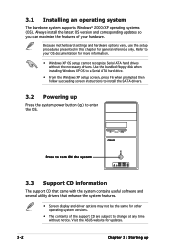
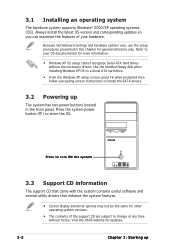
...version and corresponding updates so you can maximize the features of the support CD are subject to change at any time without the necessary drivers. Press to your hardware. Refer to turn ON the system 3.3 Support CD information The support CD that came with the system contains...versions. • The contents of your OS documentation for updates. 3-2 Chapter 3: Starting up Press the system power button ( ) to install the SATA drivers. 3.2 Powering up Visit the ASUS website for more information. • Windows XP OS setup cannot recognize Serial ATA hard drives without notice.
...version and corresponding updates so you can maximize the features of the support CD are subject to change at any time without the necessary drivers. Press to your hardware. Refer to turn ON the system 3.3 Support CD information The support CD that came with the system contains...versions. • The contents of your OS documentation for updates. 3-2 Chapter 3: Starting up Press the system power button ( ) to install the SATA drivers. 3.2 Powering up Visit the ASUS website for more information. • Windows XP OS setup cannot recognize Serial ATA hard drives without notice.
Vintage-AH1 User's Manual for English Edtion
Page 44
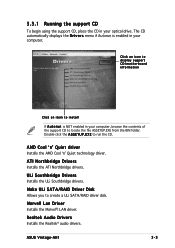
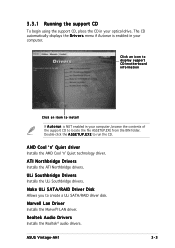
...® audio drivers. ASUS Vintage-AH1 3-3 Click an icon to display support CD/motherboard information Click an item to install If A u t o r u n is enabled in your optical drive. The CD automatically displays the D r i v e r s menu if Autorun is NOT enabled in your computer, browse the contents of the support CD to create a ULi SATA/RAID driver disk. AMD...
...® audio drivers. ASUS Vintage-AH1 3-3 Click an icon to display support CD/motherboard information Click an item to install If A u t o r u n is enabled in your optical drive. The CD automatically displays the D r i v e r s menu if Autorun is NOT enabled in your computer, browse the contents of the support CD to create a ULi SATA/RAID driver disk. AMD...
Vintage-AH1 User's Manual for English Edtion
Page 57
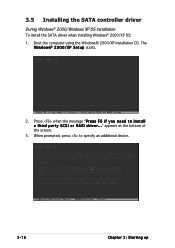
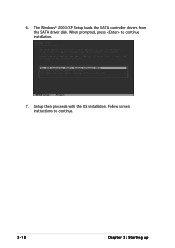
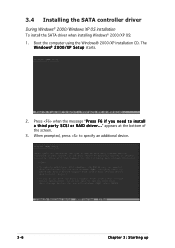
The W i n d o w s® 2 0 0 0 / X P S e t u p starts. 2. Press when the message "P r e s s F 6 i f y o u n e e d t o i n s t a l l a t h i r d p a r t y S C S I o r R A I D d r i v e r . . ." Boot the computer using the Windows® 2000/XP installation CD. When prompted, press to specify an additional device. 3-16 Chapter 3: Starting up 3.5 Installing the SATA controller driver During Windows® 2000/Windows XP OS installation To install the SATA driver when installing Windows® 2000/XP OS: 1. appears at the bottom of the screen. 3.
The W i n d o w s® 2 0 0 0 / X P S e t u p starts. 2. Press when the message "P r e s s F 6 i f y o u n e e d t o i n s t a l l a t h i r d p a r t y S C S I o r R A I D d r i v e r . . ." Boot the computer using the Windows® 2000/XP installation CD. When prompted, press to specify an additional device. 3-16 Chapter 3: Starting up 3.5 Installing the SATA controller driver During Windows® 2000/Windows XP OS installation To install the SATA driver when installing Windows® 2000/XP OS: 1. appears at the bottom of the screen. 3.
Vintage-AH1 User's Manual for English Edtion
Page 59
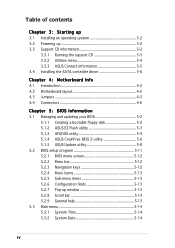
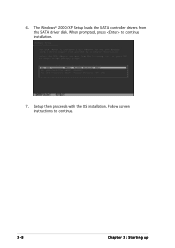
6. Follow screen instructions to continue installation. 7. Setup then proceeds with the OS installation. The Windows® 2000/XP Setup loads the SATA controller drivers from the SATA driver disk. When prompted, press to continue. 3-18 Chapter 3: Starting up
6. Follow screen instructions to continue installation. 7. Setup then proceeds with the OS installation. The Windows® 2000/XP Setup loads the SATA controller drivers from the SATA driver disk. When prompted, press to continue. 3-18 Chapter 3: Starting up
Vintage-AH1 User''s Manual for English Edition
Page 4
... CD information 3-2 3.3.1 Running the support CD 3-3 3.3.2 Utilities menu 3-4 3.3.3 ASUS Contact information 3-5 3.4 Installing the SATA controller driver 3-6 Chapter 4: Motherboard Info 4.1 Introduction 4-2 4.2 Motherboard layout 4-2 4.3 Jumpers 4-3 4.4 Connectors 4-6 Chapter 5: BIOS Information 5.1 Managing and updating your BIOS 5-2 5.1.1 Creating a bootable floppy disk 5-2 5.1.2 ASUS EZ Flash utility 5-3 5.1.3 AFUDOS utility 5-4 5.1.4 ASUS CrashFree BIOS 2 utility 5-6 5.1.5 ASUS Update utility 5-8 5.2 BIOS setup program 5-11 5.2.1 BIOS menu screen...
... CD information 3-2 3.3.1 Running the support CD 3-3 3.3.2 Utilities menu 3-4 3.3.3 ASUS Contact information 3-5 3.4 Installing the SATA controller driver 3-6 Chapter 4: Motherboard Info 4.1 Introduction 4-2 4.2 Motherboard layout 4-2 4.3 Jumpers 4-3 4.4 Connectors 4-6 Chapter 5: BIOS Information 5.1 Managing and updating your BIOS 5-2 5.1.1 Creating a bootable floppy disk 5-2 5.1.2 ASUS EZ Flash utility 5-3 5.1.3 AFUDOS utility 5-4 5.1.4 ASUS CrashFree BIOS 2 utility 5-6 5.1.5 ASUS Update utility 5-8 5.2 BIOS setup program 5-11 5.2.1 BIOS menu screen...
Vintage-AH1 User''s Manual for English Edition
Page 31
shared - - -- - shared - - When using PCI cards on shared slots, ensure that the drivers support "Share IRQ" or that the cards do not need IRQ assignments; Standard interrupt assignments IRQ Priority 0 1 1 2 2 - 3 11 4 12 5 13 6 ... PCI slot 1 PCI slot 2 PCI Express x16 slot PCI Express x1 slot Onboard USB controller 0 Onboard USB controller 1 Onboard USB controller 2 Onboard EHCI controller Onboard SATA Controller Onboard Audio Controller Onboard VGA Onboard IEEE1394 Onboard Gigabit LAN A B C D E - shared - - - - - shared - -- - -- -- - -- -- - -- - used - - -...
shared - - -- - shared - - When using PCI cards on shared slots, ensure that the drivers support "Share IRQ" or that the cards do not need IRQ assignments; Standard interrupt assignments IRQ Priority 0 1 1 2 2 - 3 11 4 12 5 13 6 ... PCI slot 1 PCI slot 2 PCI Express x16 slot PCI Express x1 slot Onboard USB controller 0 Onboard USB controller 1 Onboard USB controller 2 Onboard EHCI controller Onboard SATA Controller Onboard Audio Controller Onboard VGA Onboard IEEE1394 Onboard Gigabit LAN A B C D E - shared - - - - - shared - -- - -- -- - -- -- - -- - used - - -...
Vintage-AH1 User''s Manual for English Edition
Page 43
... prompted then follow succeeding screen instructions to your hardware. Refer to install the SATA drivers. 3.2 Powering up Press the system power button ( ) to change at any time without the necessary drivers. Visit the ASUS website for updates. 3-2 Chapter 3: Starting up The system has two power buttons... Support CD information The support CD that came with the system contains useful software and several utility drivers that enhance the system features. • Screen display and driver options may not be the same for other operating system versions. • The contents of your...
... prompted then follow succeeding screen instructions to your hardware. Refer to install the SATA drivers. 3.2 Powering up Press the system power button ( ) to change at any time without the necessary drivers. Visit the ASUS website for updates. 3-2 Chapter 3: Starting up The system has two power buttons... Support CD information The support CD that came with the system contains useful software and several utility drivers that enhance the system features. • Screen display and driver options may not be the same for other operating system versions. • The contents of your...
Vintage-AH1 User''s Manual for English Edition
Page 44
... the file ASSETUP.EXE from the BIN folder. ULi Southbridge Drivers Installs the ULi Southbridge drivers. Realtek Audio Drivers Installs the Realtek® audio drivers. Make ULi SATA/RAID Driver Disk Allows you to run the CD. Click an icon ...t o r u n is enabled in your optical drive. E X E to create a ULi SATA/RAID driver disk. ATI Northbridge Drivers Installs the ATI Northbridge drivers. Double-click the A S S E T U P . Marvell Lan Driver Installs the Marvel®l LAN driver. ASUS Vintage-AH1 3-3 The CD automatically displays the D r i v e r s menu if Autorun is NOT ...
... the file ASSETUP.EXE from the BIN folder. ULi Southbridge Drivers Installs the ULi Southbridge drivers. Realtek Audio Drivers Installs the Realtek® audio drivers. Make ULi SATA/RAID Driver Disk Allows you to run the CD. Click an icon ...t o r u n is enabled in your optical drive. E X E to create a ULi SATA/RAID driver disk. ATI Northbridge Drivers Installs the ATI Northbridge drivers. Double-click the A S S E T U P . Marvell Lan Driver Installs the Marvel®l LAN driver. ASUS Vintage-AH1 3-3 The CD automatically displays the D r i v e r s menu if Autorun is NOT ...
Vintage-AH1 User''s Manual for English Edition
Page 47
The W i n d o w s® 2 0 0 0 / X P S e t u p starts. 2. When prompted, press to specify an additional device. 3-6 Chapter 3: Starting up Press when the message "P r e s s F 6 i f y o u n e e d t o i n s t a l l a t h i r d p a r t y S C S I o r R A I D d r i v e r . . ." appears at the bottom of the screen. 3. Boot the computer using the Windows® 2000/XP installation CD. 3.4 Installing the SATA controller driver During Windows® 2000/Windows XP OS installation To install the SATA driver when installing Windows® 2000/XP OS: 1.
The W i n d o w s® 2 0 0 0 / X P S e t u p starts. 2. When prompted, press to specify an additional device. 3-6 Chapter 3: Starting up Press when the message "P r e s s F 6 i f y o u n e e d t o i n s t a l l a t h i r d p a r t y S C S I o r R A I D d r i v e r . . ." appears at the bottom of the screen. 3. Boot the computer using the Windows® 2000/XP installation CD. 3.4 Installing the SATA controller driver During Windows® 2000/Windows XP OS installation To install the SATA driver when installing Windows® 2000/XP OS: 1.
Vintage-AH1 User''s Manual for English Edition
Page 49
The Windows® 2000/XP Setup loads the SATA controller drivers from the SATA driver disk. Setup then proceeds with the OS installation. Follow screen instructions to continue installation. 7. When prompted, press to continue. 3-8 Chapter 3: Starting up 6.
The Windows® 2000/XP Setup loads the SATA controller drivers from the SATA driver disk. Setup then proceeds with the OS installation. Follow screen instructions to continue installation. 7. When prompted, press to continue. 3-8 Chapter 3: Starting up 6.