Vintage-AH1 User's Manual for English Edtion
Page 12
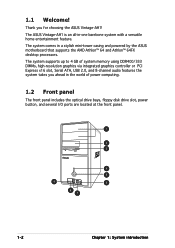
...™ 64FX desktop processors. The system comes in the world of system memory using DDR400/333 DIMMs, high-resolution graphics via integrated graphics controller or PCI Express x16 slot, Serial ATA, USB 2.0, and 8-channel audio features the system takes you for choosing the ASUS Vintage-AH1! The system supports...bays, floppy disk drive slot, power button, and several I/O ports are located at the front panel. 1 2 3 4 5 9 6 8 7 1-2 Chapter 1: System introduction The ASUS Vintage-AH1 is an all-in-one barebone system with a versatile home entertainment feature. 1.1 Welcome!
...™ 64FX desktop processors. The system comes in the world of system memory using DDR400/333 DIMMs, high-resolution graphics via integrated graphics controller or PCI Express x16 slot, Serial ATA, USB 2.0, and 8-channel audio features the system takes you for choosing the ASUS Vintage-AH1! The system supports...bays, floppy disk drive slot, power button, and several I/O ports are located at the front panel. 1 2 3 4 5 9 6 8 7 1-2 Chapter 1: System introduction The ASUS Vintage-AH1 is an all-in-one barebone system with a versatile home entertainment feature. 1.1 Welcome!
Vintage-AH1 User's Manual for English Edtion
Page 51
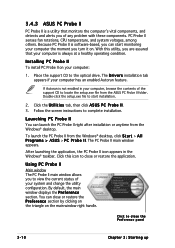
... PC Probe II icon appears in your computer, browse the contents of the support CD to locate the setup.exe file from the Windows® desktop, click S t a r t > A l l P r o g r a m s > A S U S > P C P r o b e I I . 3. By default, the main window displays the P r e f e r e n c e section. Place the support CD to complete installation. Double-click the ..., and detects and alerts you can launch the PC Probe II right after installation or anytime from the Windows® desktop. 3.4.3 ASUS PC Probe II PC Probe II is a utility that your computer is always at a healthy operating condition.
... PC Probe II icon appears in your computer, browse the contents of the support CD to locate the setup.exe file from the Windows® desktop, click S t a r t > A l l P r o g r a m s > A S U S > P C P r o b e I I . 3. By default, the main window displays the P r e f e r e n c e section. Place the support CD to complete installation. Double-click the ..., and detects and alerts you can launch the PC Probe II right after installation or anytime from the Windows® desktop. 3.4.3 ASUS PC Probe II PC Probe II is a utility that your computer is always at a healthy operating condition.

Vintage-AH1 User's Manual for English Edtion
Page 53
... Starting up Moving the monitor panels All monitor panels move or reposition the panel independently. You can adjust the sensor threshold value in the desktop, click the arrow down button of the S c h e m e options, then select another position from the list box. The ...to increase value Click to detach a monitor panel from the P r e f e r e n c e section, the monitor panels appear on your computer's desktop. Click O K when finished. You cannot adjust the sensor threshold values in two display modes: hexagonal (large) and rectangular (small). Large display Small display Changing...
... Starting up Moving the monitor panels All monitor panels move or reposition the panel independently. You can adjust the sensor threshold value in the desktop, click the arrow down button of the S c h e m e options, then select another position from the list box. The ...to increase value Click to detach a monitor panel from the P r e f e r e n c e section, the monitor panels appear on your computer's desktop. Click O K when finished. You cannot adjust the sensor threshold values in two display modes: hexagonal (large) and rectangular (small). Large display Small display Changing...

Vintage-AH1 User's Manual for English Edtion
Page 54
... Click to display the available information. Click the plus sign (+) before W M I I n f o r m a t i o n to display the DMI (Desktop Management Interface) browser. This browser displays various Windows® management information. This browser displays various desktop and system information. DMI browser Click to display the available information. Click the plus sign (+) before D M I I n f o r m a t i o ... a component value exceeds or is lower than the threshold value. Click an item from the left panel to the illustrations below. ASUS Vintage-AH1 3-13
... Click to display the available information. Click the plus sign (+) before W M I I n f o r m a t i o n to display the DMI (Desktop Management Interface) browser. This browser displays various Windows® management information. This browser displays various desktop and system information. DMI browser Click to display the available information. Click the plus sign (+) before D M I I n f o r m a t i o ... a component value exceeds or is lower than the threshold value. Click an item from the left panel to the illustrations below. ASUS Vintage-AH1 3-13
Vintage-AH1 User's Manual for English Edtion
Page 75
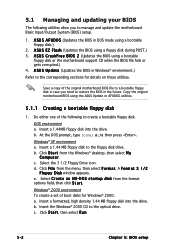
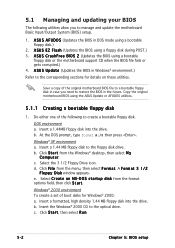
A S U S C r a s h F r e e B I O S 2 (Updates the BIOS using the ASUS Update or AFUDOS utilities. 5.1.1 Creating a bootable floppy disk 1. At the DOS prompt, type format A:/S then press . Select the 3 1/2 Floppy Drive icon. d. Click F i l e from the Windows® desktop, then select M y C o m p u t e r. Insert a formatted, high density 1.44 MB floppy disk into the drive. Click S t a r t, then select R u n. 5-2 Chapter 5: BIOS setup A S U S U p d a t e (Updates...
A S U S C r a s h F r e e B I O S 2 (Updates the BIOS using the ASUS Update or AFUDOS utilities. 5.1.1 Creating a bootable floppy disk 1. At the DOS prompt, type format A:/S then press . Select the 3 1/2 Floppy Drive icon. d. Click F i l e from the Windows® desktop, then select M y C o m p u t e r. Insert a formatted, high density 1.44 MB floppy disk into the drive. Click S t a r t, then select R u n. 5-2 Chapter 5: BIOS setup A S U S U p d a t e (Updates...
Vintage-AH1 User's Manual for English Edtion
Page 82
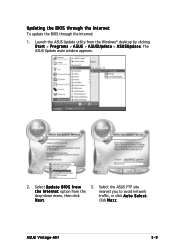
N e x t. ASUS Vintage-AH1 5-9 Select U p d a t e B I n t e r n e t option from the Windows® desktop by clicking S t a r t > P r o g r a m s > A S U S > A S U S U p d a t e > A S U S U p d a t e. Click N e x t. The ASUS Update main window appears. 2. Select the ASUS FTP site t h e I O S f r o m 3. Updating the BIOS through the Internet To update the BIOS through the Internet: 1. Launch the ASUS Update utility from the nearest you to avoid network drop-down menu, then click traffic, or click A u t o S e l e c t.
N e x t. ASUS Vintage-AH1 5-9 Select U p d a t e B I n t e r n e t option from the Windows® desktop by clicking S t a r t > P r o g r a m s > A S U S > A S U S U p d a t e > A S U S U p d a t e. Click N e x t. The ASUS Update main window appears. 2. Select the ASUS FTP site t h e I O S f r o m 3. Updating the BIOS through the Internet To update the BIOS through the Internet: 1. Launch the ASUS Update utility from the nearest you to avoid network drop-down menu, then click traffic, or click A u t o S e l e c t.
Vintage-AH1 User's Manual for English Edtion
Page 83
... To update the BIOS through the Internet. Follow the screen instructions to complete the update process. 4. Launch the ASUS Update utility from the drop-down menu, then click N e x t. 3. Select U p d a t e B I O S f r o m a f i l e option from the Windows® desktop by clicking S t a r t > P r o g r a m s > A S U S > A S U S U p d a t e > A S U S U p d a t e. Locate the BIOS file from the O p e n window, then click O p e n. 4. Click Next. 5. Follow the screen instructions...
... To update the BIOS through the Internet. Follow the screen instructions to complete the update process. 4. Launch the ASUS Update utility from the drop-down menu, then click N e x t. 3. Select U p d a t e B I O S f r o m a f i l e option from the Windows® desktop by clicking S t a r t > P r o g r a m s > A S U S > A S U S U p d a t e > A S U S U p d a t e. Locate the BIOS file from the O p e n window, then click O p e n. 4. Click Next. 5. Follow the screen instructions...

Vintage-AH1 User''s Manual for English Edition
Page 12
1.1 Welcome! Thank you ahead in a stylish mini-tower casing and powered by the ASUS motherboard that supports the AMD Athlon™ 64 and Athlon™ 64FX desktop processors. The system comes in the world of power computing. 1.2 Front panel The front panel includes the optical drive bays, floppy disk drive slot... via integrated graphics controller or PCI Express x16 slot, Serial ATA, USB 2.0, and 8-channel audio features the system takes you for choosing the ASUS Vintage-AH1! The ASUS Vintage-AH1 is an all-in-one barebone system with a versatile home entertainment feature.
1.1 Welcome! Thank you ahead in a stylish mini-tower casing and powered by the ASUS motherboard that supports the AMD Athlon™ 64 and Athlon™ 64FX desktop processors. The system comes in the world of power computing. 1.2 Front panel The front panel includes the optical drive bays, floppy disk drive slot... via integrated graphics controller or PCI Express x16 slot, Serial ATA, USB 2.0, and 8-channel audio features the system takes you for choosing the ASUS Vintage-AH1! The ASUS Vintage-AH1 is an all-in-one barebone system with a versatile home entertainment feature.
Vintage-AH1 User''s Manual for English Edition
Page 65
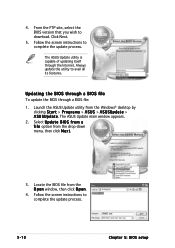
... disk in case you to manage and update the motherboard Basic Input/Output System (BIOS) setup. 1. Click F i l e from the Windows® desktop, then select M y C o m p u t e r. Insert the Windows® 2000 CD to the floppy disk drive. 5.1 Managing and updating... a. b. Click S t a r t, then select R u n. 5-2 Chapter 5: BIOS setup A S U S C r a s h F r e e B I O S 2 (Updates the BIOS using the ASUS Update or AFUDOS utilities. 5.1.1 Creating a bootable floppy disk 1. Insert a 1.44MB floppy disk into the drive. At the DOS prompt, type format A:/S then press . Windows®...
... disk in case you to manage and update the motherboard Basic Input/Output System (BIOS) setup. 1. Click F i l e from the Windows® desktop, then select M y C o m p u t e r. Insert the Windows® 2000 CD to the floppy disk drive. 5.1 Managing and updating... a. b. Click S t a r t, then select R u n. 5-2 Chapter 5: BIOS setup A S U S C r a s h F r e e B I O S 2 (Updates the BIOS using the ASUS Update or AFUDOS utilities. 5.1.1 Creating a bootable floppy disk 1. Insert a 1.44MB floppy disk into the drive. At the DOS prompt, type format A:/S then press . Windows®...

Vintage-AH1 User''s Manual for English Edition
Page 72
The ASUS Update main window appears. 2. Click N e x t. Select the ASUS FTP site t h e I O S f r o m 3. ASUS Vintage-AH1 5-9 Updating the BIOS through the Internet To update the BIOS through the Internet: 1. Select U p d a t e B I n t e r n e t option from the Windows® desktop by clicking S t a r t > P r o g r a m s > A S U S > A S U S U p d a t e > A S U S U p d a t e. N e x t. Launch the ASUS Update utility from the nearest you to avoid network drop-down menu, then click traffic, or click A u t o S e l e c t.
The ASUS Update main window appears. 2. Click N e x t. Select the ASUS FTP site t h e I O S f r o m 3. ASUS Vintage-AH1 5-9 Updating the BIOS through the Internet To update the BIOS through the Internet: 1. Select U p d a t e B I n t e r n e t option from the Windows® desktop by clicking S t a r t > P r o g r a m s > A S U S > A S U S U p d a t e > A S U S U p d a t e. N e x t. Launch the ASUS Update utility from the nearest you to avoid network drop-down menu, then click traffic, or click A u t o S e l e c t.

Vintage-AH1 User''s Manual for English Edition
Page 73
Click Next. 5. Updating the BIOS through a BIOS file To update the BIOS through the Internet. The ASUS Update main window appears. 2. Locate the BIOS file from the Windows® desktop by clicking S t a r t > P r o g r a m s > A S U S > A S U S U p d a t e > A S U S U p d a t e. 4. The ASUS Update utility is capable of updating itself through a BIOS file: 1. Follow the screen instructions to avail all its features. Always...
Click Next. 5. Updating the BIOS through a BIOS file To update the BIOS through the Internet. The ASUS Update main window appears. 2. Locate the BIOS file from the Windows® desktop by clicking S t a r t > P r o g r a m s > A S U S > A S U S U p d a t e > A S U S U p d a t e. 4. The ASUS Update utility is capable of updating itself through a BIOS file: 1. Follow the screen instructions to avail all its features. Always...