VE228D User's Manual
Page 9
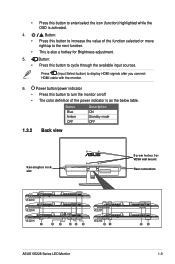
... Description ON Standby mode OFF 1.3.2 Back view Kensington lock slot Screw holes for Brightness adjustment. 5. Button: • Press this button to display HDMI signals after you connect HDMI cable with the monitor. 6. Press (Input Select button) to cycle through the available input sources. • Press this button to enter/select.... 4. • • Button: Press this button to increase the value of the power indicator is also a hotkey for VESA wall mount Rear connectors VE228D VE228N VE228H 1 23 45 6 VE228T VE228S 31 56 ASUS VE228 Series LED Monitor 1-3
... Description ON Standby mode OFF 1.3.2 Back view Kensington lock slot Screw holes for Brightness adjustment. 5. Button: • Press this button to display HDMI signals after you connect HDMI cable with the monitor. 6. Press (Input Select button) to cycle through the available input sources. • Press this button to enter/select.... 4. • • Button: Press this button to increase the value of the power indicator is also a hotkey for VESA wall mount Rear connectors VE228D VE228N VE228H 1 23 45 6 VE228T VE228S 31 56 ASUS VE228 Series LED Monitor 1-3

VE228D User's Manual
Page 13
... to the monitor's earphone jack. Gather all the cables with plug type to your computer's VGA/DVI/HDMI. Connect the cables as the following instructions: VE228D VE228N VE228H VE228T VE228S Audio-in Earphone jack HDMI VGA Audio-in VGA • To connect the audio cable: connect one end of the audio cable to the... VGA/DVI connector. • To use earphones: connect the end with the cable management slot. Connect the other end to the LED monitor's VGA/DVI/HDMI port. Cable management slot ASUS VE228 Series LED Monitor 2-3 2.4 Connecting the cables 1. b.
... to the monitor's earphone jack. Gather all the cables with plug type to your computer's VGA/DVI/HDMI. Connect the cables as the following instructions: VE228D VE228N VE228H VE228T VE228S Audio-in Earphone jack HDMI VGA Audio-in VGA • To connect the audio cable: connect one end of the audio cable to the... VGA/DVI connector. • To use earphones: connect the end with the cable management slot. Connect the other end to the LED monitor's VGA/DVI/HDMI port. Cable management slot ASUS VE228 Series LED Monitor 2-3 2.4 Connecting the cables 1. b.
VE228D User's Manual
Page 18
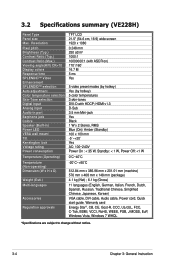
HDMI v1.3 D-Sub 3.5 mm Mini-jack Yes Black 1 W x 2 Stereo, RMS Blue (On)/ Amber (Standby) 100 x 100 mm -5˚~+20˚ Yes AC: 100~240V Power On : < 5 W, ... on) 170˚/160˚ 16.7 M 5 ms Yes 5 video preset modes (by hotkey) Yes (by hotkey) 5 color temperatures 3 skin-tones DVI-D with HDCP; 3.2 Specifications summary (VE228H) Panel Type Panel size Max.
HDMI v1.3 D-Sub 3.5 mm Mini-jack Yes Black 1 W x 2 Stereo, RMS Blue (On)/ Amber (Standby) 100 x 100 mm -5˚~+20˚ Yes AC: 100~240V Power On : < 5 W, ... on) 170˚/160˚ 16.7 M 5 ms Yes 5 video preset modes (by hotkey) Yes (by hotkey) 5 color temperatures 3 skin-tones DVI-D with HDCP; 3.2 Specifications summary (VE228H) Panel Type Panel size Max.


