User Guide
Page 3
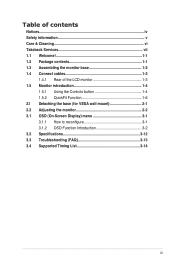
......iv Safety information v Care & Cleaning vi Takeback Services vii 1.1 Welcome 1-1 1.2 Package contents 1-1 1.3 Assembling the monitor base 1-2 1.4 Connect cables 1-3 1.4.1 Rear of the LCD monitor 1-3 1.5 Monitor introduction 1-4 1.5.1 Using the Controls button 1-4 1.5.2 QuickFit Function 1-6 2.1 Detaching the base (for VESA wall mount 2-1 2.2 Adjusting the monitor 2-2 3.1 OSD (On-Screen Display) menu 3-1 3.1.1 How to reconfigure 3-1 3.1.2 OSD Function Introduction 3-2 3.2 Specifications 3-12...
......iv Safety information v Care & Cleaning vi Takeback Services vii 1.1 Welcome 1-1 1.2 Package contents 1-1 1.3 Assembling the monitor base 1-2 1.4 Connect cables 1-3 1.4.1 Rear of the LCD monitor 1-3 1.5 Monitor introduction 1-4 1.5.1 Using the Controls button 1-4 1.5.2 QuickFit Function 1-6 2.1 Detaching the base (for VESA wall mount 2-1 2.2 Adjusting the monitor 2-2 3.1 OSD (On-Screen Display) menu 3-1 3.1.1 How to reconfigure 3-1 3.1.2 OSD Function Introduction 3-2 3.2 Specifications 3-12...

User Guide
Page 5
...heat source unless proper ventilation is broken, do not try to fix it by yourself. Wash hands after handling. The dangerous high voltages inside the monitor may result in fire or electric shock. • Avoid dust, humidity, and temperature extremes. If you are provided for a long period of ...California to the State of time. v Place the monitor on the back or top of the cabinet are not sure of the type of power source indicated on the label. Contact a qualified service technician...
...heat source unless proper ventilation is broken, do not try to fix it by yourself. Wash hands after handling. The dangerous high voltages inside the monitor may result in fire or electric shock. • Avoid dust, humidity, and temperature extremes. If you are provided for a long period of ...California to the State of time. v Place the monitor on the back or top of the cabinet are not sure of the type of power source indicated on the label. Contact a qualified service technician...

User Guide
Page 6
...WARNING: Information to prevent injury to yourself when trying to fix it. Turn your dealer or service center to complete a task. Clean the monitor surface with mild cleaner. • Avoid using a cleaner containing alcohol or acetone. The screen will recover slowly or you MUST follow to ...the screen becomes black or flashes, or cannot work anymore, contact your monitor off the Power Switch and turn it may flicker during the initial use with the monitor: • The screen may drip inside the monitor and cause an electric shock. Never spray cleaner directly on the screen...
...WARNING: Information to prevent injury to yourself when trying to fix it. Turn your dealer or service center to complete a task. Clean the monitor surface with mild cleaner. • Avoid using a cleaner containing alcohol or acetone. The screen will recover slowly or you MUST follow to ...the screen becomes black or flashes, or cannot work anymore, contact your monitor off the Power Switch and turn it may flicker during the initial use with the monitor: • The screen may drip inside the monitor and cause an electric shock. Never spray cleaner directly on the screen...
User Guide
Page 8
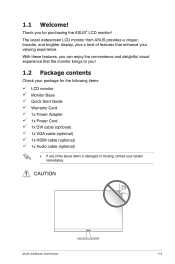
... Series 1-1 Thank you ! 1.2 Package contents Check your retailer immediately. 1.1 Welcome! The latest widescreen LCD monitor from ASUS provides a crisper, broader, and brighter display, plus a host of features that the monitor brings to you for the following items: LCD monitor Monitor Base Quick Start Guide Warranty Card 1x Power Adapter 1x Power Cord 1x DVI cable...
... Series 1-1 Thank you ! 1.2 Package contents Check your retailer immediately. 1.1 Welcome! The latest widescreen LCD monitor from ASUS provides a crisper, broader, and brighter display, plus a host of features that the monitor brings to you for the following items: LCD monitor Monitor Base Quick Start Guide Warranty Card 1x Power Adapter 1x Power Cord 1x DVI cable...

User Guide
Page 9
1.3 Assembling the monitor base 1. Using a coin, turn the screw clockwise to the monitor. 1-2 Chapter 1: Product Introduction Have the front of the monitor face down on a table. 2. Then adjust the monitor to the angle that is most comfortable for you. •• We recommend that you cover the table surface with soft cloth to prevent damage to secure the base. Attach the base to the arm. 3.
1.3 Assembling the monitor base 1. Using a coin, turn the screw clockwise to the monitor. 1-2 Chapter 1: Product Introduction Have the front of the monitor face down on a table. 2. Then adjust the monitor to the angle that is most comfortable for you. •• We recommend that you cover the table surface with soft cloth to prevent damage to secure the base. Attach the base to the arm. 3.
User Guide
Page 10
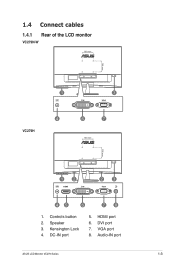
Controls button 2. Speaker 3. VGA port 8. Kensington Lock 4. DVI port 7. DC-IN port 5. 1.4 Connect cables 1.4.1 Rear of the LCD monitor VC279N-W 100 mm 100 mm VC279H 1 4 HDMI DVI VGA 3 DVI VGA 6 7 100 mm 100 mm HDMI DVI VGA 12 HDMI DVI 23 VGA 45 6 78 1. Audio-IN port ASUS LCD Monitor VC279 Series 1-3 HDMI port 6.
Controls button 2. Speaker 3. VGA port 8. Kensington Lock 4. DVI port 7. DC-IN port 5. 1.4 Connect cables 1.4.1 Rear of the LCD monitor VC279N-W 100 mm 100 mm VC279H 1 4 HDMI DVI VGA 3 DVI VGA 6 7 100 mm 100 mm HDMI DVI VGA 12 HDMI DVI 23 VGA 45 6 78 1. Audio-IN port ASUS LCD Monitor VC279 Series 1-3 HDMI port 6.
User Guide
Page 11
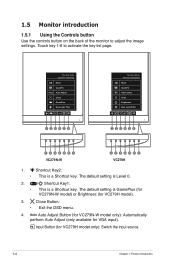
...a Shortcut key. Shortcut Key2: • This is a Shortcut key. The default setting is GamePlus (for VC279N-W model) or Brightness (for VC279H model only): Switch the input source. 1-4 Chapter 1: Product Introduction Standard Mode VGA 1920 x 1080 @ 60Hz Menu QuickFit Auto Auto Adjust Close GamePlus...60Hz Menu QuickFit Input Select Close Brightness Blue Light Filter 123456 1234567 VC279N-W 1234567 VC279H 1. 1.5 Monitor introduction 1.5.1 Using the Controls button Use the controls button on the back of the monitor to activate the key list page. Auto Adjust Button (for VC279N-W model ...
...a Shortcut key. Shortcut Key2: • This is a Shortcut key. The default setting is GamePlus (for VC279N-W model) or Brightness (for VC279H model only): Switch the input source. 1-4 Chapter 1: Product Introduction Standard Mode VGA 1920 x 1080 @ 60Hz Menu QuickFit Auto Auto Adjust Close GamePlus...60Hz Menu QuickFit Input Select Close Brightness Blue Light Filter 123456 1234567 VC279N-W 1234567 VC279H 1. 1.5 Monitor introduction 1.5.1 Using the Controls button Use the controls button on the back of the monitor to activate the key list page. Auto Adjust Button (for VC279N-W model ...

User Guide
Page 12
Menu Button: • Enter the OSD menu. 7. Status White Amber OFF Description ON Standby mode OFF ASUS LCD Monitor VC279 Series 1-5 QuickFit Button: • This is as the table below. Power Button/Power Indicator: • Press this button to activate the QuickFit function designed for details. 6. See page 1-6 for alignment. • The QuickFit function contains 5 pages of the power indicator is a hotkey to turn the monitor on/off. • The color definition of common grid patterns, paper sizes, and photo sizes. 5.
Menu Button: • Enter the OSD menu. 7. Status White Amber OFF Description ON Standby mode OFF ASUS LCD Monitor VC279 Series 1-5 QuickFit Button: • This is as the table below. Power Button/Power Indicator: • Press this button to activate the QuickFit function designed for details. 6. See page 1-6 for alignment. • The QuickFit function contains 5 pages of the power indicator is a hotkey to turn the monitor on/off. • The color definition of common grid patterns, paper sizes, and photo sizes. 5.

User Guide
Page 14
... the screw counter-clockwise to remove the stand. 5. Align and install the wall mount bracket on a clean table. 2. Carefully put the front of the monitor face down on the rear of the base. 3. Remove the base from the stand. 4. Screw holes for VESA wall mount) To detach the base, perform... the following: 1. Then loosen the 4 screws to loosen the screw located at the bottom of the monitor. Remove the stand cover. 2.1 Detaching the base (for VESA wall mount (100 x 100 mm) • We recommend that you cover the table surface with...
... the screw counter-clockwise to remove the stand. 5. Align and install the wall mount bracket on a clean table. 2. Carefully put the front of the monitor face down on the rear of the base. 3. Remove the base from the stand. 4. Screw holes for VESA wall mount) To detach the base, perform... the following: 1. Then loosen the 4 screws to loosen the screw located at the bottom of the monitor. Remove the stand cover. 2.1 Detaching the base (for VESA wall mount (100 x 100 mm) • We recommend that you cover the table surface with...

User Guide
Page 15
2.2 Adjusting the monitor • For optimal viewing, we recommend that you look at the full face of the monitor, then adjust the monitor to the angle that is most comfortable for you. • Hold the stand to prevent the monitor from falling while changing its angle. • You can adjust the monitor's angle from -5˚ to 20˚. -5˚ to +20˚ •• It is normal that the monitor slightly shakes while you adjust the viewing angle. ASUS LCD Monitor VC279 Series 2-2
2.2 Adjusting the monitor • For optimal viewing, we recommend that you look at the full face of the monitor, then adjust the monitor to the angle that is most comfortable for you. • Hold the stand to prevent the monitor from falling while changing its angle. • You can adjust the monitor's angle from -5˚ to 20˚. -5˚ to +20˚ •• It is normal that the monitor slightly shakes while you adjust the viewing angle. ASUS LCD Monitor VC279 Series 2-2

User Guide
Page 17
ASUS LCD Monitor VC279 Series 3-2 3.1.2 OSD Function Introduction 1. Each mode has the Reset selection, allowing you can select for a weak ambient light environmen with SPLENDID™ Video Intelligence ...
ASUS LCD Monitor VC279 Series 3-2 3.1.2 OSD Function Introduction 1. Each mode has the Reset selection, allowing you can select for a weak ambient light environmen with SPLENDID™ Video Intelligence ...
User Guide
Page 19
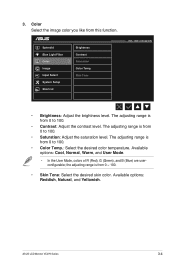
... Mode, colors of R (Red), G (Green), and B (Blue) are userconfigurable; the adjusting range is from 0 to 100. • Color Temp.: Select the desired color temperature. ASUS LCD Monitor VC279 Series 3-4 The adjusting range is from 0 to 100. • Contrast: Adjust the contrast level. Available options: Reddish, Natural, and Yellowish. Skin Tone Standard Mode...
... Mode, colors of R (Red), G (Green), and B (Blue) are userconfigurable; the adjusting range is from 0 to 100. • Color Temp.: Select the desired color temperature. ASUS LCD Monitor VC279 Series 3-4 The adjusting range is from 0 to 100. • Contrast: Adjust the contrast level. Available options: Reddish, Natural, and Yellowish. Skin Tone Standard Mode...
User Guide
Page 21
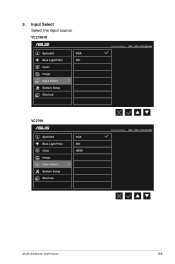
VC279N-W Splendid Blue Light Filter Color Image Input Select System Setup Shortcut VGA DVI VC279H Splendid Blue Light Filter Color Image Input Select System Setup Shortcut VGA DVI HDMI Standard Mode VGA 1920 x 1080 @ 60Hz Standard Mode VGA 1920 x 1080 @ 60Hz ASUS LCD Monitor VC279 Series 3-6 Input Select Select the input source. 5.
VC279N-W Splendid Blue Light Filter Color Image Input Select System Setup Shortcut VGA DVI VC279H Splendid Blue Light Filter Color Image Input Select System Setup Shortcut VGA DVI HDMI Standard Mode VGA 1920 x 1080 @ 60Hz Standard Mode VGA 1920 x 1080 @ 60Hz ASUS LCD Monitor VC279 Series 3-6 Input Select Select the input source. 5.
User Guide
Page 23
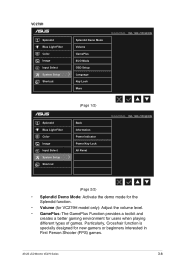
ASUS LCD Monitor VC279 Series 3-8 VC279H Splendid Blue Light Filter Color Image Input Select System Setup Shortcut Splendid Demo Mode Volume GamePlus ECO Mode OSD Setup Language Key Lock More Standard ... Lock All Reset Standard Mode VGA 1920 x 1080 @ 60Hz (Page 2/2) • Splendid Demo Mode: Activate the demo mode for the Splendid function. • Volume (for VC279H model only): Adjust the volume level. • GamePlus: The GamePlus Function provides a toolkit and creates a better gaming environment for new gamers or beginners interested in...
ASUS LCD Monitor VC279 Series 3-8 VC279H Splendid Blue Light Filter Color Image Input Select System Setup Shortcut Splendid Demo Mode Volume GamePlus ECO Mode OSD Setup Language Key Lock More Standard ... Lock All Reset Standard Mode VGA 1920 x 1080 @ 60Hz (Page 2/2) • Splendid Demo Mode: Activate the demo mode for the Splendid function. • Volume (for VC279H model only): Adjust the volume level. • GamePlus: The GamePlus Function provides a toolkit and creates a better gaming environment for new gamers or beginners interested in...

User Guide
Page 24
... button on the right for power saving. • OSD Setup: Adjust the OSD Timeout, DDC/CI, and Transparency of System Setting. • Information: Display the monitor information. • Power Indicator: Turn the power LED indicator on/off. • Power Key Lock: Disable/Enable the power key. • All Reset: Select YES...
... button on the right for power saving. • OSD Setup: Adjust the OSD Timeout, DDC/CI, and Transparency of System Setting. • Information: Display the monitor information. • Power Indicator: Turn the power LED indicator on/off. • Power Key Lock: Disable/Enable the power key. • All Reset: Select YES...
User Guide
Page 27
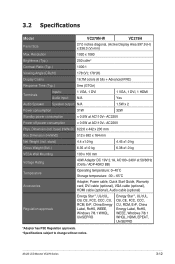
... 100 x 100 mm 40W Adaptor DC 19V 2.1A, AC100~240V at AC110V~ AC220V Phys. Dimension (incl. 3.2 Specifications Model Panel Size Max. ASUS LCD Monitor VC279 Series 3-12 Resolution Brightness (Typ.) VC279N-W VC279H 27.0 inches diagonal, (Active Display Area 597.9 (H) x 336.3 (V) mm) 1920 x 1080 250 cd/m2 Contrast Ratio (Typ.) 1000:1 Viewing Angle (CR...
... 100 x 100 mm 40W Adaptor DC 19V 2.1A, AC100~240V at AC110V~ AC220V Phys. Dimension (incl. 3.2 Specifications Model Panel Size Max. ASUS LCD Monitor VC279 Series 3-12 Resolution Brightness (Typ.) VC279N-W VC279H 27.0 inches diagonal, (Active Display Area 597.9 (H) x 336.3 (V) mm) 1920 x 1080 250 cd/m2 Contrast Ratio (Typ.) 1000:1 Viewing Angle (CR...

User Guide
Page 28
... No sound or sound is low • Adjust the volume settings of the pins are bent. • Connect the computer with another available monitor to the monitor and the power outlet. • Check Power Indicator function in main menu OSD. 3.3 Troubleshooting (FAQ) Problem Possible Solution Power LED is not... ON • Press the button to check if the monitor is in the ON mode. • Check if the power cord is properly connected to check if the computer is properly working. Select "ON...
... No sound or sound is low • Adjust the volume settings of the pins are bent. • Connect the computer with another available monitor to the monitor and the power outlet. • Check Power Indicator function in main menu OSD. 3.3 Troubleshooting (FAQ) Problem Possible Solution Power LED is not... ON • Press the button to check if the monitor is in the ON mode. • Check if the power cord is properly connected to check if the computer is properly working. Select "ON...

User Guide
Page 29
ASUS LCD Monitor VC279 Series 3-14 For optimal resolution, we recommend that you choose a mode listed in the table may not be supported. 3.4 Supported Timing List VESA / IBM ...
ASUS LCD Monitor VC279 Series 3-14 For optimal resolution, we recommend that you choose a mode listed in the table may not be supported. 3.4 Supported Timing List VESA / IBM ...


