
User Guide
Page 2
...stand (for VESA wall mount 1-5 2.2 Adjusting the monitor 2-1 3.1 OSD (On-Screen Display) menu 2-2 3.1.1 How to the owners' benefit, without the express written permission of ASUSTeK COMPUTER INC. ("ASUS"). Product warranty or service will not be extended if: (1) the product is repaired,... OSD Function Introduction 2-2 3.2 Specifications 2-6 3.3 Troubleshooting (FAQ 2-7 3.4 Supported timing list 2-8 Copyright © 2011 ASUSTeK COMPUTER INC. ASUS PROVIDES THIS MANUAL "AS IS" WITHOUT WARRANTY OF ANY KIND, EITHER EXPRESS OR IMPLIED, INCLUDING BUT NOT LIMITED TO THE IMPLIED WARRANTIES ...
...stand (for VESA wall mount 1-5 2.2 Adjusting the monitor 2-1 3.1 OSD (On-Screen Display) menu 2-2 3.1.1 How to the owners' benefit, without the express written permission of ASUSTeK COMPUTER INC. ("ASUS"). Product warranty or service will not be extended if: (1) the product is repaired,... OSD Function Introduction 2-2 3.2 Specifications 2-6 3.3 Troubleshooting (FAQ 2-7 3.4 Supported timing list 2-8 Copyright © 2011 ASUSTeK COMPUTER INC. ASUS PROVIDES THIS MANUAL "AS IS" WITHOUT WARRANTY OF ANY KIND, EITHER EXPRESS OR IMPLIED, INCLUDING BUT NOT LIMITED TO THE IMPLIED WARRANTIES ...
User Guide
Page 5
... When lifting or carrying the monitor, grasp the edges of the fluorescent light. Do not lift the display by yourself! Do not repair the screen by the stand or the cord. • Cleaning. CAUTION: Information to prevent damage to the components when trying to aid in this guide ...yourself when trying to disconnect the cables and power cord. Stubborn stains may be removed with a cloth dampened with the monitor: • The screen may flicker during the initial use with a lint-free, non-abrasive cloth. v Follow the correct lifting techniques when positioning the monitor. Turn your...
... When lifting or carrying the monitor, grasp the edges of the fluorescent light. Do not lift the display by yourself! Do not repair the screen by the stand or the cord. • Cleaning. CAUTION: Information to prevent damage to the components when trying to aid in this guide ...yourself when trying to disconnect the cables and power cord. Stubborn stains may be removed with a cloth dampened with the monitor: • The screen may flicker during the initial use with a lint-free, non-abrasive cloth. v Follow the correct lifting techniques when positioning the monitor. Turn your...
User Guide
Page 13
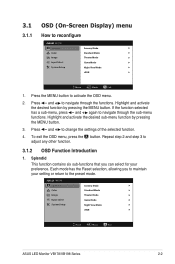
...button. 3. VB178 Splendid Color Image Input Select System Setup Scenery Mode Standard Mode Theater Mode Game Mode Night View Mode sRGB Move Menu Exit ASUS LED Monitor VB178/VB198 Series 2-2 Repeat step 2 and step 3 to activate the OSD menu. 2. Splendid This function contains six sub-...functions that you to navigate through the functions. To exit the OSD menu, press the button. 3.1 3.1.1 OSD (On-Screen Display) menu How to change the settings of the selected function. 4. Press and to the preset mode. Press and to reconfigure VB178 Splendid Color...
...button. 3. VB178 Splendid Color Image Input Select System Setup Scenery Mode Standard Mode Theater Mode Game Mode Night View Mode sRGB Move Menu Exit ASUS LED Monitor VB178/VB198 Series 2-2 Repeat step 2 and step 3 to activate the OSD menu. 2. Splendid This function contains six sub-...functions that you to navigate through the functions. To exit the OSD menu, press the button. 3.1 3.1.1 OSD (On-Screen Display) menu How to change the settings of the selected function. 4. Press and to the preset mode. Press and to reconfigure VB178 Splendid Color...
User Guide
Page 16
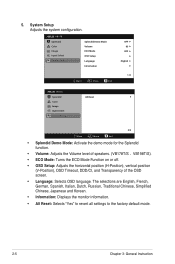
... All Reset 2/2 Move Menu Exit • Splendid Demo Mode: Activate the demo mode for the Splendid function. • Volume: Adjusts the Volume level of speakers. (VB178T/S 、VB198T/S). • ECO Mode: Turns the ECO Mode Function on or off. • OSD Setup: Adjusts the horizontal position (H-Position), vertical position (V-Position), OSD...
... All Reset 2/2 Move Menu Exit • Splendid Demo Mode: Activate the demo mode for the Splendid function. • Volume: Adjusts the Volume level of speakers. (VB178T/S 、VB198T/S). • ECO Mode: Turns the ECO Mode Function on or off. • OSD Setup: Adjusts the horizontal position (H-Position), vertical position (V-Position), OSD...
User Guide
Page 18
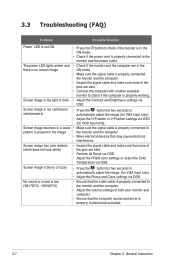
...or V-Position settings via OSD (for VGA input only). • Adjust the Phase and Clock settings via OSD. No sound or sound is low (VB178T/S , VB198T/S) • Ensure that the audio cable is properly connected to the monitor and the computer. • Adjust the volume settings of both ...your monitor and computer. • Ensure that may cause electrical interference. Screen image bounces or a wave • Make sure the signal cable is properly connected to pattern is present in the image the monitor and the ...
...or V-Position settings via OSD (for VGA input only). • Adjust the Phase and Clock settings via OSD. No sound or sound is low (VB178T/S , VB198T/S) • Ensure that the audio cable is properly connected to the monitor and the computer. • Adjust the volume settings of both ...your monitor and computer. • Ensure that may cause electrical interference. Screen image bounces or a wave • Make sure the signal cable is properly connected to pattern is present in the image the monitor and the ...


