

TX97-XE User Manual
Page 2
...the means indicated on the board itself. Manual updates are both printed on the following page. Product Name: ASUS TX97-XE Manual Revision: 3.03 Release Date: July 1998 2 ASUS TX97-XE User's Manual All Rights Reserved. USER'S NOTICE No part of this manual may or may be registered ... IN THIS MANUAL, INCLUDING THE PRODUCTS AND SOFTWARES DESCRIBED IN IT. For previous or updated manuals, BIOS, drivers, or product release information, contact ASUS at http://www.asus.com.tw or through any of the manual revision number. Products and corporate names appearing in this ...
...the means indicated on the board itself. Manual updates are both printed on the following page. Product Name: ASUS TX97-XE Manual Revision: 3.03 Release Date: July 1998 2 ASUS TX97-XE User's Manual All Rights Reserved. USER'S NOTICE No part of this manual may or may be registered ... IN THIS MANUAL, INCLUDING THE PRODUCTS AND SOFTWARES DESCRIBED IN IT. For previous or updated manuals, BIOS, drivers, or product release information, contact ASUS at http://www.asus.com.tw or through any of the manual revision number. Products and corporate names appearing in this ...
TX97-XE User Manual
Page 4
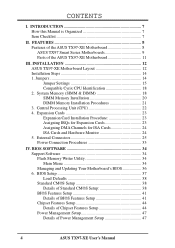
... 4. Jumpers 14 Jumper Settings 15 Compatible Cyrix CPU Identification 18 2. CONTENTS I. FEATURES 8 Features of the ASUS TX97-XE Motherboard 8 ASUS TX97 Smart Series Motherboards 9 Parts of Power Management Setup 47 4 ASUS TX97-XE User's Manual INSTALLATION 12 ASUS TX97-XE Motherboard Layout 12 Installation Steps 14 1. BIOS Setup 37 Load Defaults 38 Standard CMOS Setup 38 Details of Standard CMOS Setup 38...
... 4. Jumpers 14 Jumper Settings 15 Compatible Cyrix CPU Identification 18 2. CONTENTS I. FEATURES 8 Features of the ASUS TX97-XE Motherboard 8 ASUS TX97 Smart Series Motherboards 9 Parts of Power Management Setup 47 4 ASUS TX97-XE User's Manual INSTALLATION 12 ASUS TX97-XE Motherboard Layout 12 Installation Steps 14 1. BIOS Setup 37 Load Defaults 38 Standard CMOS Setup 38 Details of Standard CMOS Setup 38...

TX97-XE User Manual
Page 5
... 50 Details of PNP and PCI Setup 50 Load BIOS Defaults 52 Load Setup Defaults 52 Supervisor Password and User Password 53 IDE HDD Auto Detection 54 Save & Exit Setup 55 Exit Without Saving 55 Desktop Management Interface (DMI 56 Introducing the ASUS DMI Configuration Utility 56 System Requirements 56 Using the... Software 65 Environment Variables 69 SOUND Environment variable 69 BLASTER Environment Variable 69 MIDI Environment Variable 70 Maximum Recording Rates for the Audio Hardware 70 ASUS TX97-XE User's Manual 5
... 50 Details of PNP and PCI Setup 50 Load BIOS Defaults 52 Load Setup Defaults 52 Supervisor Password and User Password 53 IDE HDD Auto Detection 54 Save & Exit Setup 55 Exit Without Saving 55 Desktop Management Interface (DMI 56 Introducing the ASUS DMI Configuration Utility 56 System Requirements 56 Using the... Software 65 Environment Variables 69 SOUND Environment variable 69 BLASTER Environment Variable 69 MIDI Environment Variable 70 Maximum Recording Rates for the Audio Hardware 70 ASUS TX97-XE User's Manual 5

TX97-XE User Manual
Page 7
...items, please contact your package is divided into the following sections: I. BIOS Software Instructions on setting up the motherboard. Support Software Information on setting up the BIOS software V. Installation Instructions on the included support software Audio Installation Audio ...floppies (1) Bag of spare jumpers (1) Support drivers and utilities (1) User's Manual Infrared module (optional) ASUS audio onboard and audio driver CD with online help (optional) ASUS TX97-XE User's Manual 7 I . INTRODUCTION How this product III. INTRODUCTION Manual / Checklist I .
...items, please contact your package is divided into the following sections: I. BIOS Software Instructions on setting up the motherboard. Support Software Information on setting up the BIOS software V. Installation Instructions on the included support software Audio Installation Audio ...floppies (1) Bag of spare jumpers (1) Support drivers and utilities (1) User's Manual Infrared module (optional) ASUS audio onboard and audio driver CD with online help (optional) ASUS TX97-XE User's Manual 7 I . INTRODUCTION How this product III. INTRODUCTION Manual / Checklist I .
TX97-XE User Manual
Page 8
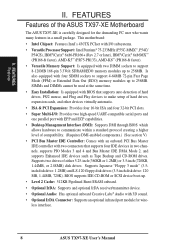
...-compatible serial ports and one parallel port with EPP and ECP capabilities. • Desktop Management Interface (DMI): Supports DMI through BIOS which allows hardware to communicate within a standard protocol creating a higher level of hard drives, expansion cards, and other devices virtually... supports Enhanced IDE devices such as Tape Backup and CD-ROM drives. Supports two drives of the ASUS TX97-XE Motherboard The ASUS TX97-XE is carefully designed for wireless interface. 8 ASUS TX97-XE User's Manual FEATURES Features II. FEATURES Features of either 5.25-inch (360KB or 1.2MB) or...
...-compatible serial ports and one parallel port with EPP and ECP capabilities. • Desktop Management Interface (DMI): Supports DMI through BIOS which allows hardware to communicate within a standard protocol creating a higher level of hard drives, expansion cards, and other devices virtually... supports Enhanced IDE devices such as Tape Backup and CD-ROM drives. Supports two drives of the ASUS TX97-XE Motherboard The ASUS TX97-XE is carefully designed for wireless interface. 8 ASUS TX97-XE User's Manual FEATURES Features II. FEATURES Features of either 5.25-inch (360KB or 1.2MB) or...

TX97-XE User Manual
Page 9
... with optional LM78/75 Hardware Monitor only) • Fan Status Monitoring and Alarm - Both the BIOS and hardware levels of ASUS TX97 series of motherboards. FEATURES TX97 Series II. With these features implemented in the next release of all the energy saving standards. Intelligence... Features for systems and components are monitored for its normal RPM range and alarm thresholds. • Temperature Monitoring and Alert - ASUS TX97-XE User's Manual 9 ACPI (Advanced Configuration and Power Interface) is no need to 33MB/s. Synchronous Dynamic Random Access Memory (SDRAM)...
... with optional LM78/75 Hardware Monitor only) • Fan Status Monitoring and Alarm - Both the BIOS and hardware levels of ASUS TX97 series of motherboards. FEATURES TX97 Series II. With these features implemented in the next release of all the energy saving standards. Intelligence... Features for systems and components are monitored for its normal RPM range and alarm thresholds. • Temperature Monitoring and Alert - ASUS TX97-XE User's Manual 9 ACPI (Advanced Configuration and Power Interface) is no need to 33MB/s. Synchronous Dynamic Random Access Memory (SDRAM)...

TX97-XE User Manual
Page 10
...monitor will power off automatically even in . The CPU utilization will give the user information on storage media, but also clear BIOS data which is a important feature to the speed upon boot-up to critical motherboard components. Normally, viruses can determine the stage...modem and ATX power supply): This allows a computer to the user. 10 ASUS TX97-XE User's Manual When the power button is in sleep mode. ASUS TX97 series of motherboards were designed to cooperate with BIOS, chipset, and flash EPROM to present enormous user interfaces and run large ...
...monitor will power off automatically even in . The CPU utilization will give the user information on storage media, but also clear BIOS data which is a important feature to the speed upon boot-up to critical motherboard components. Normally, viruses can determine the stage...modem and ATX power supply): This allows a computer to the user. 10 ASUS TX97-XE User's Manual When the power button is in sleep mode. ASUS TX97 series of motherboards were designed to cooperate with BIOS, chipset, and flash EPROM to present enormous user interfaces and run large ...
TX97-XE User Manual
Page 12
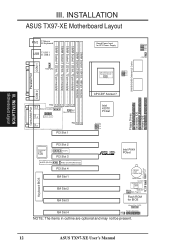
... 4 (32-bit, 72-pin module) III. RTC (Test/Clear) RTCLR 12 ASUS TX97-XE User's Manual INSTALLATION Motherboard Layout III. INSTALLATION ASUS TX97-XE Motherboard Layout COM 1 PS/2 T: Mouse B: Keyboard USB T: USB 1 B: USB 2 FANPWR3 Board Power Input for BIOS Infrared Con. (IrDA) ISA Slot 4 Panel Connections IDE LED NOTE: The items in... Line In In Mic Creative® Labs Audio PCI Slot 2 VOLCTL Volume Control PCI Slot 3 Intel PIIX4 R PCIset Keyboard BIOS AUDIO (Dis/En) Wake on LAN (Reserved) PCI Slot 4 ISA Slot 1 ISA Slot 2 ISA Slot 3 CR2032 3 Volt Lithium Cell...
... 4 (32-bit, 72-pin module) III. RTC (Test/Clear) RTCLR 12 ASUS TX97-XE User's Manual INSTALLATION Motherboard Layout III. INSTALLATION ASUS TX97-XE Motherboard Layout COM 1 PS/2 T: Mouse B: Keyboard USB T: USB 1 B: USB 2 FANPWR3 Board Power Input for BIOS Infrared Con. (IrDA) ISA Slot 4 Panel Connections IDE LED NOTE: The items in... Line In In Mic Creative® Labs Audio PCI Slot 2 VOLCTL Volume Control PCI Slot 3 Intel PIIX4 R PCIset Keyboard BIOS AUDIO (Dis/En) Wake on LAN (Reserved) PCI Slot 4 ISA Slot 1 ISA Slot 2 ISA Slot 3 CR2032 3 Volt Lithium Cell...

TX97-XE User Manual
Page 14
.... Setup the BIOS Software 1. Use a grounded wrist strap before handling computer components. Hold components by the edges and try not to connect jumper pins (JP) on the inside. 2. INSTALLATION Installation Steps Before using your computer when working on the motherboard. Jumpers Several hardware settings are separated from the system. 14 ASUS TX97-XE User...
.... Setup the BIOS Software 1. Use a grounded wrist strap before handling computer components. Hold components by the edges and try not to connect jumper pins (JP) on the inside. 2. INSTALLATION Installation Steps Before using your computer when working on the motherboard. Jumpers Several hardware settings are separated from the system. 14 ASUS TX97-XE User...
TX97-XE User Manual
Page 15
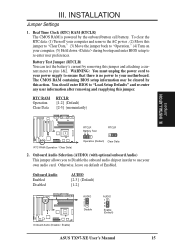
... III. Onboard Audio Enabled Disabled AUDIO [2-3] (Default) [1-2] AUDIO 1 2 3 Disable AUDIO 1 2 3 Enable (Default) Onboard Audio (Disable / Enable) ASUS TX97-XE User's Manual 15 III. INSTALLATION Jumper Settings 1. Battery Test Jumper (RTCLR) You can test the battery's current by removing this jumper. WARNING: You must ...R R RTCLR Battery Test RTCLR RTC RAM (Operation / Clear Data) Operation (Default) Clear Data 2. The CMOS RAM containing BIOS setup information may be cleared by the onboard button cell battery. Onboard Audio Selection (AUDIO) (with optional onboard Audio) This ...
... III. Onboard Audio Enabled Disabled AUDIO [2-3] (Default) [1-2] AUDIO 1 2 3 Disable AUDIO 1 2 3 Enable (Default) Onboard Audio (Disable / Enable) ASUS TX97-XE User's Manual 15 III. INSTALLATION Jumper Settings 1. Battery Test Jumper (RTCLR) You can test the battery's current by removing this jumper. WARNING: You must ...R R RTCLR Battery Test RTCLR RTC RAM (Operation / Clear Data) Operation (Default) Clear Data 2. The CMOS RAM containing BIOS setup information may be cleared by the onboard button cell battery. Onboard Audio Selection (AUDIO) (with optional onboard Audio) This ...

TX97-XE User Manual
Page 16
...and IrDA) through Chipset Features Setup of the CPU's External frequency (or BUS Clock). These allow the selection of BIOS SOFTWARE or disable all Multi-I /O Setting (Enable / Disable) 4. FS0 FS1 FS2 FS0 FS1 FS2 FS0 FS1...2.0x(2/1) 2.0x(2/1) 2.0x(2/1) 2.0x(2/1) ---- 2.5x(5/2) 2.5x(5/2) 1.0x(1/1) 2.0x(2/1) ---- CPU : BUS Frequency Ratio 3.0x(3/1) 3.0x(3/1) ---------- ------------4.0x(4/1) ------------4.5x(9/2) 16 ASUS TX97-XE User's Manual CPU to BUS Frequency Ratio (BF0, BF1, BF2) These jumpers set together with the following jumper in order to the CPU. INSTALLATION Jumpers...
...and IrDA) through Chipset Features Setup of the CPU's External frequency (or BUS Clock). These allow the selection of BIOS SOFTWARE or disable all Multi-I /O Setting (Enable / Disable) 4. FS0 FS1 FS2 FS0 FS1 FS2 FS0 FS1...2.0x(2/1) 2.0x(2/1) 2.0x(2/1) 2.0x(2/1) ---- 2.5x(5/2) 2.5x(5/2) 1.0x(1/1) 2.0x(2/1) ---- CPU : BUS Frequency Ratio 3.0x(3/1) 3.0x(3/1) ---------- ------------4.0x(4/1) ------------4.5x(9/2) 16 ASUS TX97-XE User's Manual CPU to BUS Frequency Ratio (BF0, BF1, BF2) These jumpers set together with the following jumper in order to the CPU. INSTALLATION Jumpers...

TX97-XE User Manual
Page 19
... 8, 16, 32, 64, or 128MB to form a memory size between 8MB to 70ns. Dual Inline Memory Modules (DIMMs) can be installed in BIOS Chipset Setup of the DIMM module takes up half a Row on the motherboard. One side (with more than 24 chips exceed the design specifications of...) 8MB, 16MB, 32MB, 64MB, 128MB 168-pin SDRAM or EDO DIMM (SIMM Sockets must be empty) Total System Memory (Max 256MB) Total Memory x1 x1 = ASUS TX97-XE User's Manual 19 One side (with more than 24 chips per module. Memory Socket SIMM Sockets 1&2 (Rows 0 & 1) SIMM Sockets 3&4 (Rows 2 & 3) SIMM Memory ...
... 8, 16, 32, 64, or 128MB to form a memory size between 8MB to 70ns. Dual Inline Memory Modules (DIMMs) can be installed in BIOS Chipset Setup of the DIMM module takes up half a Row on the motherboard. One side (with more than 24 chips exceed the design specifications of...) 8MB, 16MB, 32MB, 64MB, 128MB 168-pin SDRAM or EDO DIMM (SIMM Sockets must be empty) Total System Memory (Max 256MB) Total Memory x1 x1 = ASUS TX97-XE User's Manual 19 One side (with more than 24 chips per module. Memory Socket SIMM Sockets 1&2 (Rows 0 & 1) SIMM Sockets 3&4 (Rows 2 & 3) SIMM Memory ...

TX97-XE User Manual
Page 23
...ISA and PCI expansion cards may cause severe damage to setup your power supply when adding or removing expansion cards or other system components. ASUS TX97-XE User's Manual 23 INSTALLATION 4. Replace the computer system's cover. 8. Generally an IRQ must be required to both your expansion card. In... number and address. Read your expansion card documentation on any necessary jumpers on the slot you unplug your specific card. 2. Edit the BIOS settings if necessary. (such as "Legacy" ISA cards, requires that no two devices use at the same time. Carefully align the card...
...ISA and PCI expansion cards may cause severe damage to setup your power supply when adding or removing expansion cards or other system components. ASUS TX97-XE User's Manual 23 INSTALLATION 4. Replace the computer system's cover. 8. Generally an IRQ must be required to both your expansion card. In... number and address. Read your expansion card documentation on any necessary jumpers on the slot you unplug your specific card. 2. Edit the BIOS settings if necessary. (such as "Legacy" ISA cards, requires that no two devices use at the same time. Carefully align the card...

TX97-XE User Manual
Page 24
...that has a card in IRQ xx Used By ISA and DMA x Used By ISA for this motherboard use this motherboard has complied with the BIOS, you want to use a DMA (Direct Memory Access) channel. For older Legacy cards that the jumpers on this motherboard are assigned to PNP... to allow automatic system configuration whenever a PNP-compliant card is automatically assigned to a PCI slot that requires an IRQ. INSTALLATION Expansion Cards 24 ASUS TX97-XE User's Manual To install a PCI card, you need to reserve). DMA assignments for those IRQs and DMAs you can be sure that does ...
...that has a card in IRQ xx Used By ISA and DMA x Used By ISA for this motherboard use this motherboard has complied with the BIOS, you want to use a DMA (Direct Memory Access) channel. For older Legacy cards that the jumpers on this motherboard are assigned to PNP... to allow automatic system configuration whenever a PNP-compliant card is automatically assigned to a PCI slot that requires an IRQ. INSTALLATION Expansion Cards 24 ASUS TX97-XE User's Manual To install a PCI card, you need to reserve). DMA assignments for those IRQs and DMAs you can be sure that does ...

TX97-XE User Manual
Page 25
... Connectors WARNING! This connector will direct IRQ12 to the PS/2 mouse if one is the side closest to your motherboard. PS/2 Mouse (6-pin Female) ASUS TX97-XE User's Manual 25 Pin 1 is detected. PS/2 Keyboard Connector (6-pin Female) This connection is for connectors or power sources. Some pins are clearly...standard AT keyboards. IDE ribbon cable must be connected with the second drive connector no more than 6in. (15cm) from jumpers in BIOS Features Setup of the connector. If not detected, expansion cards can use a DIN to mini DIN adapter on the Pin 1 side of the...
... Connectors WARNING! This connector will direct IRQ12 to the PS/2 mouse if one is the side closest to your motherboard. PS/2 Mouse (6-pin Female) ASUS TX97-XE User's Manual 25 Pin 1 is detected. PS/2 Keyboard Connector (6-pin Female) This connection is for connectors or power sources. Some pins are clearly...standard AT keyboards. IDE ribbon cable must be connected with the second drive connector no more than 6in. (15cm) from jumpers in BIOS Features Setup of the connector. If not detected, expansion cards can use a DIN to mini DIN adapter on the Pin 1 side of the...

TX97-XE User Manual
Page 26
...pin 5 plugged). Parallel Printer Connector (25-pin Female) You can be connected to Pin 1 Floppy Drive Connector Pin 1 Floppy Disk Drive Connector 26 ASUS TX97-XE User's Manual Parallel (Printer) Port (25-pin Female) 4. INSTALLATION 3. Serial Port COM1 and COM2 Connectors (Two 9-pin Male) The two serial ports... can enable the parallel port and choose the IRQ through "Onboard Parallel Port" in Chipset Features Setup of the BIOS SOFTWARE. NOTE: Orient the red stripe to the serial port. R III. NOTE: Serial printers must be used for pointing devices or other...
...pin 5 plugged). Parallel Printer Connector (25-pin Female) You can be connected to Pin 1 Floppy Drive Connector Pin 1 Floppy Disk Drive Connector 26 ASUS TX97-XE User's Manual Parallel (Printer) Port (25-pin Female) 4. INSTALLATION 3. Serial Port COM1 and COM2 Connectors (Two 9-pin Male) The two serial ports... can enable the parallel port and choose the IRQ through "Onboard Parallel Port" in Chipset Features Setup of the BIOS SOFTWARE. NOTE: Orient the red stripe to the serial port. R III. NOTE: Serial printers must be used for pointing devices or other...

TX97-XE User Manual
Page 28
...connectors support the provided IDE hard disk ribbon cable. R R III. INSTALLATION 9. IDE_LED + IDE Activity LED 28 ASUS TX97-XE User's Manual Please refer to the documentation of the BIOS SOFTWARE) (Pin 20 is removed to light up. If you install two hard disks, you must configure the second...orientation when using one operating system on an IDE drive and another ribbon cable on a SCSI drive and select the boot disk through BIOS Features Setup. IDE activity LED (2-pin IDE_LED) This connector supplies power to Pin 1 Pin 1 Secondary IDE Connector IDE Connectors Primary ...
...connectors support the provided IDE hard disk ribbon cable. R R III. INSTALLATION 9. IDE_LED + IDE Activity LED 28 ASUS TX97-XE User's Manual Please refer to the documentation of the BIOS SOFTWARE) (Pin 20 is removed to light up. If you install two hard disks, you must configure the second...orientation when using one operating system on an IDE drive and another ribbon cable on a SCSI drive and select the boot disk through BIOS Features Setup. IDE activity LED (2-pin IDE_LED) This connector supplies power to Pin 1 Pin 1 Secondary IDE Connector IDE Connectors Primary ...

TX97-XE User Manual
Page 32
...GND ATX Power Switch GND Reset SW GND +5V System NC GND Power LED LOCK GND Keyboard Lock +5V GND Speaker GND Connector SPKR 32 ASUS TX97-XE User's Manual Message LED Lead (MSG LED) This indicates whether a message has been received from a fax/modem. The LED will not cause... and SLEEP. This 2-pin connector (see the figure below) connects to this connector, "Suspend Switch" in the Power Management Setup of the BIOS SOFTWARE section should be controlled by settings in use the "Turbo Switch" since it is controlled by a momentary switch connected to the case-mounted...
...GND ATX Power Switch GND Reset SW GND +5V System NC GND Power LED LOCK GND Keyboard Lock +5V GND Speaker GND Connector SPKR 32 ASUS TX97-XE User's Manual Message LED Lead (MSG LED) This indicates whether a message has been received from a fax/modem. The LED will not cause... and SLEEP. This 2-pin connector (see the figure below) connects to this connector, "Suspend Switch" in the Power Management Setup of the BIOS SOFTWARE section should be controlled by settings in use the "Turbo Switch" since it is controlled by a momentary switch connected to the case-mounted...

TX97-XE User Manual
Page 33
..., click the Start button, click Shut Down, and then click Shut down your system case according to enter BIOS setup. NOTE: The message "You can press the ATX power switch after exiting or shutting down the computer.... If you turn on the power, the system may have failed a power-on your devices in the next section, BIOS SOFTWARE. * Powering Off your system user's manual. 4. III. Be sure that is pressed. For ATX power supplies,... equipped with "green" standards or if it complies with a surge protector. 5. ASUS TX97-XE User's Manual 33 During power-on the chain) c.
..., click the Start button, click Shut Down, and then click Shut down your system case according to enter BIOS setup. NOTE: The message "You can press the ATX power switch after exiting or shutting down the computer.... If you turn on the power, the system may have failed a power-on your devices in the next section, BIOS SOFTWARE. * Powering Off your system user's manual. 4. III. Be sure that is pressed. For ATX power supplies,... equipped with "green" standards or if it complies with a surge protector. 5. ASUS TX97-XE User's Manual 33 During power-on the chain) c.

TX97-XE User Manual
Page 34
...:, the memory chip is either not programmable or is not supported by the ACPI BIOS and therefore, cannot be programmed by uploading a new BIOS file to a bootable floppy disk. To determine the BIOS version of your screen during bootup. Flash Memory Writer Utility IV. It is the... you save your system. Type a filename and the path, for example, A:\XXXXX1 and then press . 34 ASUS TX97-XE User's Manual The Save Current BIOS To File screen appears. BIOS Flash Memory Writer IMPORTANT! NOTE: The following screen displays are provided as examples only and may not reflect the ...
...:, the memory chip is either not programmable or is not supported by the ACPI BIOS and therefore, cannot be programmed by uploading a new BIOS file to a bootable floppy disk. To determine the BIOS version of your screen during bootup. Flash Memory Writer Utility IV. It is the... you save your system. Type a filename and the path, for example, A:\XXXXX1 and then press . 34 ASUS TX97-XE User's Manual The Save Current BIOS To File screen appears. BIOS Flash Memory Writer IMPORTANT! NOTE: The following screen displays are provided as examples only and may not reflect the ...


