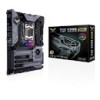
TUF X299 MARK 1 Users ManualEnglish
Page 3
Contents Safety information...vi About this guide...vii TUF X299 MARK 1 specifications summary ix Package contents...xiv Installation tools and components xv Chapter 1: Product Introduction 1.1 Motherboard ...2.1.4 DIMM installation 2-6 2.1.5 ATX power connection 2-7 2.1.6 SATA device connection 2-8 2.1.7 Front I/O connector 2-9 2.1.8 Expansion Card installation 2-10 2.1.9 M.2 installation 2-11 2.2 BIOS update utility 2-12 2.3 Motherboard rear and audio connections 2-13 2.3.1 Rear I/O connection 2-13 2.3.2 Audio I/O connections 2-15 2.4 Starting up for the first time 2-...
Contents Safety information...vi About this guide...vii TUF X299 MARK 1 specifications summary ix Package contents...xiv Installation tools and components xv Chapter 1: Product Introduction 1.1 Motherboard ...2.1.4 DIMM installation 2-6 2.1.5 ATX power connection 2-7 2.1.6 SATA device connection 2-8 2.1.7 Front I/O connector 2-9 2.1.8 Expansion Card installation 2-10 2.1.9 M.2 installation 2-11 2.2 BIOS update utility 2-12 2.3 Motherboard rear and audio connections 2-13 2.3.1 Rear I/O connection 2-13 2.3.2 Audio I/O connections 2-15 2.4 Starting up for the first time 2-...
TUF X299 MARK 1 Users ManualEnglish
Page 4
Chapter 3: BIOS Setup 3.1 Knowing BIOS 3-1 3.2 BIOS setup program 3-2 3.2.1 EZ Mode 3-3 3.2.2 Advanced Mode 3-4 3.2.3 QFan Control 3-7 3.2.4 EZ Tuning Wizard 3-9 3.3 My Favorites 3-12 3.4 Main menu 3-14 3.5 Ai Tweaker... 3-20 3.8 Boot menu 3-20 3.9 Tool menu 3-22 3.9.1 ASUS EZ Flash 3 Utility 3-22 3.9.2 Secure Erase 3-23 3.9.3 ASUS Overclocking Profile 3-24 3.9.4 ASUS SPD Information 3-24 3.9.5 Graphics Card Information 3-24 3.10 Exit menu 3-25 3.11 Updating BIOS 3-26 3.11.1 EZ Update 3-26 3.11.2 ASUS EZ Flash 3 3-27 3.11.3 ASUS CrashFree BIOS 3 3-29 iv
Chapter 3: BIOS Setup 3.1 Knowing BIOS 3-1 3.2 BIOS setup program 3-2 3.2.1 EZ Mode 3-3 3.2.2 Advanced Mode 3-4 3.2.3 QFan Control 3-7 3.2.4 EZ Tuning Wizard 3-9 3.3 My Favorites 3-12 3.4 Main menu 3-14 3.5 Ai Tweaker... 3-20 3.8 Boot menu 3-20 3.9 Tool menu 3-22 3.9.1 ASUS EZ Flash 3 Utility 3-22 3.9.2 Secure Erase 3-23 3.9.3 ASUS Overclocking Profile 3-24 3.9.4 ASUS SPD Information 3-24 3.9.5 Graphics Card Information 3-24 3.10 Exit menu 3-25 3.11 Updating BIOS 3-26 3.11.1 EZ Update 3-26 3.11.2 ASUS EZ Flash 3 3-27 3.11.3 ASUS CrashFree BIOS 3 3-29 iv

TUF X299 MARK 1 Users ManualEnglish
Page 5
Chapter 4: RAID Support 4.1 RAID configurations 4-1 4.1.1 RAID definitions 4-1 4.1.2 Installing storage devices 4-2 4.1.3 Intel® Rapid Storage Technology in UEFI BIOS 4-2 4.1.4 Intel® Virtual Raid on CPU in UEFI BIOS 4-6 4.1.5 Intel® Rapid Storage Technology Option ROM utility 4-12 4.2 Creating a RAID driver disk 4-16 4.2.1 Creating a RAID driver disk in Windows 4-16 Appendix Notices ...A-1 ASUS contact information A-7 v
Chapter 4: RAID Support 4.1 RAID configurations 4-1 4.1.1 RAID definitions 4-1 4.1.2 Installing storage devices 4-2 4.1.3 Intel® Rapid Storage Technology in UEFI BIOS 4-2 4.1.4 Intel® Virtual Raid on CPU in UEFI BIOS 4-6 4.1.5 Intel® Rapid Storage Technology Option ROM utility 4-12 4.2 Creating a RAID driver disk 4-16 4.2.1 Creating a RAID driver disk in Windows 4-16 Appendix Notices ...A-1 ASUS contact information A-7 v

TUF X299 MARK 1 Users ManualEnglish
Page 7
...of the standard package. Optional documentation Your product package may have to change system settings through the BIOS Setup menus. ASUS website The ASUS website (www.asus.com) provides updated information on the motherboard. 2. How this guide This user guide contains the information... This chapter describes the features of the switches, jumpers, and connectors on ASUS hardware and software products. 2. Chapter 4: RAID Support This chapter describes the RAID configurations. vii Chapter 3: BIOS Setup This chapter tells how to perform when installing system components. 3.
...of the standard package. Optional documentation Your product package may have to change system settings through the BIOS Setup menus. ASUS website The ASUS website (www.asus.com) provides updated information on the motherboard. 2. How this guide This user guide contains the information... This chapter describes the features of the switches, jumpers, and connectors on ASUS hardware and software products. 2. Chapter 4: RAID Support This chapter describes the RAID configurations. vii Chapter 3: BIOS Setup This chapter tells how to perform when installing system components. 3.

TUF X299 MARK 1 Users ManualEnglish
Page 10
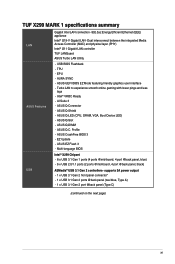
..., natural, and immersive sound with PCIEX4_2. 1 x TUF Detective USB port 1 x USB BIOS Flashback Button 1 x Optical S/PDIF out 2 x LAN (RJ45) ports 1 x USB 3.1 Gen 2 port (teal blue, Type A) 1 x USB 3.1 Gen 2 port (Type C) 4 x USB 3.1 Gen 1 ports 4 x USB 2.0/1.1 ports (black, one supports USB BIOS Flashback) 8-channel Audio I/O ports Bluetooth V4.0 LE ... circuit to reduce start-up to 32-Bit/192kHz playback* - Impedance sense for Intel® Optane™ Memory - 8 x SATA 6.0 Gb/s ports** - TUF X299 MARK 1 specifications summary Storage Back Panel I /O * Due to limitations in ) support -
..., natural, and immersive sound with PCIEX4_2. 1 x TUF Detective USB port 1 x USB BIOS Flashback Button 1 x Optical S/PDIF out 2 x LAN (RJ45) ports 1 x USB 3.1 Gen 2 port (teal blue, Type A) 1 x USB 3.1 Gen 2 port (Type C) 4 x USB 3.1 Gen 1 ports 4 x USB 2.0/1.1 ports (black, one supports USB BIOS Flashback) 8-channel Audio I/O ports Bluetooth V4.0 LE ... circuit to reduce start-up to 32-Bit/192kHz playback* - Impedance sense for Intel® Optane™ Memory - 8 x SATA 6.0 Gb/s ports** - TUF X299 MARK 1 specifications summary Storage Back Panel I /O * Due to limitations in ) support -
TUF X299 MARK 1 Users ManualEnglish
Page 11
... LAN to experience smooth online gaming with lower pings and less lags - Intel® VROC Ready - AI Suite 3 - ASUS CrashFree BIOS 3 - AURA SYNC - ASUS Q-LED (CPU, DRAM, VGA, Boot Device LED) - TUF X299 MARK 1 specifications summary LAN ASUS Features USB Gigabit Intel LAN connection- 802.3az Energy Efficient Ethernet (EEE) appliance Intel® I219-V Gigabit LAN- TPU...
... LAN to experience smooth online gaming with lower pings and less lags - Intel® VROC Ready - AI Suite 3 - ASUS CrashFree BIOS 3 - AURA SYNC - ASUS Q-LED (CPU, DRAM, VGA, Boot Device LED) - TUF X299 MARK 1 specifications summary LAN ASUS Features USB Gigabit Intel LAN connection- 802.3az Energy Efficient Ethernet (EEE) appliance Intel® I219-V Gigabit LAN- TPU...

TUF X299 MARK 1 Users ManualEnglish
Page 13
xiii TUF X299 MARK 1 specifications summary BIOS Features Manageability Support DVD contents Operating system support Form factor 128 Mb Flash ROM, UEFI AMI BIOS, PnP, DMI3.0, WfM2.0, SM BIOS 3.0, ACPI 6.0, Multi-language BIOS, ASUS EZ Flash 3, CrashFree BIOS 3, F11 EZ Tuning Wizard, F6 Qfan Control, F3 My Favorites, Last Modified log, F12 PrintScreen and ASUS DRAM SPD (Serial Presence Detect) memory...
xiii TUF X299 MARK 1 specifications summary BIOS Features Manageability Support DVD contents Operating system support Form factor 128 Mb Flash ROM, UEFI AMI BIOS, PnP, DMI3.0, WfM2.0, SM BIOS 3.0, ACPI 6.0, Multi-language BIOS, ASUS EZ Flash 3, CrashFree BIOS 3, F11 EZ Tuning Wizard, F6 Qfan Control, F3 My Favorites, Last Modified log, F12 PrintScreen and ASUS DRAM SPD (Serial Presence Detect) memory...
TUF X299 MARK 1 Users ManualEnglish
Page 25
System will appear during POST reminding you that the BIOS has been restored to its default settings. • We recommend that are not compatible with ones recommended in the Memory QVL (Qualified Vendors Lists) at www.asus.com. • If you turn off the system and ...fails, the system reboots and tests the next set of failsafe settings. If the installed DIMMs still fail to boot and load the BIOS default settings. ASUS TUF X299 MARK 1 1-9 Replace the DIMMs with the motherboard may cause system boot failure. If the system fails to enhance system performance. 1. ...
System will appear during POST reminding you that the BIOS has been restored to its default settings. • We recommend that are not compatible with ones recommended in the Memory QVL (Qualified Vendors Lists) at www.asus.com. • If you turn off the system and ...fails, the system reboots and tests the next set of failsafe settings. If the installed DIMMs still fail to boot and load the BIOS default settings. ASUS TUF X299 MARK 1 1-9 Replace the DIMMs with the motherboard may cause system boot failure. If the system fails to enhance system performance. 1. ...
TUF X299 MARK 1 Users ManualEnglish
Page 27
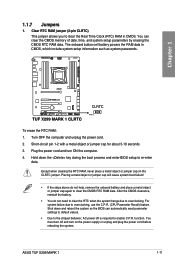
... Short-circuit pin 1-2 with a metal object or jumper cap for about 5-10 seconds. 3. ASUS TUF X299 MARK 1 1-11 You can automatically reset parameter settings to default values. • Due to the chipset...off is required to re-enter data. Shut down the key during the boot process and enter BIOS setup to enable C.P.R. Placing a metal object or jumper cap will cause system boot failure! •...plug the power cord before rebooting the system. Hold down and reboot the system so the BIOS can clear the CMOS memory of date, time, and system setup parameters by erasing the CMOS...
... Short-circuit pin 1-2 with a metal object or jumper cap for about 5-10 seconds. 3. ASUS TUF X299 MARK 1 1-11 You can automatically reset parameter settings to default values. • Due to the chipset...off is required to re-enter data. Shut down the key during the boot process and enter BIOS setup to enable C.P.R. Placing a metal object or jumper cap will cause system boot failure! •...plug the power cord before rebooting the system. Hold down and reboot the system so the BIOS can clear the CMOS memory of date, time, and system setup parameters by erasing the CMOS...

TUF X299 MARK 1 Users ManualEnglish
Page 30
... create a RAID 0, 1, 5, and 10 configuration with the Intel® Rapid Storage Technology through the onboard Intel® X299 chipset. SATA 6G_34; SATA 6G_56; These connectors are set the SATA Mode item in the BIOS to [Intel RST Premium With Intel Optane System Acceleration (RAID)]. 1-14 Chapter 1: Product Introduction If you installed Serial...
... create a RAID 0, 1, 5, and 10 configuration with the Intel® Rapid Storage Technology through the onboard Intel® X299 chipset. SATA 6G_34; SATA 6G_56; These connectors are set the SATA Mode item in the BIOS to [Intel RST Premium With Intel Optane System Acceleration (RAID)]. 1-14 Chapter 1: Product Introduction If you installed Serial...

TUF X299 MARK 1 Users ManualEnglish
Page 52
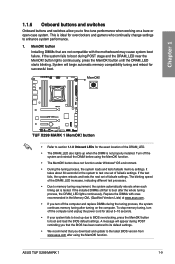
...BIOS without entering the existing BIOS or operating system. Press the BIOS Flashback button for three seconds to turn off the light. • Updating BIOS may be interrupted. 2.2 BIOS update utility USB BIOS Flashback USB BIOS Flashback allows you to use USB BIOS Flashback: 1. Shut down your local ASUS...press the USB BIOS Flashback button for three seconds until the light goes out, indicating that supports USB BIOS Flashback. 2. Chapter 2 BIOS Flashback button USB BIOS Flashback port 6. Simply insert a USB storage device to the USB port (the USB port hole marked in Chapter 3....
...BIOS without entering the existing BIOS or operating system. Press the BIOS Flashback button for three seconds to turn off the light. • Updating BIOS may be interrupted. 2.2 BIOS update utility USB BIOS Flashback USB BIOS Flashback allows you to use USB BIOS Flashback: 1. Shut down your local ASUS...press the USB BIOS Flashback button for three seconds until the light goes out, indicating that supports USB BIOS Flashback. 2. Chapter 2 BIOS Flashback button USB BIOS Flashback port 6. Simply insert a USB storage device to the USB port (the USB port hole marked in Chapter 3....
TUF X299 MARK 1 Users ManualEnglish
Page 53
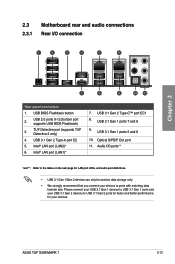
...) 3. Intel® LAN port (LAN1)* 7. Please connect your USB 3.1 Gen 1 devices to USB 3.1 Gen 1 ports and your devices. ASUS TUF X299 MARK 1 2-13 USB BIOS Flashback button 2. USB 3.1 Gen 2 Type-A port E2 5. USB 3.1 Gen 1 ports 7 and 8 9. Audio I /O connection Chapter 2 Rear panel connectors 1. 2.3 Motherboard rear and audio connections 2.3.1 Rear I /O ports** *and **: ...
...) 3. Intel® LAN port (LAN1)* 7. Please connect your USB 3.1 Gen 1 devices to USB 3.1 Gen 1 ports and your devices. ASUS TUF X299 MARK 1 2-13 USB BIOS Flashback button 2. USB 3.1 Gen 2 Type-A port E2 5. USB 3.1 Gen 1 ports 7 and 8 9. Audio I /O connection Chapter 2 Rear panel connectors 1. 2.3 Motherboard rear and audio connections 2.3.1 Rear I /O ports** *and **: ...

TUF X299 MARK 1 Users ManualEnglish
Page 54
...'s LEDs may continue to wake up then steady) from S5 mode ACT/LINK SPEED LED LED LAN port You can disable the LAN controllers in BIOS. Black - 4-channel 6-channel 8-channel Line In Front Speaker Out Mic In - Rear Speaker Out Line In Front Speaker Out Mic In Center/Sub woofer Rear...
...'s LEDs may continue to wake up then steady) from S5 mode ACT/LINK SPEED LED LED LAN port You can disable the LAN controllers in BIOS. Black - 4-channel 6-channel 8-channel Line In Front Speaker Out Mic In - Rear Speaker Out Line In Front Speaker Out Mic In Center/Sub woofer Rear...

TUF X299 MARK 1 Users ManualEnglish
Page 57
...BIOS Beep One short beep One continuous beep followed by two short beeps then a pause (repeated) One continuous beep followed by three short beeps One continuous beep followed by four short beeps Description VGA detected Quick boot set to a power outlet that all the connections, replace the system case cover. 2. ASUS TUF X299 MARK... While the tests are off. 3. Ensure that is ON, press the power button for assistance. Connect the power cord to the BIOS beep codes table) or additional messages appear on the screen. External SCSI devices (starting with the "green" standards or if it ...
...BIOS Beep One short beep One continuous beep followed by two short beeps then a pause (repeated) One continuous beep followed by three short beeps One continuous beep followed by four short beeps Description VGA detected Quick boot set to a power outlet that all the connections, replace the system case cover. 2. ASUS TUF X299 MARK... While the tests are off. 3. Ensure that is ON, press the power button for assistance. Connect the power cord to the BIOS beep codes table) or additional messages appear on the screen. External SCSI devices (starting with the "green" standards or if it ...
TUF X299 MARK 1 Users ManualEnglish
Page 59
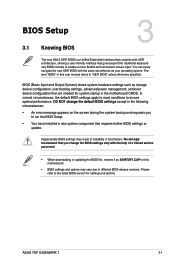
...X299TUF1.CAP for system startup in this motherboard. • BIOS settings and options may result to enable a more flexible and convenient mouse input. Chapter 3 ASUS TUF X299 MARK 1 3-1 You can easily navigate the new UEFI BIOS with the help of a trained service personnel. •... When downloading or updating the BIOS file, rename it as storage device configuration, overclocking settings, ...
...X299TUF1.CAP for system startup in this motherboard. • BIOS settings and options may result to enable a more flexible and convenient mouse input. Chapter 3 ASUS TUF X299 MARK 1 3-1 You can easily navigate the new UEFI BIOS with the help of a trained service personnel. •... When downloading or updating the BIOS file, rename it as storage device configuration, overclocking settings, ...

TUF X299 MARK 1 Users ManualEnglish
Page 60
... configure its routines. You can be used under the Exit menu or press hotkey . BIOS menu screen The BIOS Setup program can change modes from Setup Mode in using the first two options. Please visit ASUS website for reference purposes only, and may not exactly match what you see on . Select the Load...
... configure its routines. You can be used under the Exit menu or press hotkey . BIOS menu screen The BIOS Setup program can change modes from Setup Mode in using the first two options. Please visit ASUS website for reference purposes only, and may not exactly match what you see on . Select the Load...
TUF X299 MARK 1 Users ManualEnglish
Page 61
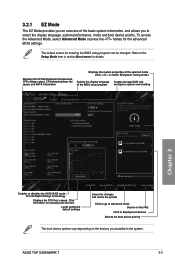
...CPU/chassis/power fan speed, and SATA information Displays the system properties of the selected mode. ASUS TUF X299 MARK 1 3-3 Refer to the Setup Mode item in section Boot menu for entering the BIOS setup program can be changed. Click < or > to switch EZ System Tuning modes Selects the... display language Creates storage RAID and of the BIOS setup program configures system overclocking Chapter 3 Enables or disables the SATA RAID mode for the advanced BIOS settings. Click the button to manually tune the fans Loads optimized default settings Saves...
...CPU/chassis/power fan speed, and SATA information Displays the system properties of the selected mode. ASUS TUF X299 MARK 1 3-3 Refer to the Setup Mode item in section Boot menu for entering the BIOS setup program can be changed. Click < or > to switch EZ System Tuning modes Selects the... display language Creates storage RAID and of the BIOS setup program configures system overclocking Chapter 3 Enables or disables the SATA RAID mode for the advanced BIOS settings. Click the button to manually tune the fans Loads optimized default settings Saves...

TUF X299 MARK 1 Users ManualEnglish
Page 62
... the detailed configurations. To switch from EZ Mode to EZ Mode Search on the FAQ Displays the CPU temperature, CPU, and memory voltage output 3-4 Chapter 3: BIOS Setup Configuration fields Pop-up Menu Menu bar Language Scroll bar MyFavorite(F3) Qfan Control(F6) EZ Tuning Wizard(F11) Hot Keys Chapter 3 Menu items... Go back to Advanced Mode, click Advanced Mode(F7) or press the hotkey. Refer to the following sections for experienced end-users to configure the BIOS settings.
... the detailed configurations. To switch from EZ Mode to EZ Mode Search on the FAQ Displays the CPU temperature, CPU, and memory voltage output 3-4 Chapter 3: BIOS Setup Configuration fields Pop-up Menu Menu bar Language Scroll bar MyFavorite(F3) Qfan Control(F6) EZ Tuning Wizard(F11) Hot Keys Chapter 3 Menu items... Go back to Advanced Mode, click Advanced Mode(F7) or press the hotkey. Refer to the following sections for experienced end-users to configure the BIOS settings.
TUF X299 MARK 1 Users ManualEnglish
Page 63
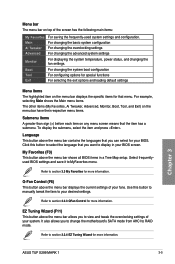
.... Q-Fan Control (F6) This button above the menu bar shows all BIOS items in your BIOS screen. Chapter 3 ASUS TUF X299 MARK 1 3-5 To display the submenu, select the item and press . Select frequentlyused BIOS settings and save it to section 3.2.4 EZ Tuning Wizard for your BIOS. EZ Tuning Wizard (F11) This button above the menu bar contains the...
.... Q-Fan Control (F6) This button above the menu bar shows all BIOS items in your BIOS screen. Chapter 3 ASUS TUF X299 MARK 1 3-5 To display the submenu, select the item and press . Select frequentlyused BIOS settings and save it to section 3.2.4 EZ Tuning Wizard for your BIOS. EZ Tuning Wizard (F11) This button above the menu bar contains the...

TUF X299 MARK 1 Users ManualEnglish
Page 64
...for the menu items. If an item is a brief description of options. Chapter 3 3-6 Chapter 3: BIOS Setup Search on FAQ Move your mobile device to connect to the BIOS FAQ web page of the ASUS support website. Configuration fields These fields show a QR code, scan this QR code on the screen. ...Scroll bar A scroll bar appears on the right side of the field opposite the item. Use key to capture the BIOS screen and save...
...for the menu items. If an item is a brief description of options. Chapter 3 3-6 Chapter 3: BIOS Setup Search on FAQ Move your mobile device to connect to the BIOS FAQ web page of the ASUS support website. Configuration fields These fields show a QR code, scan this QR code on the screen. ...Scroll bar A scroll bar appears on the right side of the field opposite the item. Use key to capture the BIOS screen and save...


